


45
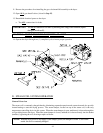
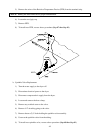
6) Remove steam coil damper cylinder (piston).
7) Remove the steam coil damper by unbolting from its hinges.
8) Disconnect steam supply lines and steam return lines at the unions.
9) Remove the remaining piping from the steam coil.
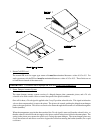
10) Remove
ALL of the panels surrounding the steam coil.
11) Unbolt the steam coil and remove.
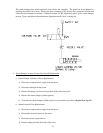
WARNING: The steam coil is heavy. A crane may be needed to remove (and install) the steam coil.
12) Remove the steam coil damper hinges from the old coil and install them on the new steam coil.
13) Hoist the new steam coil into place and bolt down.
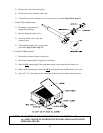
14) Replace
ALL of the panels removed in Step #10.
15) Reinstall ALL of the piping removed from the old steam coil in Step #9.
NOTE: Thread sealant certified for steam piping must be applied to the threads.
16) Reconnect ALL of the piping (supply lines and return lines) disconnected in Step #8.
17) Reinstall steam damper cylinder (piston) removed in Step #6.
18) Reestablish electrical power to the dryer.
19) Close the 1/2” (12.7 mm) plug which was opened in Step #5.
WARNING: THE 1/2” (12.7 MM) PLUG MUST BE CLOSED BEFORE ATTEMPTING TO
APPLY ANY STEAM PRESSURE.
20) Slowly open the return line then slowly open the supply line.