


© Copyright, Alliance Laundry Systems LLC – DO NOT COPY or TRANSMIT
Programming
F232157
24
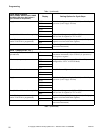
To Edit an Entire Wash Cycle
Formula
1. Enter PROGRAM Mode. Refer to Entering
Program Mode.
2. Press the (∧) keypad until display shows
“CY01”.
3. Press the (∧) or (∨) keypad until cycle to be
edited is displayed.
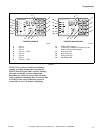
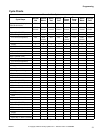
4. Press START (Enter) keypad to select the cycle
desired. Refer to Figure 3, showing which cycle
number corresponds to each keypad when in
RUN Mode.
Agitation for the cycle
5. With display showing “CY_x” (x = cycle
number), press the START (Enter) keypad.
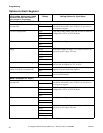
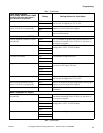
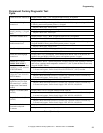
6. Display shows either “nor
n” (for normal
agitation), or “GEnt” (for gentle agitation). Refer
to Table 3.
7. Press the (∧) or (∨) keypad to alter the selection,
or the START (Enter) keypad to continue.
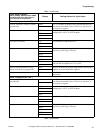
Wash 1 – Wash 4
NOTE: Programming a time other than “00” for
Wash 1 will make the WASH indicator LED light
while this step is running, but NOT in PROGRAM
Mode.
8. The main display shows “USH1” indicating you
are in the Wash segment (number will reflect
selected Wash cycle 1-4).
9. Press START (Enter) keypad. Display shows
agitation time during the step: “00” (skips
segment) or 2-30 minutes. Wash 2 agitation’s
time can be 2-20 minutes, 2-15 minutes for Wash
3 and Wash 4 or “00” to skip Wash 2, Wash 3 or
Wash 4. This is the time after the fill and before
the drain and does not include spin time or time
to first reach a programmed temperature (if
machine is configured for heat).
10. Press the (∧) or (∨) keypad to alter the selection,
or the START (Enter) keypad to continue.
11. Display shows “CFIL”, “HFIL”, “bFIL” or
“EFIL” for Cold, Hot, Both (warm) or Extra fill,
respectively.
12. Press the (∧) or (∨) keypad to alter the selection,
or the START (Enter) keypad to continue.
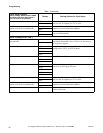
NOTE: Extra fill (“EFIL”) is possible only if
configured for “EFIL” in SETUP Mode. If model is
not configured for the extra fill valve, “nEFL” will
display. If configured, a third valve can be
controlled.
13. Display shows “LO”, “
nEd”, or “HI” for Low,
Medium, or High water level, respectively.
14. Press the (∧) or (∨) keypad to alter the
selection, or the START (Enter) keypad to
continue.
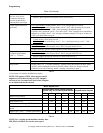
15. Display shows “SUP0”, “SUP1”, “SUP2”,
“SUP3”, or “SUP6” (or “S 12” depending on
version of control). Refer to Table 2 for operation
of each supply selection.
16. Press the (∧) or (∨) keypad to alter the selection,
or the START (Enter) keypad to continue.
NOTE: If programmed for “SUP2”, the ADD
BLEACH indicator LED light turns on and is set
up for “bEEP” the buzzer sounds for the first eight
seconds Supply 2 is on.
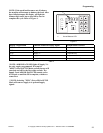
Heated Models Only
17. Display shows temperature in degrees F or C.
Display will show degrees F if configured for
“FAr” in SETUP Mode, or degrees C if
configured for “CEL” in SETUP Mode. Range is
80°F to 205°F, or 00F (no heat for segment), or
27°C to 95°C, or 00C (no heat for segment).
18. Press the (∧) keypad to increase, or (∨) keypad
to decrease temperature in one-degree
increments.
The control will energize heat and pause cycle timing
for up to 40 minutes until the programmed
temperature is first reached.
Display Meaning
nor
n 12 seconds forward, 3 seconds pause,
12 seconds reverse, 3 seconds pause, and
repeat for programmed time.
GEnt 3 seconds forward, 12 seconds pause,
3 seconds reverse, 12 seconds pause and
repeat for programmed time
Table 3
To prevent personal injury, avoid contact
with inlet water temperatures higher than
125° Fahrenheit (51° Celsius) and hot
surfaces.
W748
WARNING