


© Copyright, Alliance Laundry Systems LLC – DO NOT COPY or TRANSMIT
Programming
13
F232157
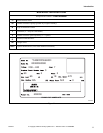
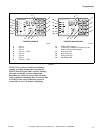
Programming Vend Price
(For Models with Firmware ID Code
“C2dS” and “CvdS”)
Setup Mode
NOTE: In SETUP Mode, certain machine
functions can be configured. The settings in this
mode are related to how the machine is equipped
from the factory. Usually, these would not be
changed in the field.
NOTE: Enter SETUP Mode through the
PROGRAM Mode. Refer to Entering Program
Mode.
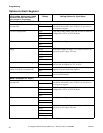
1. Press (*) keypad. Display shows machine model
size (capacity). Displayed capacity must match
machine size. Press (∧) keypad to change the
capacity. (This should already be set correctly
from the factory, and normally should never need
to be changed).
2. Press START (Enter) keypad.
3. Display shows “FAr” or “CEL”.
NOTE: This option selects whether temperatures
display in degrees Fahrenheit (F) or Celsius (C), if
control is equipped with a temperature sensor.
Press the (∧) or (∨) keypad to change degrees
“FAr” or “CEL”.
4. Press START (Enter) keypad.
5. If model displays “HEAt” or “noHt”, change the
selection by pressing the (∧) or (∨) keypad. If
model displays “CArd” or “COIn”, skip to
step# 8.
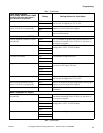
6. Press START (Enter) keypad to continue to the
next step.
7. “EFIL” or “nEFL” will display in certain models.
“EFIL” means the capability to control an extra
fill valve with programmable water level (same
as regular fills) is enabled. Machine MUST be
equipped with the extra valve for this to work
properly. “nEFL” means the extra fill valve
option is disabled or not installed on machine.
NOTE: If neither message displays, the extra fill
capability is not present. If either message displays,
changing the selection is an option by pressing the
(∧) or (∨) keypad. Press START (Enter) keypad to
continue to the next option.
8. If model displays the message “CArd” or
“COIn”, change the selection by pressing the (∧)
or (∨) keypad.
9. Press START (Enter) keypad to continue to the
next selection.
NOTE: Select “COIn used by accessory pay
system. Contact the manufacturer of the accessory
pay system if not working properly
10. “bEEP” or “nobP” will display in certain models.
If “bEEP” is set, control will beep during Add
Bleach (Supply 2) and at end of cycle after
several seconds while displaying “dOnE”. If
“nobP” displays, control will NOT beep during
Add Bleach (Supply 2) or at end of cycle. This
does not affect the short beep when a keypad is
pressed or a coin is inserted and it does not affect
the beep during an alarm. Press the (∧) or (∨)
keypad to change “bEEP”/“nobP” selection.
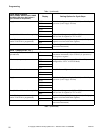
11. Press START (Enter) keypad to continue to next
step.
12. “PtI
n” means the control will display remaining
time in a cycle without fill and drain times.
“EtI
n” means the control will display estimated
remaining time in a cycle including fill and drain
time.
13. Press the (∧) or (∨) keypad to change “PtI
n”/
“EtI
n” selection.
14. Press START (Enter) keypad to continue to the
next step.
NOTE: If machine is equipped with a card reader,
or interfaces with a control/remote pay system,
setting “con1”/ “dEno” and “con2”/ “dEno” equal
to the vend start amount (“Strt”/ “A
nt”) will allow
starting with one pulse and is recommended. The
card or central remote pay vend amount should
match the “Strt”/ “A
nt” setting.
15. Display shows “con1”, “dEno” next, then a
number such as 25. This means that the coin 1
denomination is 25 cents for single coin meters.
For example, a U.S. quarter coin meter would be
set for 25 cents, or this would be the amount for
one of the two denominations for a dual coin
meter, such as a U.S. quarter for a dollar/quarter
dual coin meter. The vend price programmed
above will count down by this amount each time
a coin is added.
16. Press the (∧) or (∨) keypad to decrease or
increase this amount.
17. When correct, press START (Enter) keypad.