


The stand is now installed; check whether your washing
machines back feet rest on it (fig. 16). Otherwise undo
them using the key supplied with your washing machine
(fig. 17).
fig. 18 fig. 19
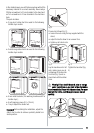
The stands drawer, with a capacity of up to 20 kg, con-
tains two dividers; they may be taken out if you wish
(fig. 18). The drawer was designed with a special com-
partment inside where you can place a folding plastic
box, supplied, quite useful to store your washing laun-
dry (fig. 19).
fig. 20 fig. 21
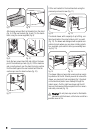
The drawer slides on two metal runners and can easily
be pulled out to the full. Should you wish to remove the
drawer, you must pull it out completely (fig. 20) and act
on the two black plastic levers halfway through the
metal runners. Pull the right lever down and the left
lever up: the drawer will be uncoupled from the runners
and easily removed (fig. 21).
Warning! Do not place any solvent or flammable
substance into the drawer, as the fumes could be a
possible cause of fire.
How to install the stand on your tumble dryer
Warning! Do not install the stand on a washer/dryer
column.
Caution! If the tumble dryer is already connected
to the mains, proceed as follows:
1. Pull out the plug from the mains;
2. remove the condensation tank found in the upper or
alternatively lower part of the tumble dryer (according
to machine type) and empty it, if necessary;
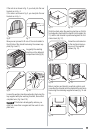
3. Drain off any condensation water through the hose
found on the lower part of the machines back (fig. 1).
Place a mop on the floor and remove first the clamp
(A) using a pair of pliers, then the cap (B). Tilt the
machine slightly on one side. When all the water has
drained off, put the cap back onto the hose and re-
fasten the clamp.
A
B
fig. 1
Important! With a brand new tumble dryer, do as follows:
1. install the stand before connecting the machine to the
mains;
2. follow the instructions to remove any transport safety
equipment.
Before you start fitting the stand to the machine make sure
you have plenty of room. Avoid working in restricted
spaces as the installation and subsequent adjustment
operations may turn out quite awkward and difficult to
carry out.
Take the stand out of its package and use the cardboard
to rest machine and stand on, so you wont scratch the
equipment varnish and the floor.
4