


15, 30, & 60 cfm Compact Dryers 35
5. Disconnect heater thermostat safety.
6. Pickup and place the top casting in a safe place.
7. Pickup the desiccant can to reveal the heater.
8. Using a 1/8” Allen wrench, remove the four (4) 10-32 screws on the heater plate.
9. Remove the wires to the heater plate assembly being removed or replaced.
10. Remove the two (2) 4-40 screws for the temperature switch.
11. Inspect temperature switch with voltmeter. (Normally closed, ohms). Replace if
faulty.
12. Re-install the heater and heater plate assemblies in reverse order. Install new heater
gaskets and securely tighten all fasteners.
Caution! Heater loops should not touch each other.
“Hot spots” lead to premature heater failure!
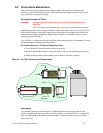
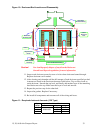
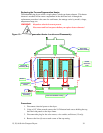
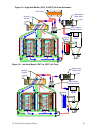
Replacing/Cleaning the Cooling Coil
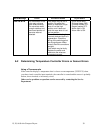
Figure 13: Cooling Coil Location and Disassembly
To clean the cooling coil, use compressed air or a steam cleaner to blow the dust off or clean
any oily residue on the coil.
Water flow requirement:
If used as an after-Cooler: 3 to 4 GPM @ 85°F.
If used as a Plasticizer trap: 3 to 4 GPM @ 40°F to 45°F.
Replacement Procedures
1. Shut down the dryer, tag out and lock out the controls if necessary.
2. Shut the water off to the cooling coil.
3. Remove the four 10-32 bolts.
4. Gently slide the cooling coil out.
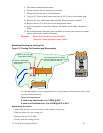
PROCESS
TEMPERATURE
DEW POINT
CONTROL
POWER
ON
OFF
ALARM
POWER ON
ON
O
F
F
Undo (4) 10-32 Button
Head Screws using 1/8
Allen Wrench
Use compressed air or a steam
cleaner to blow the dust off or clean
any oily residue on the coil.
1" Wide x 1/8" Thick High
Temperature Gasket