


15, 30, & 60 cfm Compact Dryers 33
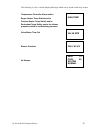
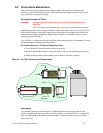
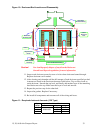
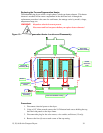
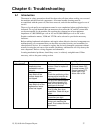
Figure 10: Desiccant Bed Location and Disassembly
Caution! You should properly dispose of any discarded desiccant.
Consult local disposal regulations for more information.
11. Inspect each desiccant screen for tears or holes where desiccant burned-through.
Replace desiccant can if needed.
12. After cleaning each chamber add the full amount of bead desiccant specified per bed.
Amounts are listed in the Desiccant Amounts Table below. Tap on side of tank to
settle desiccant. Smooth the top level, and finally add another layer of the remaining
bead desiccant to the top. Make sure this layer is level and smooth.
13. Repeat the previous step for the other bed.
14. Inspect the gaskets. Replace if necessary.
15. Re-install all components and reconnect all of the wiring and hoses.
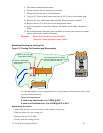
Figure 11: Required Desiccant Amounts (13X Type)
Dryer 8 x 12 bead Total
Model Part no. lbs. Kg
15 6.5 2.9
30 9.7 4.4
60
W00018051
13.5 6.1
Valve & Air
Manifold Casting
Desiccant
Assembly Rod
Regeneration
Heater
Wire Conduit
Assembly
Lower Air Manifold Casting
Gasket
Hollow
Desiccant
Tank