


© Copyright 2004, Alliance Laundry Systems LLC
All rights reserved. No part of the contents of this book may be reproduced or transmitted in any form or by any
means without the expressed written consent of the publisher.
801561
1
© Copyright, Alliance Laundry Systems LLC – DO NOT COPY or TRANSMIT
Table of
Contents
Replacement Parts.............................................................................. 3
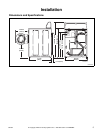
Installation........................................................................................... 5
Dimensions and Specifications............................................................. 5
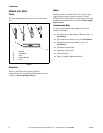
Before You Start................................................................................... 6
Tools ................................................................................................ 6
Electrical .......................................................................................... 6
Water................................................................................................ 6
Accessories Bag............................................................................... 6
Installing the Washer ............................................................................ 7
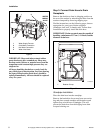
Step 1: Position Washer Near Installation Area .............................. 7
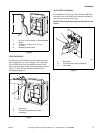
Step 2: Connect Water Inlet Hoses .................................................. 7
Step 3: Connect Drain Hose to Drain Receptacle............................ 8
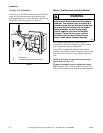
Step 4: Position and Level the Washer ............................................ 10
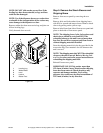
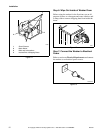
Step 5: Remove the Shock Sleeves and Shipping Brace ................. 11
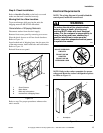
Step 6: Wipe Out Inside of Washer Drum....................................... 12
Step 7: Connect the Washer to Electrical Power ............................. 12
Step 8: Check Installation ................................................................ 13
Moving Unit to a New Location ...................................................... 13
Electrical Requirements........................................................................ 13
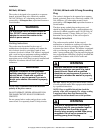
240 Volt, 50 Hertz............................................................................ 14
120 Volt, 60 Hertz with 3-Prong Grounding Plug........................... 14
Water Supply Requirements................................................................. 15
Water Temperature .......................................................................... 16
Water Pressure ................................................................................. 16
Risers................................................................................................ 16
Information for Handy Reference......................................................... 17
Installer Checklist................................................................ Back Cover