


11 12
T: 0800 0124 382 T: 0800 0124 382
INSTALLATION
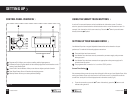
INSTALLATION REQUIREMENTS
To avoid risk of injury, please take care when moving your Washer Dryer. It is heavy and we
recommend that a minimum of two people move your Washer Dryer.
To unpack your Washer Dryer and manoeuvre it to the installation area, one person should hold
it by the front feet and the other person at the edge of the lid at the rear.
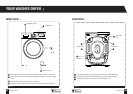
Your Washer Dryer measures 84.5 x 59.7 x 58.2cm and will require an installation area with the
space to allow the door to fully open and provide easy access to the plumbing and electrical
connections.
The most suitable installation surface for your Washer Dryer is a concrete floor as it is less
prone to vibration during the spin cycle. Soft floor surfaces such as carpets and rugs are not
suitable.
If you have to install your Washer Dryer on a wooden floor, we recommend that a water-
resistant wooden base at least 30mm thick is installed. The base should span several joists and
be bolted down. Check for the presence of pipes and cables before installing.
If possible, install your Washer Dryer in the corner of the room as it is often the most stable part
of the floor.
Do not install your Washer Dryer in rooms where temperatures below freezing may occur as
frozen hoses may burst or split.
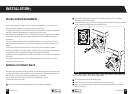
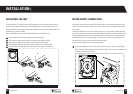
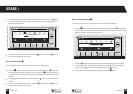
REMOVAL OF TRANSIT BOLTS
The transit bolts are used to protect your Washer Dryer from damage during transportation and
must be removed before using your Washer Dryer for the first time. Keep the transit bolts safe
and re-fit them if you need to transport your Washer Dryer in the future.
The four transit bolts are located on the back of your Washer Dryer (fig 5a).
To remove the transit bolts (4 off):
1
Remove each bolt by turning anti-clockwise with a suitable spanner (fig 5b).
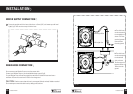
2
Pull out the remaining plastic section of each transit bolt by hand. This will require a
reasonable amount of force (fig 5c).
3
Insert the blanking caps (4 off): Push the cap into the hole until the four connectors click into
place. Check that the cap is flush with the Washer Dryer.
To re-fit the transit bolts (4 off) for future transportation:
1
Pull and remove the four plastic blanking caps.
2
Insert the plastic sections of the transit bolts into the exposed holes.
3
Insert the bolts into the plastic sections of the transit bolts and tighten with a suitable
spanner until secure.
Figure 5
a: b:
c: