


ASSEMBLY
Read these instructions and Operator's Manual in its en-
tirety before you attempt to assemble or operate your new
high pressure washer. Your high pressure washer has, for
the most part, been assembled at the factory, except those
parts left unassembled_ Before you can operate your new
high pressure washer', you must properly connect the high
pressure hose.
IF YOU HAVE ANY PROBLEMS WITH THE ASSEMBLY
OF YOUR PRESSURE WASHER, PLEASE CALL THE
PRESSURE WASHER HELPLINE AT 1-800-222-3136.
TO REMOVE PRESSURE WASHER FROM
CARTON
,, Remove gun and wand assembly from cardboard
holder.
o Remove all other packing material from box before
removing your high pressure washer.
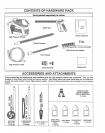
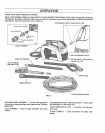
Refer to Page 5, "Contents of Hardware Pack" for an
illustrated listing of all the items included with your pressure
washer. Become familiar with each piece before assem-
bling pressure washer. Check all contents against illustra-
tions on Page 5 If any parts are missing or damaged, call
the Pressure Washer Helpline. at 1-800-222-3136
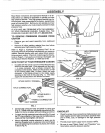
HOWTO SET UP YOUR PRESSURE WASHER
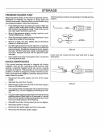
Included with this unit isa quick-connect fitting that you
attach to the water inlet. It can separate into two parts
-- a male connector and a female connector that
contains an inlet screen. Make sure this screen, as well
as the intake supply filter, is clean. Attach the male
connector of the quick-connect to the intake supply
opening on the front of the pump (Fig 1). The water
supply will be attached to the female connector.
INTAKE SUPF
INTAKE SUPPLY
FILTER
FEMALE CONNECTOR
INLET SCREEN
FIG. 2
HIGH PRESSURE
OUTLET
FIG. 3
FIG. 1
= Unravel high pressure hose and attach to spray gun
(Fig. 2). Tighten with two adjustable wrenches as illus-
trated, Do nottryto tighten withoutholding second nut.
o To attach the high pressure hose to the unit (Fig 3) push
the "O"-ring connector of the hose.into the high pressure
outlet and then hand tighten until secure.
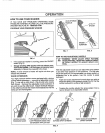
,, Attach adjustable nozzle extension to spray gun by
inserting threaded end of extension into end of spray
gun and tightening the extension by hand until it locks
in place (Fig. 4).
FIG. 4
CHECKLIST
,, Check for proper hose connections (high pressure and
water supply) and for tight connections and that there
are no kinks, cuts, or damage to the high pressure
hose_
,, Provide proper water supply (not to exceed 104°F)_
,, Be sure to read "Safety Rules" and "Operation" sec-
tions before using the pressure washer,
6