


7
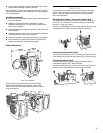
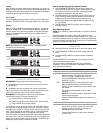
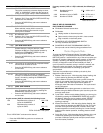
Power Cord Installation
1. Select the plug that fits with the electric receptacle.
2. Assemble the plug into the end of the power cord.
3. Secure the power cord by seating the connection on the cord
lock.
4. Place the cord lock cover and push until it snaps.
5. Ma
ke sure the power cord connection is seated on the cord
lock and that the cord lock clamps correctly.
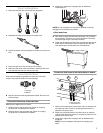
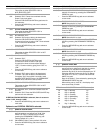
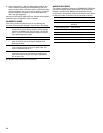
Connect the Inlet Hoses
Insert new flat washers (supplied) into each end of the inlet
hoses. Firmly seat the washers in the couplings.
A B
A.Coupling
B.Washer
■ Use the new inlet hoses supplied with washer. Do not re-use
old inlet hoses.
Connect the inlet hoses to the water taps
Make sure the washer drum is empty.
1. Attach a hose
to the hot water tap. Screw on coupling
by hand until it is seated on the washer.
2. Atta
ch a hose to the cold water tap. Screw on coupling
by hand until it is seated on the washer.
3. Using pliers, tighten the couplings with an additional
two-thirds turn.
NOTE: Do not overtighten or use tape or sealants on the tap.
Damage to the inlet hoses can result.
Clear water lines
■ Run water through both taps and inlet hoses, into a laundry
tub, drainpipe, or bucket, to get rid of particles in the water
lines that might clog the inlet valve screens.
■ Check the temperature of the water to make sure that the hot
water hose is connected to the hot water tap and that the
cold water hose is connected to the cold water tap.
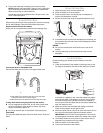
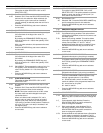
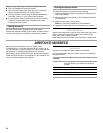
Connect the inlet hoses to the check valves on washer
H
C
H.Hot water inlet
C.Cold water inlet
1. Attach the hot water hose to the check valve on washer’s hot
(H) water inlet valve. Screw on coupling by hand until it is
seated on the check valve.
2. Atta
ch the cold water hose to the check valve on washer’s
cold (C) water inlet valve. Screw on coupling by hand until it is
seated on the check valve.
3. Usin
g pliers, tighten the couplings with an additional two-
thirds turn.
NOTE:
Do not overtighten. Damage to the coupling can
result.