


AC-Series Operator’s Manual-E/F 39
Service
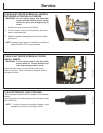
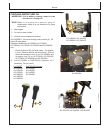
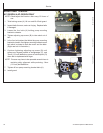
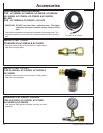
ADJUSTING IDLE SPEED
1. Start engine. Allow it to warm to normal operating
temperature.
2. With engine idling, turn throttle stop screw (A) to obtain
standard idle speed.
NOTE: Standard idle speed is 1250 - 1550 RPM.
NOTE: Idle should be serviced every 300 hours by an
authorized dealer. Operator should adjust only if
mechanically procient and using proper tools.
PIC98-102299R0
DWG15-102299R0
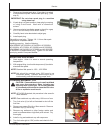
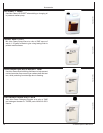
CLEANING AND GAPPING SPARK PLUG
1. Remove and inspect spark plug. If porcelain is cracked
or electrodes are pitted, install a new spark plug. (See
step 5.)
IMPORTANT: Do not clean spark plug in a machine
using abrasives.
2. If spark plug is in good condition, clean plug by scraping
or using a wire brush. Wash with a commercial
solvent.
3. Use a round wire-type feeler gauge to check for a gap
of 0.70 to 0.80 mm (0.028 to 0.031 inches.)
4. Carefully bend outer electrode to adjust gap.
5. Install spark plug.
Reinstalling used plug: Tighten 1/8 - 1/4 turn after spark
plug seats to compress washer.
Installing new plug: Use the following;
NGK BPR6ES (AC-2000GH, AC-2400GH, AC-2500GH,
AC-2600GH, AC-2700GH, AC-3300GH and AC-3500GH)
NGK BR6HS (AC-2400GS, AC-2700GS and AC-3000GS)
or W20EPR-U (Nippondenso) plug. Tighten 1/2 turn after
spark plug seats to compress washer.
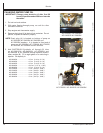
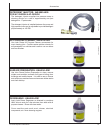
CLEANING SEDIMENT CUP
CAUTION: Clean sediment cup in a well ventilated
area, away from sparks or ame, including any
appliance with a pilot light. Do not use gasoline
or a low ash-point solvent to clean the fuel valve.
A re or explosion could result.
NOTE: AC-2400G illustrated, but procedure is the same for
other washers.
NOTE: Clean sediment cup after every 100 hours of use.
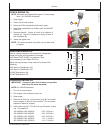
1. Turn fuel valve (A) to left as illustrated to shut off the
fuel ow.
2. Remove cap screw (B) with a 10mm wrench. Remove
sediment cup (C) and o-ring.
3. Remove any sediment or other foreign matter and
wash in nonammable or high ash point solvent. Dry
thoroughly.
4. Install o-ring and sediment cup with cap screw.
5. Turn fuel valve right to “ON” position and check for fuel
leaks.
PIC99-102299R0
PIC100-102299R0
A
A
B
C