Washing for coverlet bigger laundries
Washing the woollen silk textiles
STANDARD Common washing
Application
Washing for normal laundries
Washing the cotton textiles
The running process
(the digitron displays the running process)
The display of digitron
Program select
Program
01
02
SAVE
SINGLE WASH
SINGLE SPIN
TUB CLEAN
GENTLE
COTTON
AIRDRY
03
06
04
05
09
07
08
10
SPIN( )
RINSE( )
WASH( )
SPIN( )
RINSE( )
WASH( )
SPIN( )
RINSE( )
WASH( )
SOAK( )
SPIN( )
WASH( )
WASH( )
SPIN( )
RINSE( )
SPIN( )
RINSE( )
WASH( )
SPIN( )
SPIN( )
SPIN( )
Reusing the washing detergent
Washing the cloth washed by hand
(first draining, then spinning)
Only spinning the cloth wet or washed by
hand (first draining, then spinning)
The spinning time is the same to the single spin,
but spinning in lower
Avoid growing mildew on the outer tub and the
inner tub
RINSE( )
5
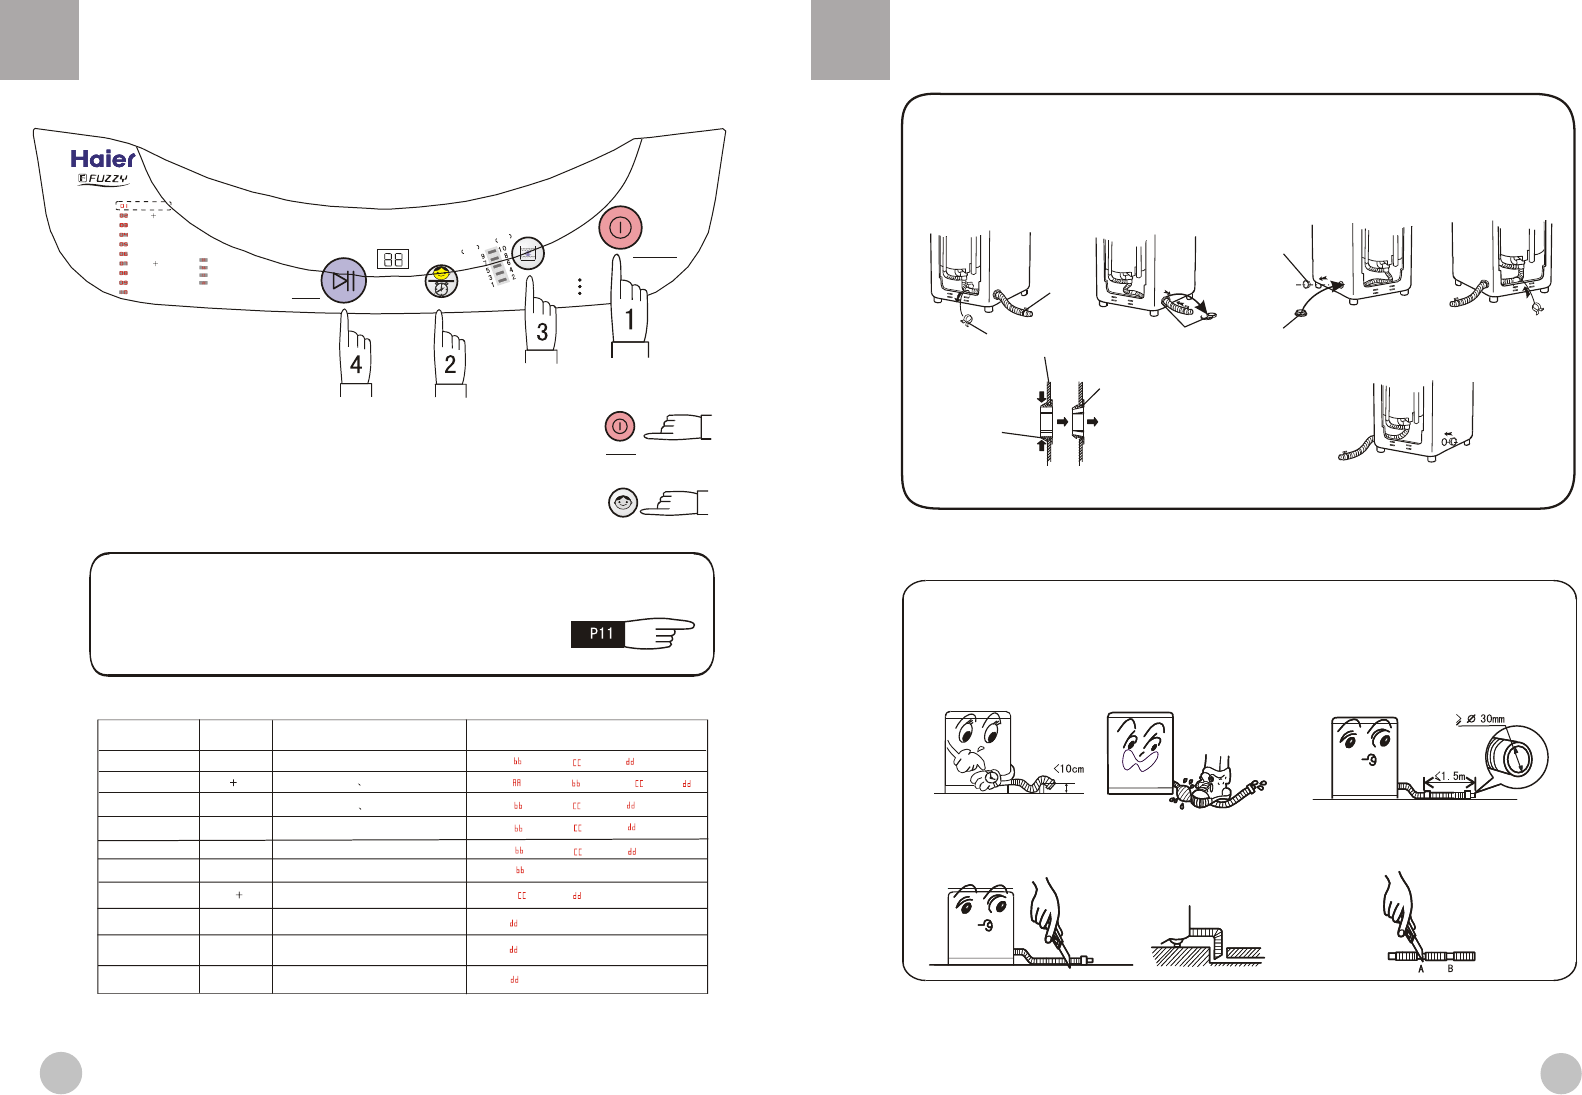
The drainage shall be smooth with the drain hose.
1.The height of the drain hose shall be less than 10cm,
or the drainage will not be smooth, and cost such long
time that the machine may stop at mid way.
2.Do not step on or press the drain hose.
4.If extra drain hose is needed, please make separate
purchase. The inner diameter of the extra hose shall
not less than 30mm, and the length shall not exceed
1.5m.
3. If the drain hose is too long, cut it at mid point. To make
smooth drainage, cut the front end of the hose slantingly.
Usage the drain hose
5.If the extra hose is too long, cut it either at A or at B.
How to change the direction of the drain hose
Remarks: in order to make sure of the correct of installation, it is suggested to change the direction of the drain hose
with our company serviceman .
Drain hose support
Drain hose
Drain bushing
Drain bushing
Drain outlet
protecting cover
Drain bushing
Drain hose fixing
clamp
Cabinet
Inner
Outer
Push
Push
Take down
Figure 1
Figure 2
Figure 3
Figure 4
Figure 5
Figure 6
2.Put down the drain hose .Take off the drain hose
frame as indicated in Figure 1.Take the drain hose into
the cabinet ,then nip the drain fixing clamp to make it
deviated from the clip,the other hand is used to put down
the drain bushing,as indicated in Figure 2,3.
1.Dismantle the rear cover of the washing machine.
3.Dismantle the drain outlet protecting cover at the other side,
(the way is the same as the drain bushing),then install the drain
bushing, as indicated in Figure 4.
4.Extend the drain hose from the other side. Fix the drain hose
with drain hose frame onto the cabinet, as indicated in Figure 5.
5.Install the drain outlet protecting cover to the other side,
as indicated in Figure 6
12
b
1.Push "POWER"button to switch on the power
2.Push "PROGRAM/RESERVE" button to select
suitable automatic program
After the power is switched on, "standard" is automatically set. To select other full-auto program, please push
the "PROGRAM/RESERVE" button till the corresponding indicator is on. Refer to the "PROGRAM/RESERVE
button" on Page 11.E.g
For instance:select "SAVE" program for small quantity of laundries with light soil.
Steps of using the operation buttons and
description of the steps
POWER
ON/OFF
PROGRAM/RESERVE
SOAK HEAVY
RINSE SPIN
PROGRAM/RESERVE
WATER
LEVEL
START
PAUSE
POWER
ON/OFF
LIG
HT
FLA
S
H
S
OA
K
H
E
A
V
Y
S
A
V
E
S
I
N
GLE
WA
S
H
S
ING
LE
S
P
IN
T
UB C
LE
A
N
G
E
NTLE
C
OTT
ON
R
INS
E
S
P
I
N
A
I
R
D
RY
S
OA
K
WA
S
H
S
P
IN
R
I
N
S
E
PROGRAM
INDIC
ATIO
N
O
FPROC
ESS
(NOCH
O
O
SING
)
S
T
A
NDA
R
D
TIME REMAINED(M INUTES)
RESERVE(HOURS LATER)
Digital display
Digital display
Fuzzy logic control
Fuzzy logic control
10 water level selection
10 water level selection
Digital display
Digital display
Fuzzy logic control
Fuzzy logic control
10 water level selection
10 water level selection
Digital display
Digital display
Fuzzy logic control
Fuzzy logic control
10 water level selection
10 water level selection
Digital display
Digital display
Fuzzy logic control
Fuzzy logic control
10 water level selection
10 water level selection


