


Grandstream Networks, Inc. HT503 User Manual Page 5 of 38
Firmware 1.0.4.2 Last Updated: 06/2011
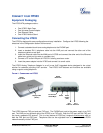
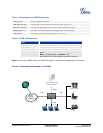
CONNECT YOUR HT503
Equipment Packaging
The HT503 ATA package contains:
• One HT503 Main Case
• One Universal Power Adaptor
• One Ethernet Cable
• One HT503 Vertical Stand
Connecting the HT503
The HT503 is designed for easy configuration and easy installation. Configure the HT503 following the
directions in the Configuration section of this manual.
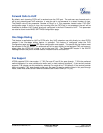
1. Connect a standard touch-tone analog telephone to the PHONE port.
2. Insert a standard RJ11 telephone cable into the LINE port and connect the other end of the
telephone cable to a wall jack.
3. Insert the Ethernet cable into the WAN port of HT503 and connect the other end of the Ethernet
cable to an uplink port (a router or a modem, etc.)
4. Connect a PC to the LAN port of HT503 if it is being used as a router.
5. Insert the power adapter into the HT503 and connect it to a wall outlet.
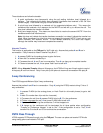
The HT503 Analog Telephone Adaptor is an all-in-one VoIP integrated device designed to be a total
solution for networks providing VoIP services. The HT503 VoIP features and functions are available
using a regular analog telephone.
F
IGURE 1: CONNECTING THE HT503
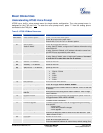
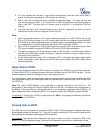
The HT503 has one FXS port and one FXO port. The PHONE port next to the power supply is an FXS
port. The LINE port on the back right of the HT503 is an FXO port. Both the FXS port and the FXO port
can have a separate SIP account. This is a key feature of HT503 as it supports simultaneous calls on
both the FXS port and FXO port. Telephone calls can be originated from or terminated on the PSTN
network remotely via the FXO port.
HT503
Front View
HT503
Back View
Display LEDs
(Green)
RJ-45 Ports
10/100 Mbps
Reset
Power
Supply
(12V)
RJ11
FXS Port
RJ11
FXO Port