


Grandstream Networks, Inc. HT503 User Manual Page 18 of 38
Firmware 1.0.4.2 Last Updated: 06/2011
Configuring HT503 with Web Browser
HT503 ATA has an embedded Web server that will respond to HTTP GET/POST requests. It also has
embedded HTML pages that allow users to configure the HT503 through a Web browser such as
Microsoft’s IE, AOL’s Netscape or Mozilla Firefox installed on Windows or Unix OS. (Macintosh OS is not
included).
Access the Web Configuration Menu
The HT503 HTML configuration page can be accessed via LAN or WAN ports.
• FROM THE LAN PORT:
1. Directly connect a computer to the LAN port
2. Open a command window on the computer
3. Type in “ipconfig /release”, the IP address etc becomes 0
4. Type in “ipconfig /renew”, the computer gets an IP address in 192.168.2.x segment by
default
5. Open a web browser, type in the default IP address of the LAN port. http://192.168.2.1. You
will see the log in page of the device.
• FROM THE WAN PORT:
1. Follow table 4 to find the WAN side IP address.
2. Open a web browser, type in the WAN side IP address – for example:
http://HT503-WAN-IP-Address
Note:
• WAN side HTTP access is disabled by default for security reason. You can enable HTTP access
on the configuration page by setting “WAN side HTTP access” to be YES.
• Initial access to the configuration pages is always from the LAN port. The instructions are listed
above.
• The IVR announces 12 digits IP address, you need to strip out the leading “0” in the IP address.
For ex. IP address: 192.168.001.014, you need to type in http://192.168.1.14 in the web browser.
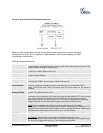
Once the HTTP request is entered and sent from a web browser, the user will see a log-in screen. There
are two default passwords for the login page:
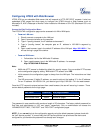
User Level: Password: Web pages allowed:
End User Level 123 Only Status and Basic Settings
Administrator Level admin Browse all pages
The password is case sensitive with maximum length of 25 characters. The factory default password for
End User and administrator is “123” and “admin” respectively. Only an administrator can access the
“ADVANCED SETTING”, “FXS PORT” and “FXO PORT” configuration pages.
NOTE: If you can not log into the configuration page by using the default password, please check with
the VoIP service provider. It is most likely the VoIP service provider has provisioned the device and
configured for you therefore the password has already been changed.