


64 / 76 EN
Washing Machine / User’s Manual
points.Ifanyleaksoccur,turnoffthetapandremovethe
nut.Retightenthenutcarefullyaftercheckingtheseal.To
preventwaterleakagesanddamagescausedbythem,
keepthetapsclosedwhenthemachineisnotinuse.
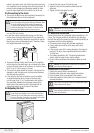
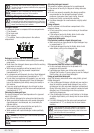
2.5 Connecting to the drain
• Theendofthedrainhosemustbedirectlyconnectedto
thewastewaterdrainortothewashbasin.
A
WARNİNG: Yourhousewillbefloodedifthehosecomes
outofitshousingduringwaterdischarge.Moreover,there
isriskofscaldingduetohighwashingtemperatures!
Topreventsuchsituationsandtoensuresmoothwater
intakeanddischargeofthemachine,fixtheendofthe
discharge hose tightly so that it cannot come out.
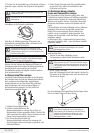
• Thehoseshouldbeattachedtoaheightofatleast40
cm, and 100 cm at most.
• Incasethehoseiselevatedafterlayingitonthefloor
level or close to the ground (less than 40 cm above the
ground),waterdischargebecomesmoredifficultandthe
laundrymaycomeoutexcessivelywet.Therefore,follow
the heights described in the figure.
• Topreventflowingofdirtywaterbackintothemachine
andtoallowforeasydischarge,donotimmersethehose
endintothedirtywaterordonotdriveitinthedrainmore
than15cm.Ifitistoolong,cutitshort.
• Theendofthehoseshouldnotbebent,itshouldnotbe
steppedonandthehosemustnotbepinchedbetween
the drain and the machine.
• Ifthelengthofthehoseistooshort,useitbyadding
anoriginalextensionhose.Lengthofthehosemay
notbelongerthan3.2m.Toavoidwaterleakfailures,
theconnectionbetweentheextensionhoseandthe
drainhoseoftheproductmustbefittedwellwithan
appropriate clamp as not to come off and leak.
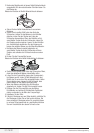
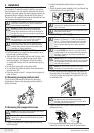
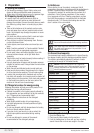
2.6 Adjusting the feet
A
WARNİNG: Inordertoensurethattheproductoperates
more silently and vibration-free, it must stand level and
balancedonitsfeet.Balancethemachinebyadjusting
thefeet.Otherwise,theproductmaymovefromitsplace
and cause crushing and vibration problems.
1. Loosen the lock nuts on the feet by hand.
2. Adjust the feet until the product stands level and
balanced.
3.Tightenalllocknutsagainbyhand.
A
WARNİNG: Do not use any tools to loosen the lock nuts.
Otherwise,theywillgetdamaged.
2.7 Electrical connection
Connect the product to a grounded outlet protected by a 16
A fuse. Our company shall not be liable for any damages
thatwillarisewhentheproductisusedwithoutgroundingin
accordancewiththelocalregulations.
• Connectionmustcomplywithnationalregulations.
• Powercableplugmustbewithineasyreachafter
installation.
• Ifthecurrentvalueofthefuseorbreakerinthehouseis
less than 16 Amps, have a qualified electrician install a
16 Amp fuse.
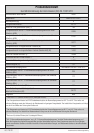
• Thevoltagespecifiedinthe"Technicalspecifications"
section must be equal to your mains voltage.
• Donotmakeconnectionsviaextensioncablesormulti-
plugs.
B
WARNİNG: Damagedpowercablesmustbereplacedby
theAuthorizedServiceAgents.
Transportation of the product
1. Unplug the product before transporting it.
2.Removewaterdrainandwatersupplyconnections.
3.Drainallwaterthathasremainedintheproduct.
4.Installtransportationsafetyboltsinthereverseorderof
removalprocedure;
C
Nevermovetheproductwithoutthetransportationsafety
boltsproperlyfixedinplace!
A
WARNİNG: Packagingmaterialsaredangeroustochildren.
Keeppackagingmaterialsinasafeplaceawayfrom
reach of the children.