


63 / 76 EN
Washing Machine / User’s Manual
2 Installation
RefertothenearestAuthorisedServiceAgentforinstallation
oftheproduct.Tomaketheproductreadyforuse,review
the information in the user manual and make sure that the
electricity,tapwatersupplyandwaterdrainagesystemsare
appropriatebeforecallingtheAuthorizedServiceAgent.If
they are not, call a qualified technician and plumber to have
any necessary arrangements carried out.
C
Preparationofthelocationandelectrical,tapwaterand
wastewaterinstallationsattheplaceofinstallationis
under customer's responsibility.
B
WARNİNG: Installationandelectricalconnectionsof
the product must be carried out by the Authorized
ServiceAgent.Manufacturershallnotbeheldliablefor
damages that may arise from procedures carried out by
unauthorized persons.
A
WARNİNG: Priortoinstallation,visuallycheckiftheproduct
hasanydefectsonit.Ifso,donothaveitinstalled.
Damaged products cause risks for your safety.
C
Makesurethatthewaterinletanddischargehoses
aswellasthepowercablearenotfolded,pinchedor
crushedwhilepushingtheproductintoitsplaceafter
installation or cleaning procedures.
2.1 Appropriate installation location
• Placethemachineonarigidfloor.Donotplaceitona
long pile rug or similar surfaces.
• Totalweightofthewashingmachineandthedryer-with
fullload-whentheyareplacedontopofeachother
reachestoapprox.180kilograms.Placetheproduct
on a solid and flat floor that has sufficient load carrying
capacity!
• Donotplacetheproductonthepowercable.
• Donotinstalltheproductatplaceswheretemperature
mayfallbelow0ºC.
• Placetheproductatleast1cmawayfromtheedgesof
other furniture.
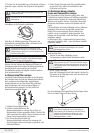
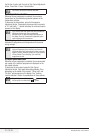
2.2 Removing packaging reinforcement
Tiltthemachinebackwardstoremovethepackaging
reinforcement. Remove the packaging reinforcement by
pulling the ribbon.
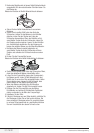
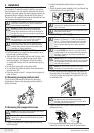
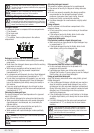
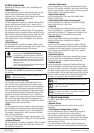
2.3 Removing the transportation locks
A
WARNİNG: Do not remove the transportation locks before
taking out the packaging reinforcement.
A
WARNİNG: Remove the transportation safety bolts before
operatingthewashingmachine!Otherwise,theproduct
willbedamaged.
1.Loosenalltheboltswithasuitablespanneruntilthey
rotate freely (C).
2. Remove transportation safety bolts by turning them
gently.
3. Attach the plastic covers supplied in the User Manual bag
into the holes on the rear panel. (P)
C
Keep the transportation safety bolts in a safe place to
reusewhenthewashingmachineneedstobemoved
again in the future.
C
Nevermovetheproductwithoutthetransportationsafety
boltsproperlyfixedinplace!
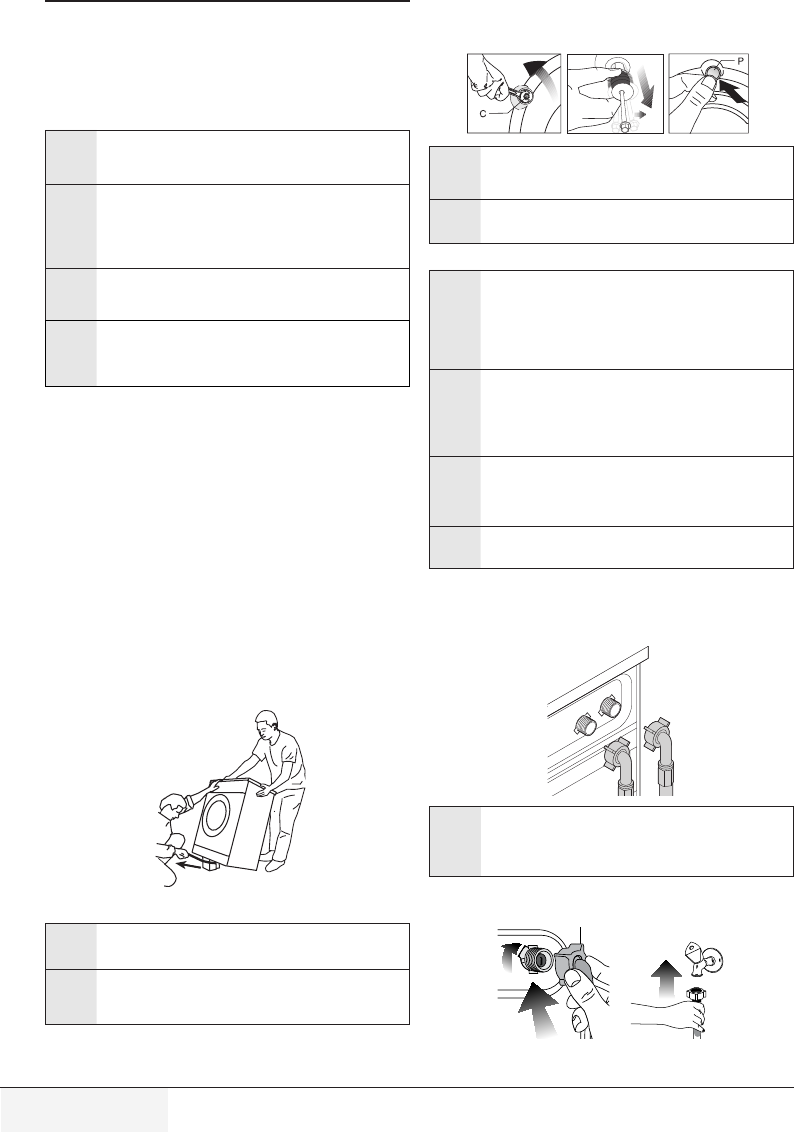
2.4 Connecting water supply
C
Thewatersupplypressurerequiredtoruntheproductis
between1to10bars(0.1–1MPa).Itisnecessaryto
have10–80litersofwaterflowingfromthefullyopen
tap in one minute to have your machine run smoothly.
Attachapressurereducingvalveifwaterpressureis
higher.
C
Ifyouaregoingtousethedoublewater-inletproduct
as a single (cold)water-inletunit,youmustinstallthe
suppliedstoppertothehotwatervalvebeforeoperating
theproduct.(Appliesfortheproductssuppliedwitha
blind stopper group.)
A
WARNİNG: Modelswithasinglewaterinletshouldnotbe
connectedtothehotwatertap.Insuchacasethelaundry
willgetdamagedortheproductwillswitchtoprotection
modeandwillnotoperate.
A
WARNİNG: Donotuseoldorusedwaterinlethosesonthe
newproduct.Itmaycausestainsonyourlaundry.
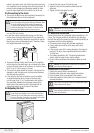
1.Connectthespecialhosessuppliedwiththeproductto
thewaterinletsontheproduct.Redhose(left)(max.90
ºC)isforhotwaterinlet,bluehose(right)(max.25ºC)is
forcoldwaterinlet.
A
WARNİNG: Ensurethatthecoldandhotwaterconnections
aremadecorrectlywheninstallingtheproduct.
Otherwise,yourlaundrywillcomeouthotattheendof
thewashingprocessandwearout.
2.Tightenallhosenutsbyhand.Neveruseatoolwhen
tightening the nuts.
3. Open the taps completely after making the hose
connectiontocheckforwaterleaksattheconnection