8
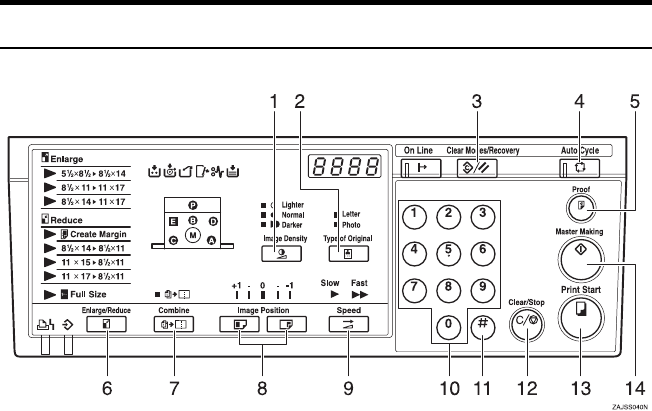
Control Panel
Keys
1. {Image Density} key
Press to make prints darker or lighter. See
p.20
“Adjusting the Print Image Density”.
2. {Type of Original} key
Press to select Letter, Photo or Let-
ter/Photo mode. See p.27 “Selecting
Original Type”.
3. {Clear Modes/Recovery} key
•Clear Modes
Press to clear the previously entered
job settings.
•Recovery
Press to reset the error indicators after
clearing a misfeed. See p.47 “x Clear-
ing Misfeeds”.
4. {Auto Cycle} key
Press to process the master and make
prints automatically. See p.28 “Auto Cy-
cle—Processing a Master and Making
Prints in One Step”.
5. {Proof} key
Press to make proof prints.
6. {Enlarge/Reduce} key
Press to enlarge or reduce the image. See
p.23 “Preset Reduce/Enlarge—Reducing
and Enlarging Using Preset Ratios”.
7. {Combine} key
Press to combine originals onto one print.
See p.29 “Combine—Combining Two
Originals onto One Print”.
8. {Image Position} keys
Press to shift the image forwards or back-
wards. See p.18 “Adjusting the Print Im-
age Position”.
9. {Speed} key
Press to select Fast or Slow for your print-
ing speed. See p.21 “Changing the Print-
ing Speed”.
10. Number keys
Press to enter the desired number of
prints and data for selected modes.
11. {q} key
Press to enter data in selected modes.
12. {Clear/Stop} key
Press to cancel a number you have en-
tered or to stop printing.
13. {Print Start} key
Press to start printing.
14. {Master Making} key
Press to make a master.
Titanium2_EN-F2_FM_forPaper.book Page 8 Wednesday, January 25, 2006 6:30 PM


