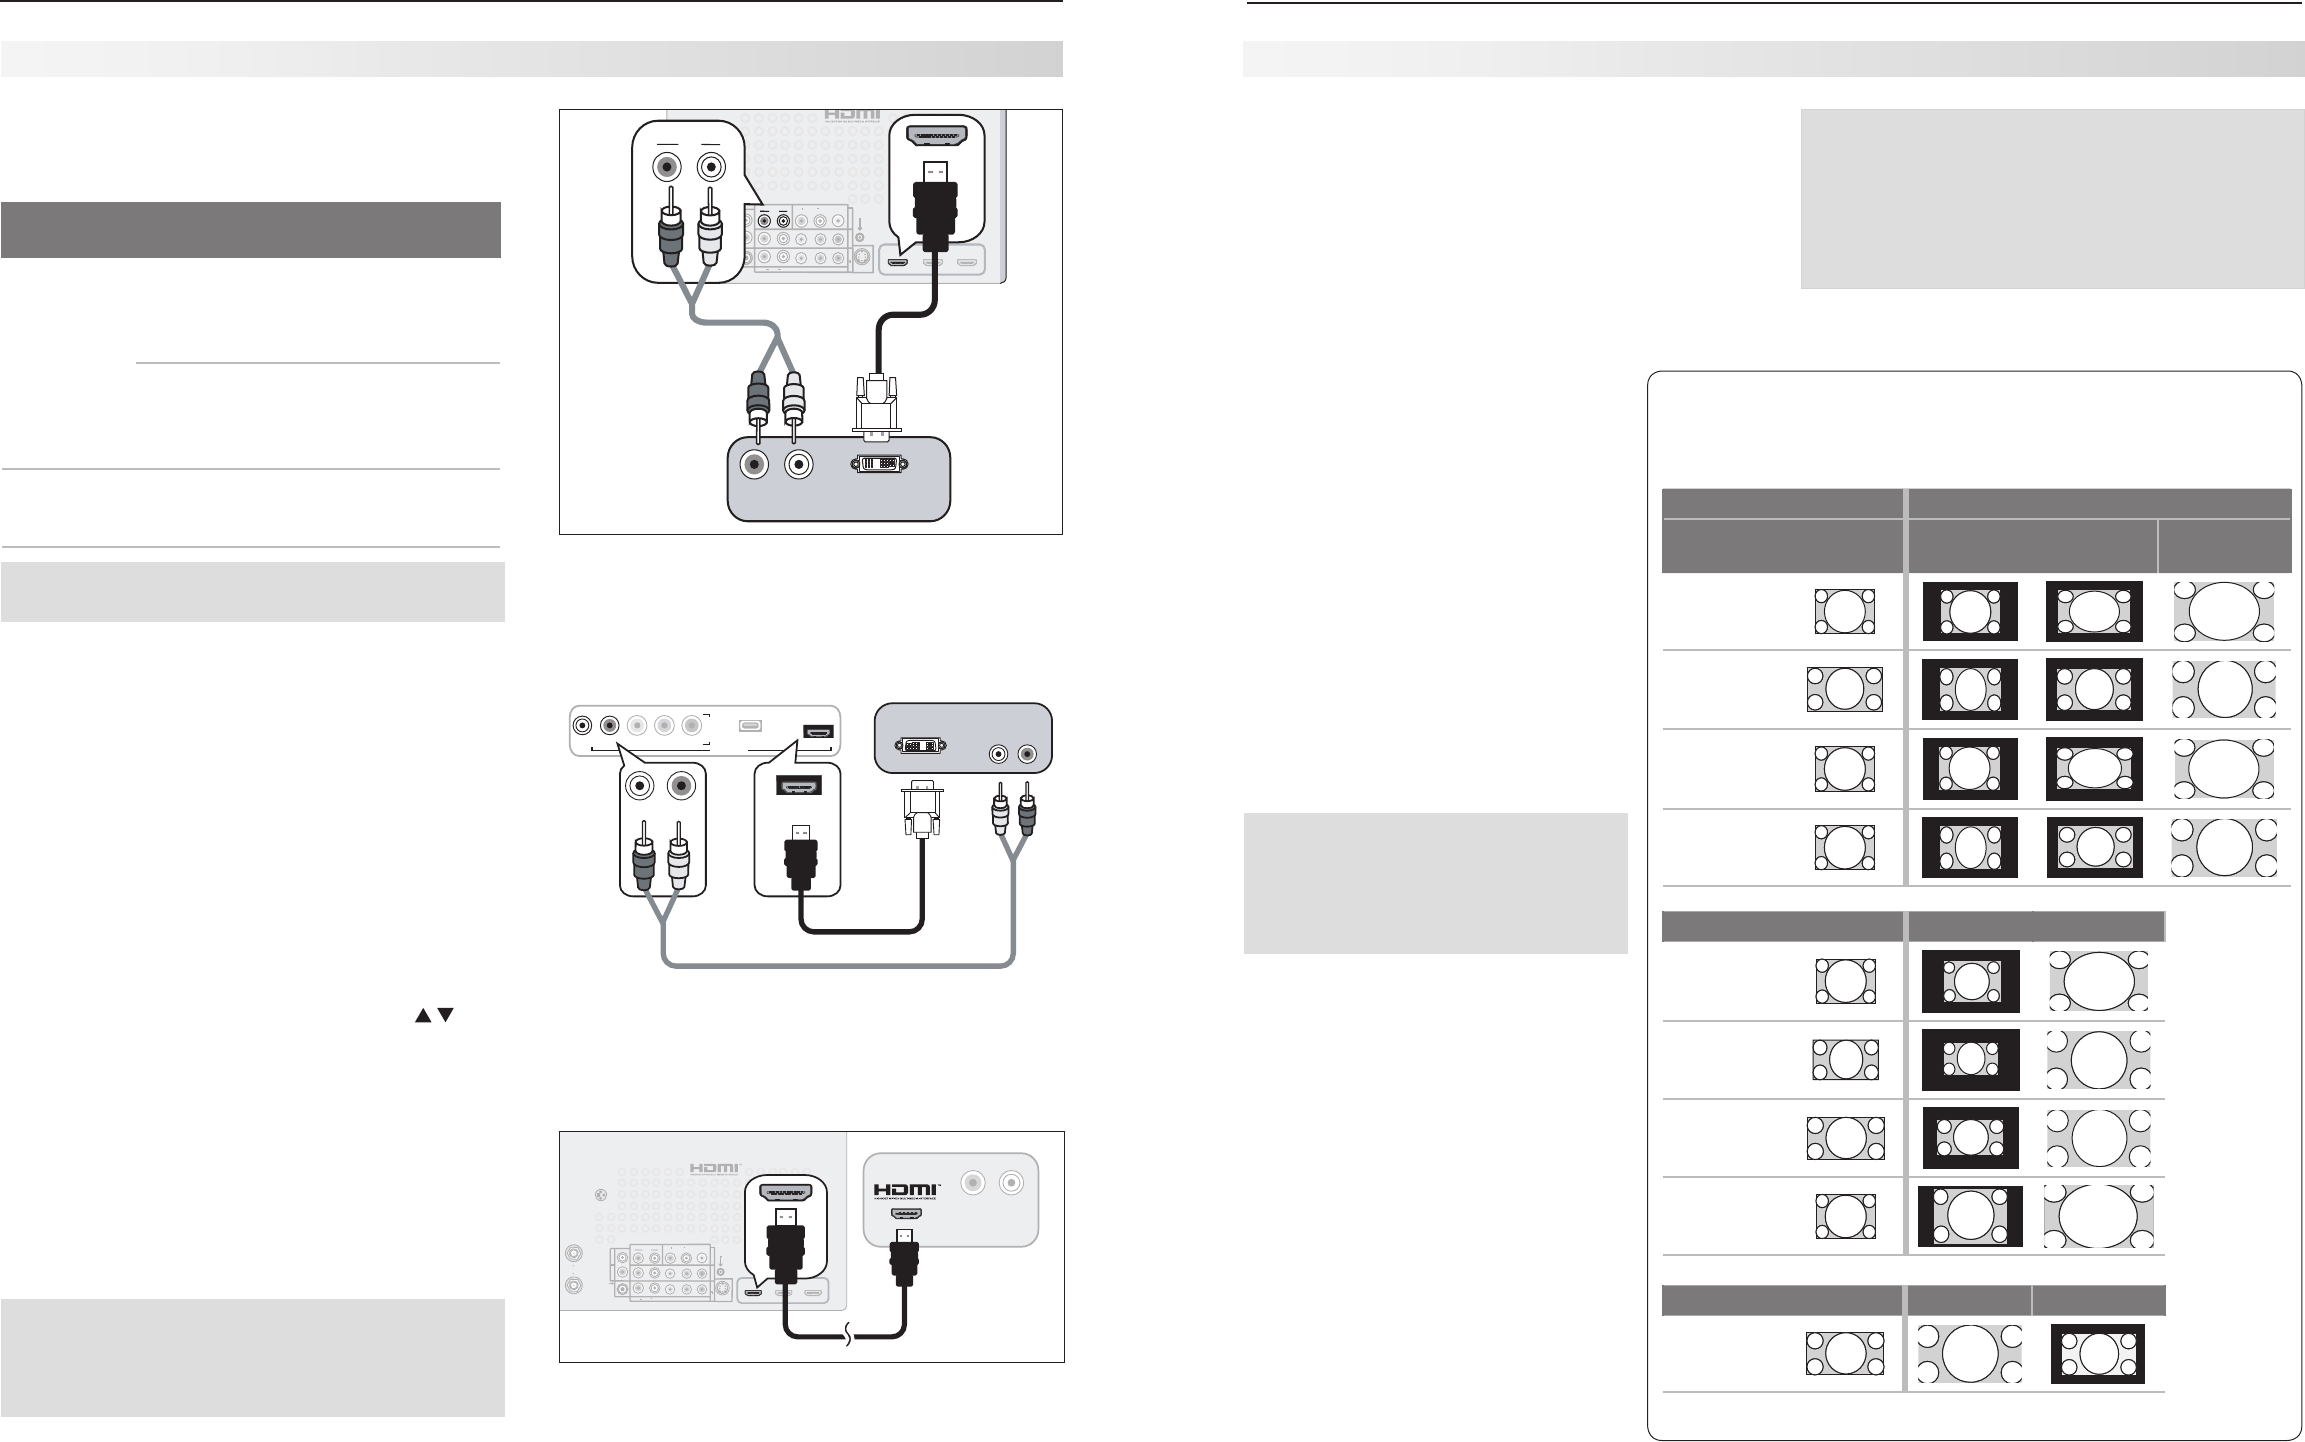
Connecting a Computer to the TV
Use one of the connection methods listed below based
on your computer’s video output.
Computer
Video Output
Video Connection
Audio
Connection
Digital DVI DVI-to-HDMI cable
or an HDMI cable
with an HDMI-to-
DVI adapter
Stereo audio
cables
Note: If the computer’s audio output
is a single mini jack, a mini audio-to-
RCA-male “Y” adapter cable is also
required.
HDMI HDMI-to-HDMI
cable
No additional
audio connec-
tion is required.
IMPORTANT
This TV accepts digital computer signals only.
See the TV specifications in Appendix A to confirm
1.
that your computer signal is compatible with the TV.
Connect the computer’s digital signal output to one
2.
of the TV’s
HDMI
jacks. See the connection dia-
grams for the method suited to your equipment.
Connect the computer’s audio output using one of
3.
these options:
• FordigitalDVIsignals,connectanalogleft/right
audio to the TV’s
DVI/PC INPUT AUDIO
jacks.
• ForHDMIsignals,noadditionalaudioconnec-
tion is required.
Power on the TV and computer. The TV will detect
4.
the connection and display the Auto Input Sensing
screen.
In the
5.
Auto Input Sensing screen, press to
highlight PC in the list of device types. It is impor-
tant to use the name PC so that the TV can process
the video signal correctly.
Press
6.
EXIT
to close the Auto Input Sensing screen.
HDMI
3D
GLASSES
EMITTER
ANT 2
ANT 1
AVR
AUDIO
OUTPUT
DIGITAL
AUDIO
OUTPUT
L
R
AUDIO
L
R
(480i / 480p / 720p / 1080i)
L
R
DVI/PC INPUT
VIDEO
AUDIO
R
L
Y
Pb
Pr
AUDIO
Pb
Y/ VIDEO
Pr
VIDEO: 480i/480p/720p/1080i/1080p
AUDIO: PCM STEREO
PC: VGA, W-VGA, SVGA, W-SVGA,
XGA, W-ZGA, SXGA, 720p/ 1080p
1
2
3
HDMI
IR-
NetCommand
Output / External
Controller Input
R
INPUT 3
INPUT 2
INPUT 1
S-VIDEO
INPUT 3
L
R
DVI/PC
INPUT
AUDIO
1
2
HDMI
L
R
DVI/PC INPUT
AUDIO
L
R
DVI/PC INPUT
AUDIO
%7*065
"6%*0
3 -
$PNQVUFSXJUI
%7*BOETUFSFP
BVEJPPVUQVUT
57CBDLQBOFM
A DVI connection from a personal computer requires a
separate audio connection. A computer connected to
the TV back panel is shown above.
L-AUDIO-R
VIDEO/Y
Pb
Pr
USB
HDMI 4
DVI AUDIO
I
N
P
U
T
4
L-AUDIO-R
HDMI 4
DVI AUDIO
HDMI 4
L-AUDIO-R
I
N
P
U
T
4
%7*065
"6%*0
3-
$PNQVUFSXJUI%7*BOE
TUFSFPBVEJPPVUQVUT
57GSPOUQBOFM
4UFSFPBVEJPDBCMF
)%.*UP%7*DBCMF
736 and 835 Series Models: Computer with DVI output
connected to the TV front panel.
HDMI
3D
GLASSES
EMITTER
AVR
AUDIO
OUTPUT
DIGITAL
AUDIO
OUTPUT
L
R
AUDIO
L
R
(480i / 480p / 720p / 1080i)
L
R
DVI/PC INPUT
VIDEO
AUDIO
R
L
Y
Pb
Pr
AUDIO
Pb
Y/ VIDEO
Pr
VIDEO: 480i/480p/720p/1080i/1080p
AUDIO: PCM STEREO
PC: VGA, W-VGA, SVGA, W-SVGA,
XGA, W-ZGA, SXGA, 720p/ 1080p
1
2
3
HDMI
IR-
NetCommand
Output / External
Controller Input
R
INPUT 3
INPUT 2
INPUT 1
S-VIDEO
INPUT 3
ANT 2 / AUX
ANT 1 / MAIN
1
2
HDMI
"6%*0
3 -
$PNQVUFS
XJUI)%.*
BVEJPWJEFP
PVUQVU
57CBDLQBOFM
An HDMI-to-HDMI connection carries all video and
audio on a single cable.
Note: If your computer provides digital audio
output (coaxial or digital), you can connect it
directly to a digital A/V receiver and bypass
the TV.
Using the TV with a Personal Computer
Tip:
Set the computer’s screen saver to display a pattern
after several minutes of inactivity. This acts as a
reminder that the TV is powered on and the lamp
is in use. The lamp is in use whenever the TV is
powered on, even if the screen appears dark.
Computer Video Adjustments
Power on the computer if it is not already on.
1.
Select
2.
PC from the Input Selection menu. To do
this, press
INPUT
to open the Input Selection menu,
move the highlight to the PC icon, and press
ENTER.
Working from the computer, change the resolution
3.
of the computer image. View the computer image
on the TV and maximize the computer resolution
while maintaining a suitable aspect ratio for the
image.
Perform TV video adjustments.
4.
Press
VIDEO
repeatedly to access video-
adjustment options. The following
additional adjustments are available
for computer video:
Horiz Position (Horizontal Position).
Manually adjust the horizontal
position.
Vert Position (Vertical Position).
Manually adjust the vertical position.
Press
5.
FORMAT
repeatedly to find the
picture format best suited to the
image. See the chart on this page
showing how different computer reso-
lutions can be displayed on the TV.
Image Resolution
Your Mitsubishi TV can display resolutions
from standard VGA (640 x 480) through
1920 x 1080 signals at a refresh rate of
60 Hz. The resolution of 1920 x 1080 is
supported at refresh rates of 24, 30, and
60 Hz. See Appendix A, “Specifications”
(page 62) for more on compatible screen
resolutions.
In most cases, the computer will select
the best resolution match to display on
the TV. You can override this setting if you
wish. Refer to your computer operating
system’s instructions for information on
changing the screen resolution.
You may need to restart the computer for
changes to take effect.
Using the TV with a Personal Computer
Distortion in Computer Images
Computer images may show distortion
when viewed on the TV, e.g., lines that
should be straight may appear slightly
curved.
Computer Display Formats
Press the
FORMAT
key repeatedly to cycle through the TV displays
available for your computer’s video signal.
Computer Signal
As Displayed on TV Screen
Original Format
4 X 3
Standard
16 X 9
Standard
Zoom
VGA
640 X 480
WVGA
848 X 480
SVGA
800 X 600
WSVGA
1064 X 600
Original Format Standard Zoom
XGA
1024 X 768
PC 720p
1280 X 720
WXGA
1360 X 768
SXGA
1280 X 1024
Original Format Standard Reduce
PC 1080p
1920 X 1080
