18
3. TV Connections 19
3
TV Connections
HDMI
3D
GLASSES
EMITTER
AVR
AUDIO
OUTPUT
DIGITAL
AUDIO
OUTPUT
L
R
AUDIO
L
R
(480i / 480p / 720p / 1080i)
L
R
DVI/PC INPUT
VIDEO
AUDIO
R
L
Y
Pb
Pr
AUDIO
Pb
Y/ VIDEO
Pr
VIDEO: 480i/480p/720p/1080i/1080p
AUDIO: PCM STEREO
PC: VGA, W-VGA, SVGA, W-SVGA,
XGA, W-ZGA, SXGA, 720p/ 1080p
1
2
3
HDMI
IR-
NetCommand
Output / External
Controller Input
R
INPUT 3
INPUT 2
INPUT 1
S-VIDEO
INPUT 3
ANT 2 / AUX
ANT 1 / MAIN
AUDIO
L
R
Pb
Y/ VIDEO
Pr
(480i / 480p / 720p / 1080i)
AUDIO
L
R
Pb
Y/ VIDEO
Pr
1C: 1S
"6%*0
-
3
*ODPNJOHGSPN
DBCMFTFSWJDFPS
TBUFMMJUFEJTI
$PNQPOFOUWJEFP
EFWJDF
57CBDLQBOFM
$"#-&*/PS
4"5&--*5&*/
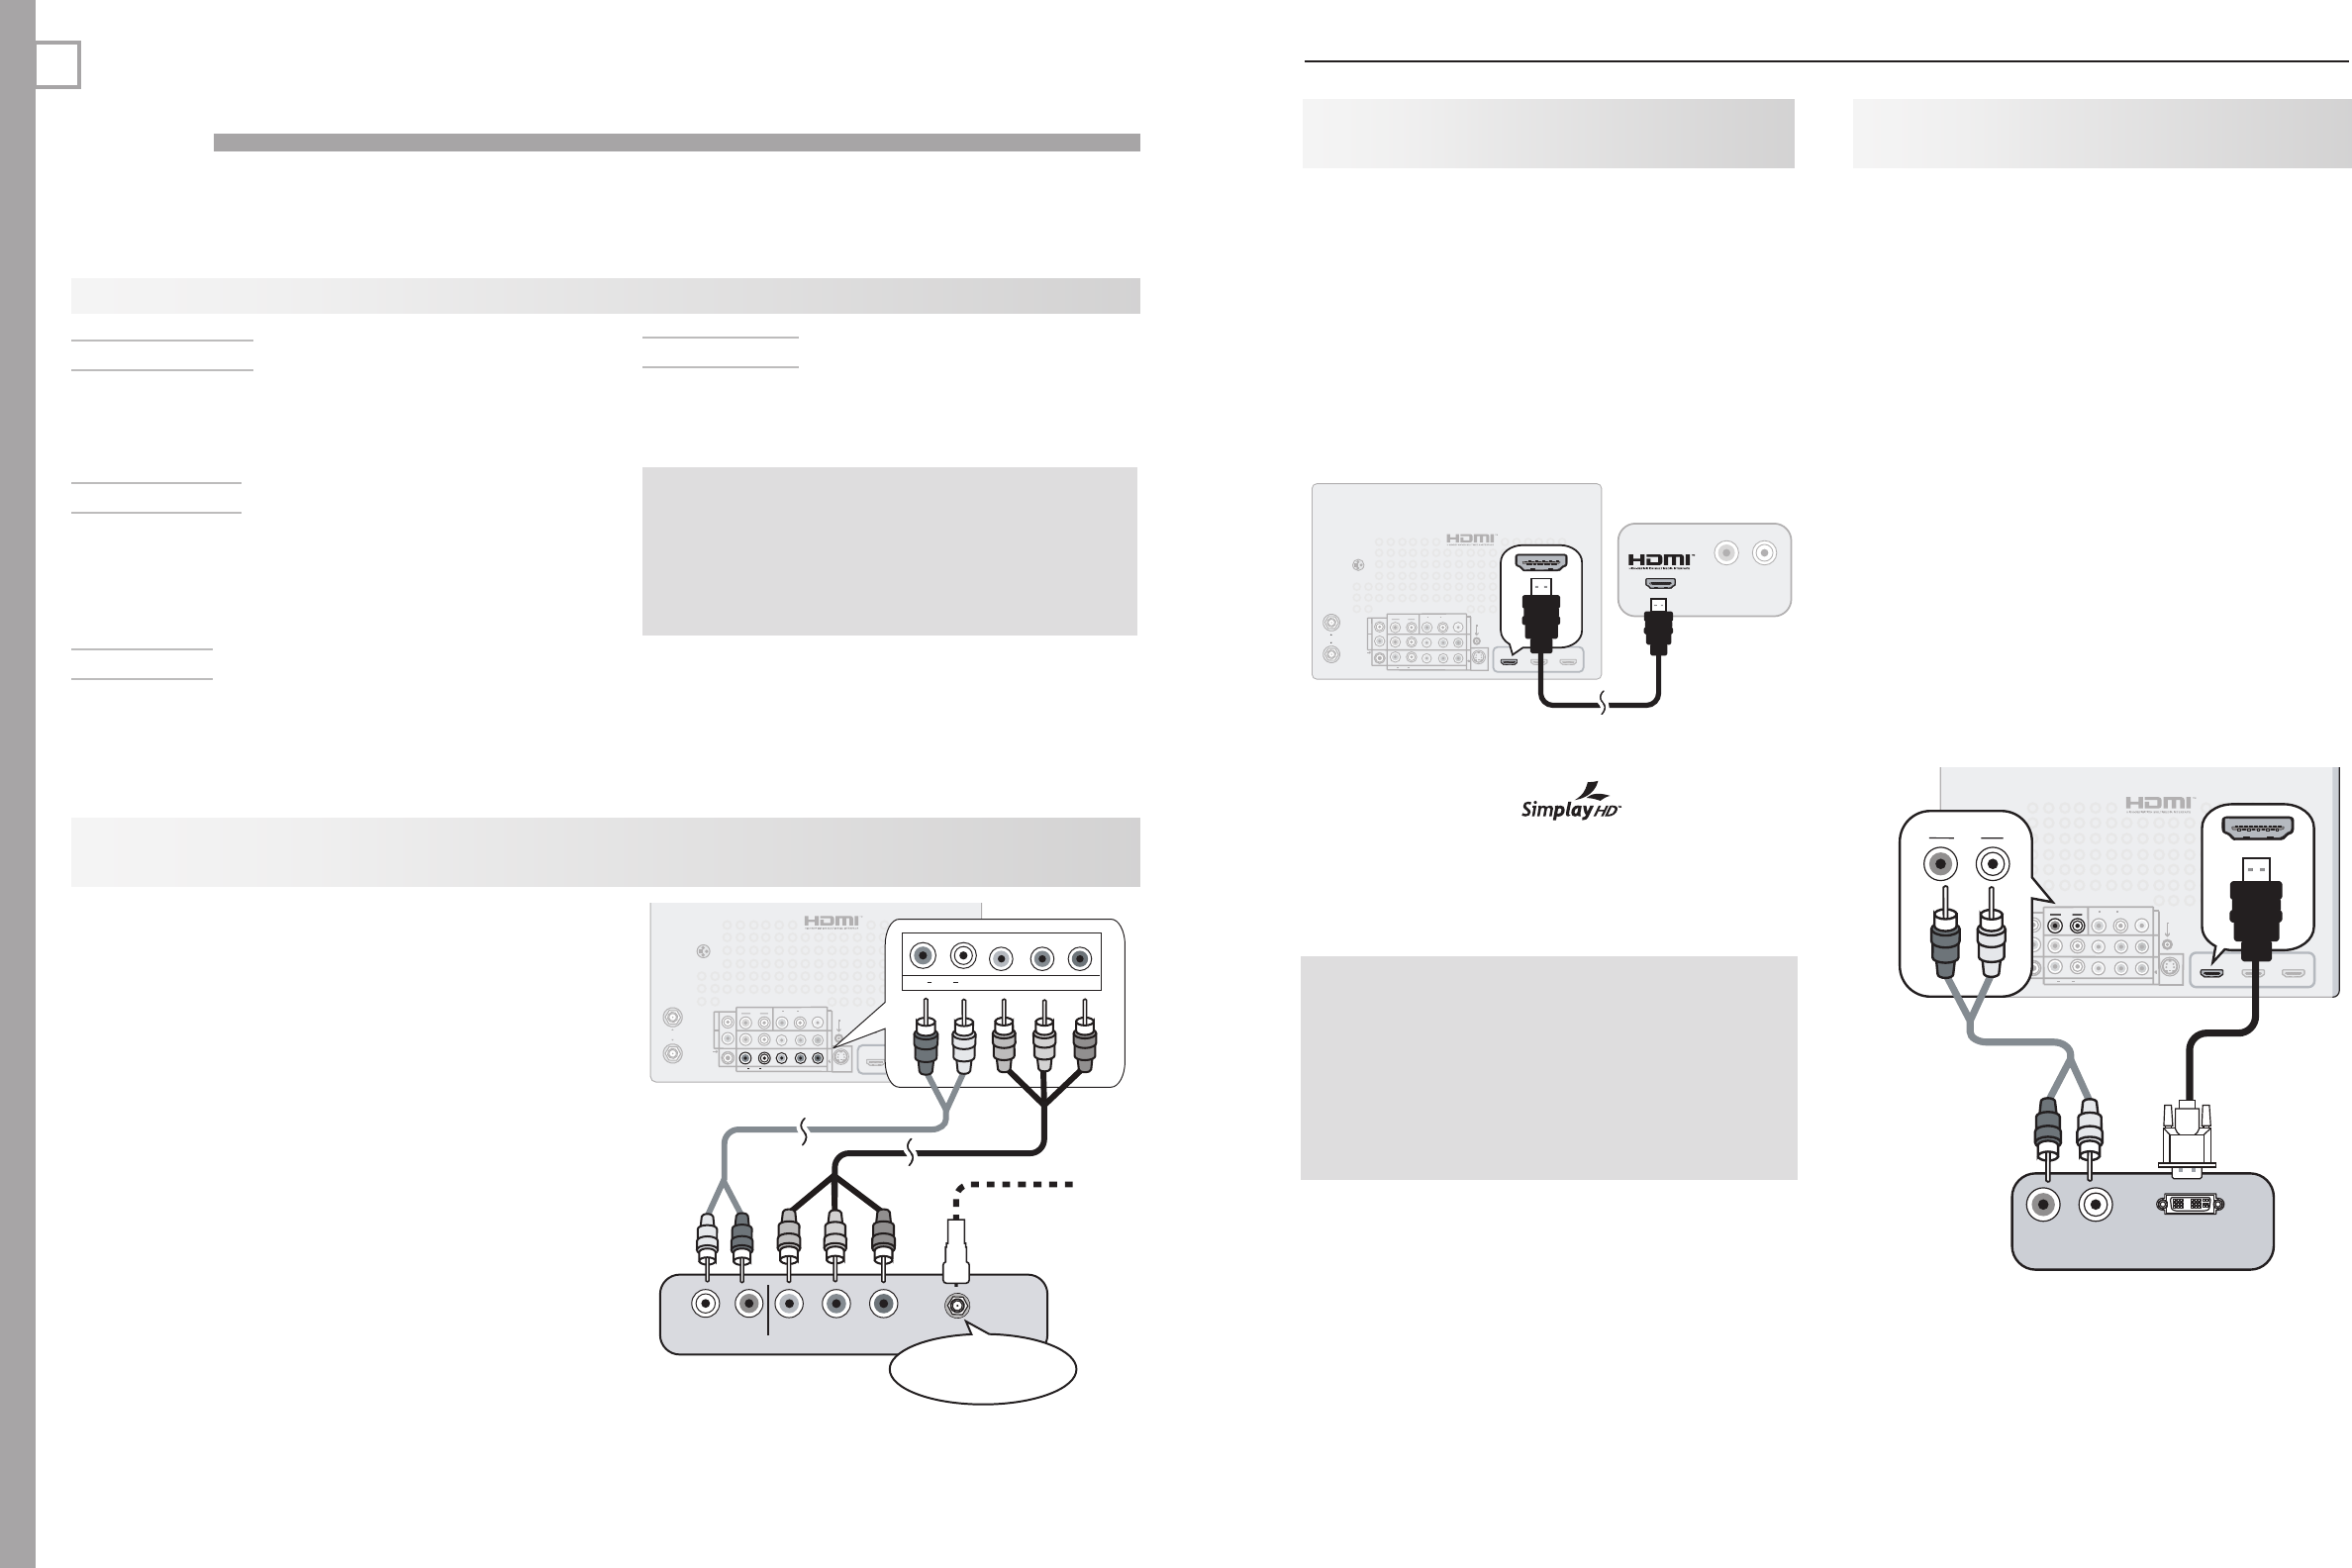
Figure 1. Connecting a device with component video
outputs
Auto Input Sensing
The TV’s Auto Input Sensing feature automatically rec-
ognizes most connections and prompts you to identify
the type of device connected. See chapter 2, “TV
Setup,” for more on Auto Input Sensing.
Connection Types
Review the connection types available on your input
devices and use connections that will give the best
video quality. For example, choose HDMI over compo-
nent video, and choose component video over S-video
or composite video.
Picture Quality
For best picture quality, route signals directly from
the input device to the TV; avoid routing video signals
through an A/V receiver, for example.
If your cable box or satellite receiver has an HDMI
output, use the connections for HDMI devices
described later in this chapter.
Required: RCA component video cables, left/right
analog stereo audio cables.
Connect RCA-type cables from the
1. Y Pb Pr
outputs
on the device to the
Y Pb Pr
inputs on the TV back
panel, matching the colored green, blue, and red
connections.
Connect left (white) and right (red) audio cables
2.
from the device to
AUDIO L
and
R
on the TV back
panel.
Cable Box or Satellite Receiver Only:
3.
Connect
the cable from the outside cable or satellite service
to
CABLE IN
or
SATELLITE IN
on the cable box or
satellite receiver. See your device’s owner’s guide
for instructions and cable compatibility.
Note:
To hear digital surround sound, connect the digital
audio output from the device directly to your digital
A/V receiver.
Surround Sound
For best surround sound audio quality, route audio-
signal cables or HDMI cables from the source device
directly to your A/V receiver or sound system.
IMPORTANT
Accessory items such as cables, adapters,
splitters, or combiners required for TV
connections are not supplied with the TV.
These items are available at many electronics
stores.
Before You Begin
HDTV Cable Box or Satellite Receiver, DVD Player, or Other Device with
Component Video
H
DMI Device (Cable Box, Satellite
Receiver, DVD Player, or Other Device
)
Required: HDMI-to-HDMI cable.
Connect an HDMI cable from the TV back panel to the
HDMI device output. HDMI devices provide video and
audio through the single cable.
Mitsubishi recommends you use category 2 (high-
speed) HDMI cables to connect HDMI 1.3 source
devices. High-speed category 2 cables bring you the
full benefits of Deep Color and x.v.Color. See “HDMI
Cable Categories,” page 10, for more on HDMI cable
types.
HDMI
3D
GLASSES
EMITTER
AVR
AUDIO
OUTPUT
DIGITAL
AUDIO
OUTPUT
L
R
AUDIO
L
R
(480i / 480p / 720p / 1080i)
L
R
DVI/PC INPUT
VIDEO
AUDIO
R
L
Y
Pb
Pr
AUDIO
Pb
Y/ VIDEO
Pr
VIDEO: 480i/480p/720p/1080i/1080p
AUDIO: PCM STEREO
PC: VGA, W-VGA, SVGA, W-SVGA,
XGA, W-ZGA, SXGA, 720p/ 1080p
1
2
3
HDMI
IR-
NetCommand
Output / External
Controller Input
R
INPUT 3
INPUT 2
INPUT 1
S-VIDEO
INPUT 3
1
2
HDMI
ANT 2 / AUX
ANT 1 / MAIN
"6%*0
3 -
"OZ)%.*
EFWJDF
57CBDLQBOFM
Figure 2. Connecting an HDMI device.
Note:
HDMI inputs are certified for proper
interoperability with other products certified by
Simplay
™
.
IMPORTANT
HDMI and Audio Signals
Digital Surround Sound: The TV’s HDMI inputs
can receive digital stereo audio signals only. To
hear digital surround sound from an HDMI device,
connect the device’s HDMI or digital audio output
directly to your A/V receiver. See the Owner’s
Guides for those devices for instructions.
DVI Video Device (Cable Box, Satellite
Receiver, DVD Player, or Other Device)
Connect DVI devices (digital only) to the TV’s HDMI
input jacks.
Analog stereo audio cables and a DVI-to-HDMI cable or
DVI/HDMI adapter and HDMI cable are required.
Connect the DVI-to-HDMI cable (recommended) or
1.
HDMI cable with DVI/HDMI adapter from the DVI
device’s back panel to the TV’s HDMI jack.
Note: If you are using a DVI/HDMI adapter, it is impor-
tant to connect the adapter to the DVI device for
best performance.
Connect a set of audio cables from
2. AUDIO OUT
on the DVI device back panel to the
DVI/PC INPUT
AUDIO
on the TV back panel. Connect the red
cable to the
R
jack and the white cable to the
L
jack.
Note: The HDMI connection supports copy protection
(HDCP).
Some devices require connection to an analog input
first in order to view on-screen menus and to select DVI
as the ouput. Please review your equipment instruc-
tions for DVI connectivity and compatibility.
HDMI
3D
GLASSES
EMITTER
ANT 2
ANT 1
AVR
AUDIO
OUTPUT
DIGITAL
AUDIO
OUTPUT
L
R
AUDIO
L
R
(480i / 480p / 720p / 1080i)
L
R
DVI/PC INPUT
VIDEO
AUDIO
R
L
Y
Pb
Pr
AUDIO
Pb
Y/ VIDEO
Pr
VIDEO: 480i/480p/720p/1080i/1080p
AUDIO: PCM STEREO
PC: VGA, W-VGA, SVGA, W-SVGA,
XGA, W-ZGA, SXGA, 720p/ 1080p
1
2
3
HDMI
IR-
NetCommand
Output / External
Controller Input
R
INPUT 3
INPUT 2
INPUT 1
S-VIDEO
INPUT 3
L
R
DVI/PC
INPUT
AUDIO
1
2
HDMI
L
R
DVI/PC INPUT
AUDIO
%7*065
"6%*0
3 -
%JHJUBM%7*
EFWJDF
57CBDLQBOFM
Figure 3. Connecting a digital DVI device
