date
display
will
probably
be
wrong.
Use the method shown above to set
ERASING A ROUTE
the time and date to their
proper
local
settings.
Once this is
done,
an
internal clock will
keep
the correct
time,
even when the
unit is turned off.
The GPS
system updates
this clock when the
unit is locked on to the
satellites.
POSITION/NAVIGATION DISPLAYS
The AccuNav II
has a
position screen, navigation screen,
plotter, steering
indicator,
and a satellite information screen. These
displays
were de-
signed
to show the most
important
data.
However, you
can customize all
of them
(except
the satellite
position screen)
to some extent
through
the
"Change Display"
feature on the first GPS menu screen.
(There
are other
screens that can be customized
by using
the Windows
feature. See the
Windows
section for more
detail.)
To customize these
screens,
see the
"Customize" section.
IMPORTANT!
If the data shown in
digital
numbers on
any
screen on this unit is
flashing,
then it means that data is
invalid. Do not
rely
on that data if it is
flashing.
For
example,
if the
position
display
is
flashing,
then the unit has lost the
satellites and
hasn't
re-aquired
them. The
position
that is
flashing
is
your
last known
position,
notyourpresent position!
Do not
navigate
with this unit
until
you
have
found the reason the unit has lost the satellites!
Each of the
following
screens is available
by
first
pressing
the MENU
key,
then
pressing
the
key
next to the desired screen label. A detailed
description
of each screen
follows.
(Press
the MENU
key
twice to see the
Satellite Information
menu.)
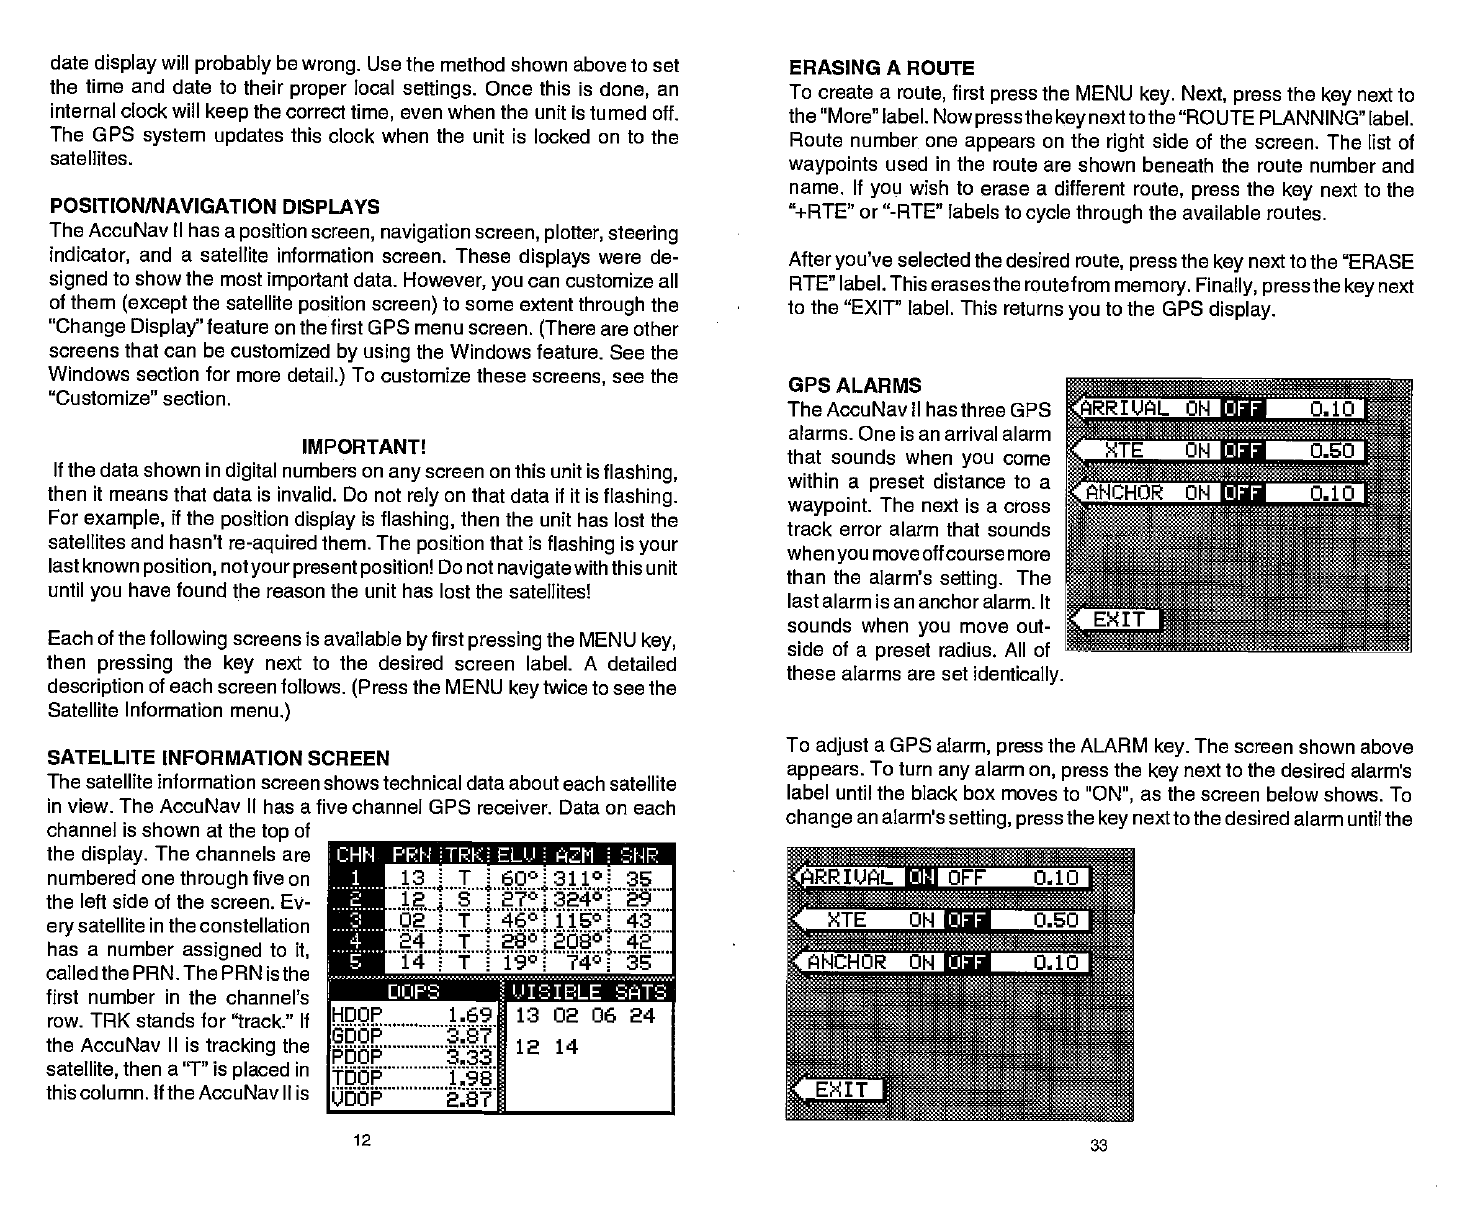
SATELLITE INFORMATION SCREEN
The satellite information
screen shows technical data about each satellite
in view. The AccuNav
II has a five channel GPS receiver. Data on each
channel is shown at the
top
of
the
display.
The channels
are
__________________________________
numbered one
through
five on
the left side of the screen. Ev-
ery
satellite in the constellation
has a number
assigned
to
it,
calledthe PRN.The PRN isthe
first
number in
the channel's
row.
TR1C
stands for "track." If
the AccuNav II is
tracking
the
satellite,
then a "T" is
placed
in
this column. If
theAccuNavll is
To create a
route,
first
press
the MENU
key. Next, press
the
key
next to
the
"More" label. Now
press
the
key
next to the "ROUTE PLANNING"
label.
Route number one
appears
on the
right
side of the
screen. The list of
waypoints
used in the
route are shown beneath the route number and
name. If
you
wish
to erase a different
route,
press
the
key
next to the
"÷RTE" or "-RTE" labels to
cycle
through
the available routes.
After
you've
selected the desired
route,
press
the
key
next to the "ERASE
RTE" label. This erases the
route from
memory. Finally, press
the
key
next
to the "EXIT" label. This
returns
you
to the GPS
display.
GPS ALARMS
The AccuNav II has three OPS
alarms. One is an arrival alarm
that sounds when
you
come
within a
preset
distance to a
waypoint.
The next is a cross
track error alarm that sounds
whenyou
moveoff course more
than the alarm's
setting.
The
last alarm is an anchor alarm. It
sounds when
you
move out-
side of a
preset
radius. All of
these alarms are set
identically.
IU
AL ON 0.1 0
>TE
:
ON 0.50
To
adjust
a GPS
alarm,
press
the ALARM
key.
The
screen shown above
appears.
To
turn
any
alarm
on,
press
the
key
next to
the desired alarm's
label
until the black box moves to
"ON",
as the screen below shows.
To
change
an alarm's
setting, press
the
key
next to the
desired alarm until the
c
TE.50
"IN
2.1fl
.
.r ii
— s
:ia u &i
13 T 600:31101
35
12
1
s
1
270132401 29
'O'2 rT
1tjjofl
24
1
T 250?3030t 42
14
1 T I
19°i ?4°T
35
HOOP
1.69 13 02 06 24
GOOP 3.87
POOP 3.33
TOOP 1.98
UDOP 2.87
_____________
12
33
PDF compression, OCR, web-optimization with CVISION's PdfCompressor


