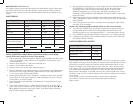
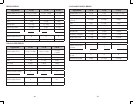
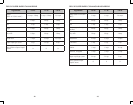
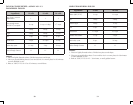
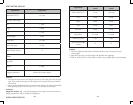
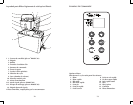
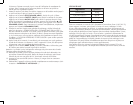
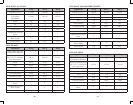
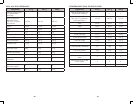
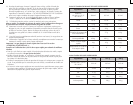
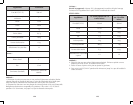
7. Press MENU to choose desired Course. The operation light will illuminate. Each
time MENU is pressed, unit and display will move to next Course.
8. Press CRUST to choose crust color. Breadmaker is preset for MEDIUM.
CRUST will not be activated for the following courses:
• Batter Breads™
• Jam
• Dough
• Pizza Dough
• Pasta Dough
When using Dough, Pizza Dough, Pasta Dough, Batter Breads™ or Jam
courses, steps 7 and 8 are not needed.
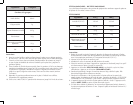
9. Press LOAF SIZE to select: 1, 1.5 LB, or 2.0 lb. Breadmaker is preset to 2 lb.
Loaf size cannot be activated for the following courses:
• Batter Breads™
• Jam
• Pizza Dough
• Pasta Dough
Although breadmaker is capable of making 1.0 lb. loaves, we recommend
baking 1.5 and 2.0 lb recipes for more uniform loaves of bread. This is especially
true for breads that contain whole grains or other special ingredients such as
sunower or sesame seeds.
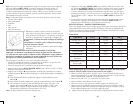
10. Press START to begin kneading cycle. The operation light will illuminate.
The TIME remaining will begin to count down in display window. LOAF SIZE
and CRUST will be shown in display window.
During kneading cycle, yeast will activate and viewing window may begin
to fog. (This will clear eventually so you can view the progress.)
For White, Whole Wheat, French, Fruit & Nut and Dough courses,
breadmaker will beep before end of kneading cycle, at which time you may add
any fruits or nuts, herbs, meat, garlic, etc. Opening lid will not stop kneading
process. Add ingredients quickly and evenly over dough. Quickly close lid to
prevent heat loss.
If using Rapid Course or delay bake timer, add all ingredients at the
beginning. Ingredients will be chopped into smaller pieces.
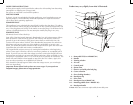
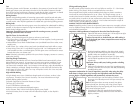
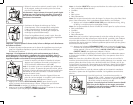
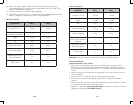
11. When your bread is nished baking, breadmaker
will beep and “0:00” will appear in display
window. Press STOP and open lid. Using oven
mitts, remove bread pan .
If bread is not removed immediately after baking
and STOP is not pressed, the Keep Warm cycle will
begin. Operation light will begin to ash. Breadmaker
will automatically turn off after 60 minutes. Although this will help prevent bread
from becoming soggy, for best results, remove bread immediately after baking.
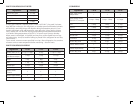
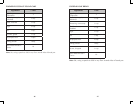
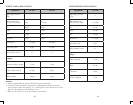
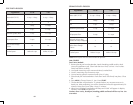
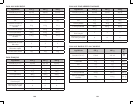
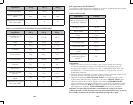
Keep Warm cycle does not apply to the following courses:
• Deluxe Super Rapid
• Batter Breads™
• Jam
• Dough
• Pizza Dough
• Pasta Dough
12. Turn bread pan upside down and shake to release
bread. Place bread upright on wire rack to cool
15 – 30 minutes before cutting. This allows steam to
escape .
13. Always unplug breadmaker after each use.
To preset your breadmaker, follow these steps:
1. Add ingredients as usual, taking care not to let yeast and liquid ingredients
contact one another.
2. Close breadmaker lid and plug it in.
3. Press MENU to choose Course. Time needed for selected Course appears in
display window.
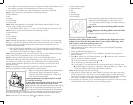
4. Press ▲ to add time in 10-minute intervals. (Use ▼ to subtract time.) Amount of
time set is shown in display window.
q To fast forward time, continually press ▲.
q To fast reverse, continually press ▼.
q For example, if it is 8:00 AM and you want bread ready at 1:00 PM, press
▲ until the display reads 5:00 – meaning it will nish baking in 5 hours. This
is the hour difference between 8:00 AM and 1:00 PM.
Actual baking times will not change.
5. Press LOAF to choose loaf size, press CRUST to choose crust color, then press
START to begin timer. The colon (:) in time display begins to ash, letting you
know timer is started. When your bread is nished baking breadmaker will beep
and “0:00” will appear in display window. Press STOP and open lid.
6. If you make an error after you’ve activated program and want to start over, press
and hold STOP. Timer will clear and you can begin again.