


6-10
4. Unplug dryer or disconnect power.
5. Access the electronic control board and
remove the P2 connector from the board.
Use an ohmmeter and touch the test leads
to connector terminals 1 (yellow/red wire)
and 2 (black wire).
• If the meter does not indicate an open
circuit (infinite), go to step 6.
• Otherwise, measure the resistance at
pins 1 and 2 of connector P2 on the
electronic control board. If a resistance
less than 1 MΩ is measured, inspect
the control board for any debris bridg-
ing the pins. If no debris is present, re-
place the board.
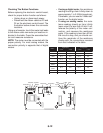
6. Access the moisture sensor by removing
the toe panel. Disconnect the moisture
sensor from the wire harness.
7. Measure the resistance across the outer-
most contacts of the cable that includes
the two red discs (MOVs).
• If a small resistance is measured, re-
place the wire harness and moisture
sensor.
• Otherwise, go to step 8.
TEST #3c: THERMAL CUTOFF TEST
(ELECTRIC DRYERS ONLY)
If the dryer does not produce heat, check the
status of the thermal cutoff.
1. Unplug dryer or disconnect power.
2. Access the thermal cutoff by first remov-
ing the toe panel.
3. Use an ohmmeter and check the continu-
ity across the thermal cutoff.
• If the ohmmeter indicates an open cir-
cuit, replace the failed thermal cutoff and
high-limit thermostat. In addition, check
for failed heat element, or blocked or
improper exhaust system.
TEST #4: MOISTURE SENSOR TEST
NOTE: This test is performed when an auto-
matic cycle stops too soon, or runs much longer
than expected. The test is started with the dryer
completely assembled. The dryer will shut
down automatically after 2-1/2 hours.
The following items are part of the moisture
sensor system:
• Harness/connection
• Metal sensor strips
• Electronic control board
1. Enter the Diagnostic Test mode.
2. Open the dryer door. If a beep tone is
heard, and a software revision number is
displayed on the console as soon as the
door is opened, a short circuit exists in the
moisture sensor system.
• If this does not occur, proceed to step 3.
• Otherwise, go to step 4
NOTE: Overdrying may be caused by a
short circuit in the sensor system.
3. Bridge the two metal sensor strips on the
face of the lint screen housing with a wet
cloth or your finger.
• If a beep is heard and a software revi-
sion number is displayed on the con-
sole, the sensor has passed the test.
Proceed to step 4.
• If the test is not successful, unplug the
dryer or disconnect power.
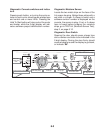
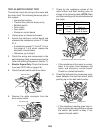
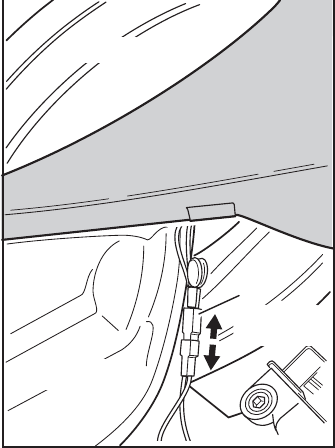
• Access the moisture sensor and discon-
nect the sensor wires from the harness
(see the illustration below). Proceed to
step 8.
Blower Housing
Drum
Harness
Connection
FRONT