9
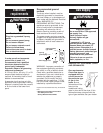
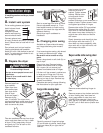
Remove tape from
dryer cabinet.
Open dryer door
and remove tape
from dryer drum.
(Not all dryer
drums are taped.)
Remove drying
rack, if included. Turn dryer drum
counterclockwise to make sure all tape
was removed. Wipe drum with damp
cloth to remove any dust.
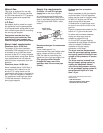
B. Prepare the dryer
diamond
marking
Excessive Weight Hazard
Use two or more people to move and
install dryer.
Failure to do so could result in back
or other injury.
WARNING
Take two cardboard corners from dryer
carton and place them on floor in back
of dryer. Firmly grasp body of dryer
and gently lay it on its back on the
cardboard corners.
Start to screw legs into holes by hand.
Use an adjustable wrench or 1” hex-
head socket wrench to finish turning
legs until you reach the ridge with the
diamond marking.
Stand dryer up on cardboard or
hardboard.
Installation steps
If installing washer and dryer, install
dryer first.
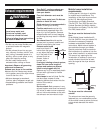
A. Install vent system
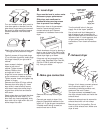
Put on safety glasses and gloves.
Install exhaust hood.
Use caulking
compound to seal
exterior wall opening
around exhaust hood.
Connect exhaust vent
to hood. (Exhaust vent MUST fit inside
hood.) Secure vent to hood with 4-inch
clamp.
Run exhaust vent to dryer location.
Use the straightest path possible.
Avoid 90° turns. Use clamps to seal all
joints. Tin snips may be needed to cut
vent to required length.
C. Changing door swing
Available on Super-wide side-swing
and Large side-swing door models
only.
If not reversing door swing, skip ahead
to “Level and exhaust dryer” steps.
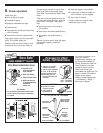
Be careful not to scratch or chip
paint.
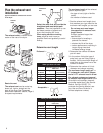
Place a large towel or soft cloth (A) on
top of dryer.
Open dryer door. Remove bottom
screws from cabinet side of hinges
(B). Loosen (do not remove) top
screws from cabinet side of hinges.
Lift door until top screws in cabinet are
in large part of hinge slot. Pull door
forward off screws. Set door (handle
side up) on top of dryer. Remove top
screws from cabinet.
Complete door swing change following
the instructions for your type door.
Carefully remove 4 hinge hole plugs
(C) on left side of cabinet. Insert plugs
into hinge holes (B) on right side of
cabinet.
Large side swing door
A
C
B
D
E
F
Insert screws in bottom
holes on left side of
cabinet. Tighten screws
halfway. Position door
so large end of door
hinge slot is over
screws. Slide door up so screws are in
bottom of slots. Tighten screws. Insert
and tighten top screws in hinges.
Remove door strike (D) from cabinet.
Remove door strike plug (E). Insert
door strike in new hole and secure
with screw. Insert door strike plug in
original door strike hole and secure
with screw.
Slowly close door and check that door
strike aligns with door catch (F). If
door does not close completely, slide
door catch left or right within slot until
strike snaps into catch.
Super-wide side swing door
B
A
D
E
C
F
Remove screws attaching hinges to
door.
Remove screws at top, bottom and side
of door. Holding door over towel on
dryer, grasp sides of outer door and
carefully lift to separate it from inner
door. Do NOT pry apart with putty knife.
Do NOT pull on door seal or plastic door
catches.


