


10
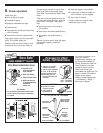
F. Exhaust dryer
4" clamp
4" clamp
Using a 4-inch clamp, connect exhaust
vent to exhaust outlet in dryer. If
connecting to existing exhaust vent,
make sure the vent is clean.
The dryer exhaust vent must fit over
the dryer exhaust outlet and inside the
exhaust hood.
Make sure exhaust vent is secured to
exhaust hood with a 4-inch clamp.
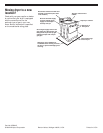
Move dryer into final position. Do not
crush or kink exhaust vent. Make sure
dryer is level.
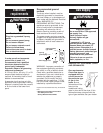
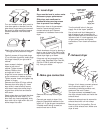
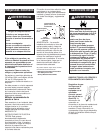
E. Make gas connection
Remove the red cap from the gas
pipe.
Connect gas supply to dryer. Use
pipe-joint compound resistant to the
action of L.P. gas for gas connections.
If flexible metal tubing is used, be
certain there are no kinks.
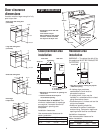
Attach door hinge to door so large part
of hinge slot is at bottom of hinge.
Carefully remove 4 hinge hole plugs
(C) on left side of cabinet. Insert plugs
into hinge holes (B) on right side of
cabinet.
Insert screws in bottom
holes on left side of
cabinet. Tighten screws
halfway. Position door
so large end of door
hinge slot is over screws. Slide door
up so screws are in bottom of slots.
Tighten screws. Insert and tighten top
screws in hinges.
Remove door strike (D) from cabinet.
Remove door strike plug (E). Insert
door strike in new hole and secure
with screw. Insert door strike plug in
original door strike hole and secure
with screw.
Slowly close door and check that door
strike aligns with door catch (F). If
door does not close completely, slide
door catch left or right within slot until
strike snaps into catch.
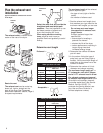
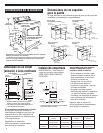
D. Level dryer
Dryer must be level to reduce noise
and assure proper performance.
Slide dryer onto cardboard or
hardboard before moving across
floor to prevent floor damage.
Move dryer close to its permanent
location. Leave enough room to
connect exhaust vent. Remove
cardboard or hardboard from under
dryer
Check levelness of dryer by placing a
level on top of dryer, first side to side,
then front to back. If dryer is not level,
adjust dryer legs up or down.
If legs are not long enough to level
dryer, order Extended Dryer Feet Kit,
Part No. 279810 (sold two legs per
kit), from your dealer.
Turn and reattach outer door panel to
inner door panel so handle is on the
side where hinges were just removed.
Be careful to keep cardboard spacer
centered between inner and outer
doors.
Turn the shutoff valve in the gas
supply line to the “open” position.
Use a brush and liquid detergent to
test all external gas connections for
leaks. Bubbles around connections will
indicate a leak. If a leak appears, shut
off gas valve controls and tighten
connections. Then check connections
again.
to dryer
manual shutoff
valve “open”
position”
rigid gas
supply line