


6
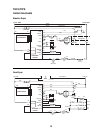
COMPONENT TESTING & DIAGNOSIS
SERVICE DIAGNOSTIC TESTS
The control must be in the STANDBY state before pressing the keypads to initiate the
diagnostic tests. To start the test routine, press the following keypads, in sequence,
within 5 seconds:
1. More Time
2. Less Time
3. More Time
4. Less Time
Once in the diagnostics, the following events will occur:
• All the LEDs will turn on and “
88
” will appear on the display. If the model identi-
fier diodes in the keyswitch do not match the configurations in the Model Identi-
fiers Table, an E3 error message will appear on the display. Make sure the cor-
rect control board is installed before continuing.
• Pressing the corresponding keys will turn off each LED and sound a beep (vol-
ume is Loud).
• When opening the door, the dryer will beep and the display will show a number,
followed by a capital “E” for electric or lower case “g” for gas. The first number
will be 7 for Whirlpool models.
• Open the door. Each actuation of the door switch will sound a beep.
• Short the moisture strips. The dryer will beep and the display will show a 2-
digit software revision code.
• Press the Start key. The heater and motor turn on, and the display reads a 2-
digit project identification code. The code for this project is “00”.
• Press the Stop/Cancel key to exit the diagnostics.
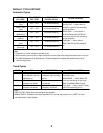
KEYPAD MATRIX
TOUCHPAD + LEAD – LEAD
Heavy Duty P3-14 P3-11
Towels / Cotton P3-14 P3-9
Normal P3-13 P3-11
Bulky Items P3-13 P3-10
Casual P3-12 P3-11
Delicate P3-12 P3-10
More Dry P3-14 P3-8
Less Dry P3-14 P3-7
Timed Dry P3-13 P3-9
Rack Dry P3-14 P3-10
Touch Up P3-12 P3-9
Temp P3-12 P3-8
Cycle Signal P3-12 P4-2
Wrinkle Shield P3-13 P3-8
More Time P3-13 P3-7
Less Time P3-12 P3-7
Stop / Cancel P3-13 P4-2
Start P3-14 P4-2