


9
8
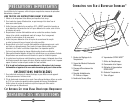
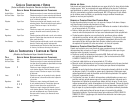
TO FILL THE WATER TANK
Always unplug the iron before filling. Set iron on its heel rest.
The water fill opening is located underneath the spill-proof cap. Hold the iron with the cap
open and fill to maximum fill line. Close the spill-proof cap on the iron. Be sure the cap
is fully sealed. Wipe the exterior of the unit to dry off any spillage.
TO EMPTY THE WATER TANK
Slide the temperature selector to the MIN position. Unplug the iron from the electrical
outlet. Open the spill-proof cap. Holding the iron over the sink, point the iron handle
down and hold in that position until water stops flowing out of the fill opening. Shake
the iron gently to loosen trapped water drops; the heat of the iron will dry the inside
of the iron. Let the iron cool on its heel rest.
IMPORTANT:
SUNBEAM DOES NOT RECOMMEND STORING THE IRON WITH
WATER IN THE TANK.
C
ARING FOR YOUR SUNBEAM IRON
•
Avoid ironing over snaps, zippers, rivets on jeans, etc., as they will scratch the soleplate.
• FOR MODELS WITH A NON-STICK SOLEPLATE, clean water marks, calcium deposits
and starch from the soleplate as follows: allow iron to cool and wipe with a soft cloth
using a mild vinegar solution (one tablespoon of vinegar in one cup of water).
DO NOT USE SCOURING PADS, ABRASIVES, OR CHEMICAL CLEANING SOLVENTS
as they may mar the finish.
NOTE:
Scratches in non-stick soleplates do not affect performance of iron.
M
AINTENANCE
Other than recommended care instructions contained in this pamphlet, no further user
maintenance should be necessary.
However, following is a list of frequently asked questions and their resolutions. If for any
reason your Sunbeam iron continues to exhibit one of these symptoms, or should require
repair for another reason, do not attempt to fix it yourself. Contact your authorized
Sunbeam Distributor.
QUESTIONS AND ANSWERS
SYMPTOM/POTENTIAL REASONS AND SOLUTIONS
Iron does not heat
• Iron should be plugged into a 120 volt, AC electrical outlet only.
• The slide control must be set at the desired temperature.
• The auto shut-off feature may have been activated. Press the power reset button
to start ironing.
Iron does not steam
• The water tank may be empty. Add water.
• Make sure the steam button is fully depressed. (On variable steam models,
the slide control must be in one of the three steam positions).
• Use only temperature settings at or above Polyester.
• Do not set to steam setting until selected temperature has been reached.
Make sure iron is pre-heated 1-1/2 – 2 minutes.
• Gently tap the soleplate on the ironing board once or twice to clear any blockage
of steam valve.
• Your iron may spit or leak water from the steam vents if you try to get steam when
the temperature setting is too low. Use only temperature settings in steam range
shown on the Temperature and Steam Guide.
Iron spits water or leaks water from steam vents
• Make sure iron has reached selected temperature before ironing. Pre-heat iron
1-1/2 – 2 minutes.
• If the iron leaks when turned OFF or while DRY ironing, make sure the steam control
is set to NO STEAM position.
• Iron may have been overfilled. Turn it off. Follow instructions for emptying the
water tank. Remove some of the water. Let iron cool, then dry it off. Replug iron
into electrical outlet and reheat. After 1-1/2 minutes, set to “steam”.
Follow USING AS A STEAM IRON instructions.
NOTE:
Always set steam control to NO STEAM position unless unit is ready
for steam ironing.