


4
5
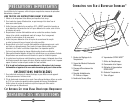
F E AT U R E S
•
SPRAY MIST
®
– Provides a fine spray mist for spot dampening. Trigger control.
•
Temperature Dial
– Controls heat output of iron. Adjust dial according to ironing
needs. For low temperatures, turn the dial to the first dot. For medium temperatures,
turn the dial to second set of dots. For high temperatures, turn dial to third set of dots.
(Refer to Ironing Guide for recommended settings).
•
Swivel Cord
– Pivots up and down and is supported to prevent dragging on fabric.
Flexible grommet protects the cord from fraying.
•
Soleplate
– Has full-length button grooves for added convenience when ironing
shirts and blouses.
•
Non-Stick Finish
– The non-stick coating on the soleplate prevents sticking
of fabrics and starch residue.
•
Sliding Water Reservoir Cover
– Prevents dust and foreign matter from
entering the water tank; stops any water spillage during ironing.
•
Cord Wrap
– Provides quick, convenient cord storage.
•
Automatic Shut-Off
– Shuts off iron after 15 minutes of operation.
•
Power Reset Button
– Press to reset.
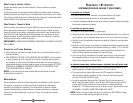
AUTO-OFF FEATURE
When the iron is plugged into a 120 V, AC electrical outlet, the steady red signal light
signals the iron is on. If the iron is left standing for 15 minutes, the iron will stop heating.
The signal light extinguishes to indicate auto shut-off and will stay out until the iron is
either reset or unplugged.
To restart iron:
To restart iron after it has shut itself off, please reset the red button.
CAUTION: DO NOT USE THE AUTO SHUT-OFF FEATURE AS A SUBSTITUTE
FOR TURNING OFF AND UNPLUGGING THE IRON WHEN NOT IN USE.
BEFORE FIRST USE
To ensure no stain is transferred to the fabric the first time you use the iron, it is advisable
to flush the soleplate steam vents to remove any residue from the manufacturing process.
To do this:
1. Set the steam adjustment control to steam (on).
2. Fill the iron’s water tank to its maximum fill line.
3. Set the temperature selector knob to its highest setting. Heat iron for 2 minutes.
4. Steam for 2 minutes while directing the steam vents away from the ironing surface.
5. Pass the iron on a damp cloth or a paper towel to clean.
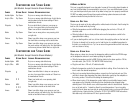
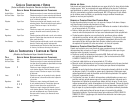
SELECTING THE CORRECT FABRIC SETTING
When ironing, use the temperature and steam settings recommended for the type of fabric
being ironed. Garments requiring low temperatures and steam should be ironed first. This
will help avoid damaging garments with an iron that is too hot. If you are not sure of the
fabric content of the garment, start with a low heat and steam setting and test the iron on
an area of the garment where it will not show, such as a seam or facing. Gradually increase
the heat and steam settings until wrinkles are removed without damaging the fabric.
When changing the temperature from a high setting to a lower setting (Example: Moving
temperature selector from maximum to minimum), allow approximately 5 minutes for the
lower temperature to be reached. The following charts are designed to help you select the
best setting and method for the fabric you plan to iron. Check garment labels and follow
recommendations given by the fabric manufacturer. For blended fabrics use the setting for
the fabric in the blend requiring the lowest temperature. For example: 65% polyester, 35%
cotton fabric. Iron this fabric at the minimum setting.