


MSSM0204AE/8332BV (1 of 1)
ÈV-BELT TENSION ADJUSTMENTS FOR 30" AND 36" B-TYPE
MACHINES AND 42" Q-TYPE MACHINES
This instruction is to be used for adjusting the belt tension on the following
machine modes:
30016BWE 42026QHE
36021BWE 42026QTG
360326QWE 42026QTH
42026QWE
A belt tension testing device (Milnor
®
part number 30T001) and a straight
edge are required when using these instructions.
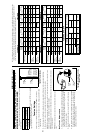
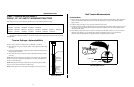
ÊTension Settings
Set the o-rings on the tension testing device (see FIGURE 1) as follows:
1. Move the upper o-ring to the topmost position, resting against the bottom
edge of the cap.
2. Find the proper belt deflection setting (by machine model and belt function) in the appropriate table below.
3. Move the lower o-ring on the tension tester to this deflection setting on the inches scale.
NOTE 1: The tension testing device is marked on the one side in inches and pounds and on the other side in cen-
timeters and kilograms. All values in the tables are marked.
NOTE 2: The instruction sheet provided with the tension testing device should not be used. Use only the instruc-
tions provided herein.
NOTE 3: The reference (ref.) codes shown in the tables are for factory use
only.
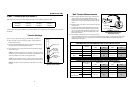
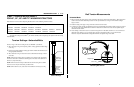
ËBelt Tension Measurements
1. Place a straight edge along the top edge of the belt to be tested so that
it spans both pulleys. Place the tension tester in the center of the belt
and press and down on the cap until the lower o-ring is in line with
the straight edge, as shown.
2. Read the setting of the upper o-ring on the LBS scale of the tension
tester.
3. Compare this value with the acceptable range in the appropriate table.
If the belt is brand new (has never been run), use the range in the In-
itial Tension column. If the belt is not brand new, locate the accept-
able range in the Final Tension column.
4. If the reading on the tension tester is less than the range shown in the table, the belt is too loose and must be
tightened. If the reading is greater than the range shown in the table, the belt is too tight and must be loos-
ened. Adjust the belt until the reading falls within the acceptable range in the table.
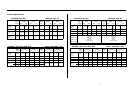
Ï30016BWE 36021BWE
Belt
Deflect.
(inches)
Initial
Tension
(lbs.) (ref.)
Initial
Tension
(lbs.) (ref.)
Belt
Deflect
(IN)
Initial
Tension
(lbs.) (ref.)
Initial
Tension
(lbs.) (ref.)
WASH/ 2
SPEED WASH
50C 5/16 6.6 – 9.2 KP3 5.1 – 7.1 KN 13/32 2.4 – 2.8 DP2 2 – 2.4 DN
60C 11/32 2.4 – 2.84 DP2 2.0 – 2.4 DN 13/32 2.4 – 2.8 DP2 2 – 2.4 DN
DRAIN 50C 5/16 9.6 – 13.0 MP3 7.4 – 10.0 MN 25/64 9.6 – 13.0 MP3 7.4 – 10.0 MN
60C 11/32 2.8 – 4.0 EP2 2.4 – 3.37 EN 13/32 2.8 – 4.0 EP2 2.4 – 3.4 EN
HIGH
SPEED
EXTRACT
50C 25/64 10.5 – 14.3 NP3 8.1 – 11.0 NN 27/64 10.5 – 14.3 NP3 8.1 – 11.0 NN
60C 25/64 8.0 – 11.0 LP3 6.2 – 8.5 LN 27/64 9.6 – 13.0 MP3 7.4 – 10.0 MN
LOW
SPEED
EXTRACT
50C 11/64
9.0 – 13.0 MP3 7.4 – 10.0 MN
11/64
6.6 – 9.2 KP3 5.1 – 7.1 KN
60C 5/32 11/64
Ï36026QWE 42026QWE
Belt
Deflect.
(inches)
Initial
Tension
(lbs.) (ref.)
Initial
Tension (lbs.)
(ref.)
Belt
Deflect
(IN)
Initial
Tension
(lbs.) (ref.)
Initial
Tension
(lbs.) (ref.)
WASH/ 2
SPEED WASH
50C 13/32
2.4 – 2.84 DP2 2.0 – 2.4 DN
11/32 9.6 – 13.0
MP3
7.4 – 10.0
MN
60C 13/32 23/64
2.8 – 4.0
DRAIN 50C 25/64 9.6 – 13.0 MP3 7.4 – 10.0 MN 23/64
EP2 2.4 – 3.4 EN
60C 13/32 2.8 – 4.0 EP2 2.4 – 3.34 EN 23/64 10.5 – 14.3
HIGH
SPEED
EXTRACT
50C 7/16 9.6 – 13.0 MP3 7.4 – 10.0 MN 7/16 9.6 – 13.0 NP3 8.1 – 11.0 NN
60C 7/16 8.0 – 11.0 LP3 6.2 – 8.5 LN 7/16 9.6 – 13.0 MP3 7.4 – 10.0 MN
LOW
SPEED
EXTRACT
50C 3/16
9.6 – 13.0 MP3 7.4 – 10.0 MN
1/4
6.6 – 9.2
MP3 7.4 – 10.0 MN
60C 3/16 1/4 KP3 5.1 – 7.1 KN
Ï42026QHE, QTG, QTH
Belt Defl.
(inches)
Initial Tension
(lbs.) (ref.)
Final Tension
(lbs.) (ref.)
WASH/
2 SPEED WASH
19/64 9.62 – 13.0 MP3 7.4 – 10.0 MN
DRAIN 5/32 10.5 – 14.3 8.1 – 11.0
MAIN 50C 31/64 10.5 – 14.3 NP3 8.1 – 11.0 NN
60C 15/32
OPTIONAL LOW
SPEED EXRACT
19/64 8.0 – 11.0 LP3 6.2 – 8.5 LN
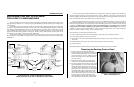
Upper
o-ring
Deflection
Force Scale
(Read Down)
Deflection Dis-
tance Scale
(Read Up)
Lower
o-ring
ÎFIGURE 1
(MSSM0204AE)
ÎTension Tester Scales
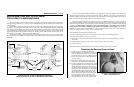
Lower
o-ring
Straight
Edge
ÎFIGURE 2
(MSSM0204AE)
ÎTaking Measurements with the
Tension Tester
2