


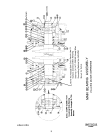


inspection plate and use a timber to pry up the cylinder to remove cylinder weight from the bearings. Once
the bearing is removed, the cylinder drops only approximately 1/32" before the shaft comes to rest on the
shaft support.
4. Slide the bearing off of the shaft and if it is to be reused, place it on a clean surface and cover with a clean,
lint free cloth.
ÊRemoving the Bearing Housing (Bearing and Seal
Carrier), Seal Sleeve, and Seals (Front or Rear)
These procedures require the use of a pulling fixture and guide rods available from the Milnor
®
factory. With
the bearing cover (or shaft seal holder) and the bearing removed, proceed as follows:
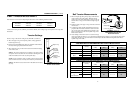
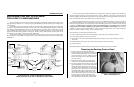
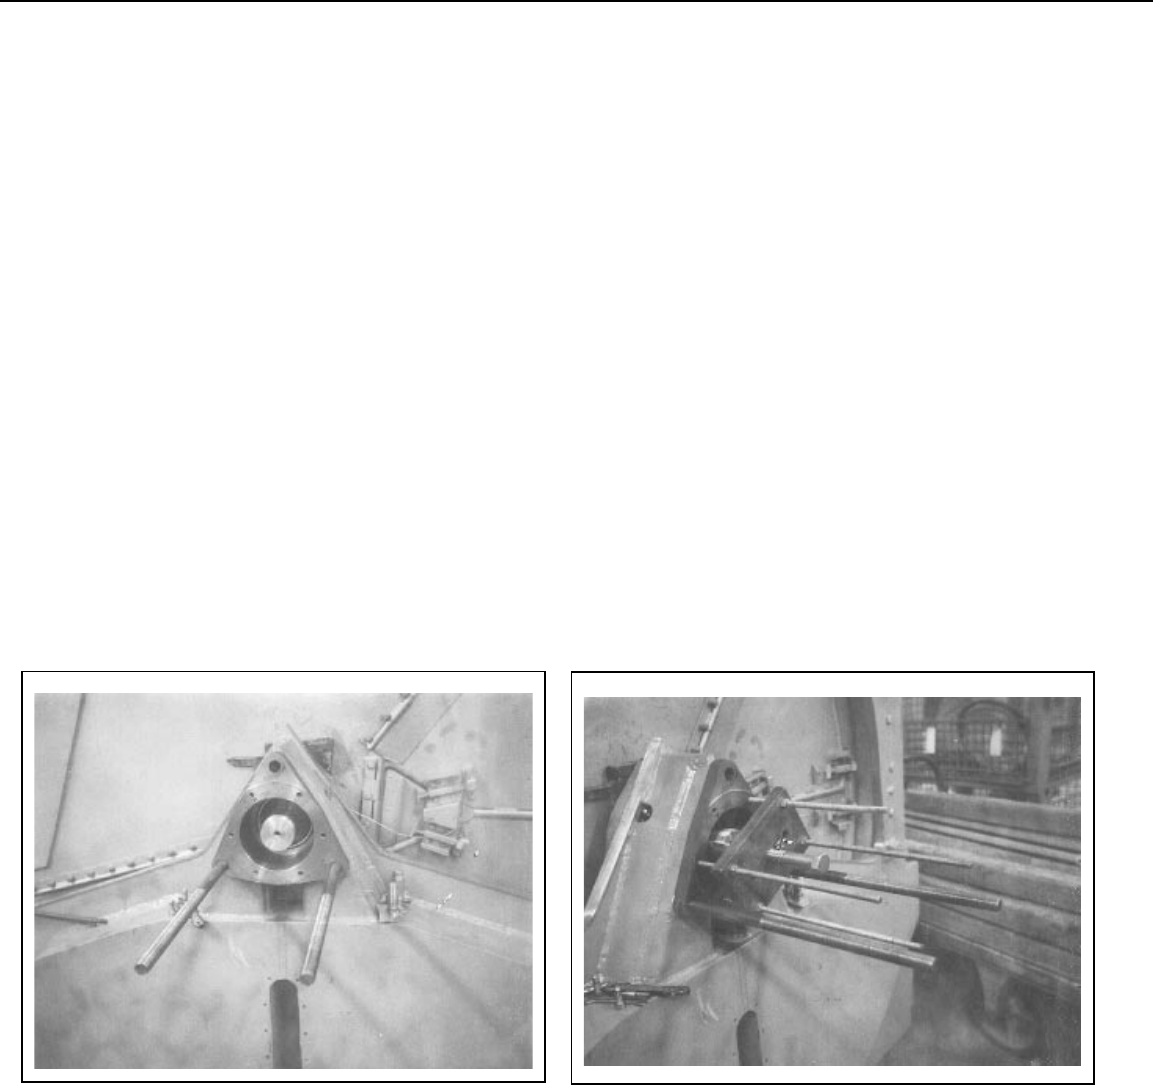
1. Remove the three bearing housing cap bolts and the grease lines from the bearing housing front plate. Install
guide rods in two of the bolt holes, as shown in FIGURE 3.
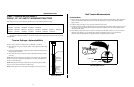
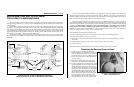
2. Install the pulling fixture as shown in FIGURE 4, by placing each of the four threaded rods through a hole in
the steel plate with hexnuts to the outside of the plate then screwing each rod into the appropriate tapped
hole in the bearing housing (same holes as used to mount the bearing cover or shaft seal holder).
NOTE: Step 2a or 2b below will cause the bearing housing to slide away from the shell. Shims were placed
under one or more of the three bearing housing pads during factory assembly to align the housing and insure
its being exactly parallel with the shaft. When removing the bearing housing, be sure to keep these shims
separate and identified so that they may be returned to their proper location, otherwise the bearing
and seal will be out of line and may be damaged after a short operating period. As a precaution in case
the shims are lost during disassembly, you will find stamped next to the bearing housing the proper thickness
of shims required (if any) under each adjacent bearing housing pad. The stamped number indicates the shim
thickness in thousandths of an inch. For example, the number “38” indicates that 38/1000 (.038") shims
would be required under this pad.
2a. Tighten all four hexnuts on the threaded rods such that the pulling fixture plate is pressed against the shaft
end. With an impact wrench, tighten down on the center bolt until the housing slides out, or
2b. If no impact wrench is available, simply continue to tighten down on each of the four hexnuts behind the
pulling fixture plate, alternately and progressively, until the housing slides out. It may be necessary to place
a spacer (approx. two inches long) between the plate and the shaft to provide enough clearance between the
plate and the bearing housing.
3. Once the bearing housing is free of the shell, carefully slide it off of the guide rods and place on a clean work
surface.
4. The seal sleeve will almost always remain on the shaft when the housing is removed. Remove the seal sleeve
taking care not to damage or scar it and place it on a clean work surface.
ÊPrecautions for Bearing Replacement
The most important ingredient in successful bearing and seal installation is cleanliness. The bearing housing
must be free of all foreign matter. The grease and leak-off passages must be blown clear and all foreign matter
removed. You must have a clean work area. Keep your hands and tools free from grit and grime. Wash your hands
before starting and as required during these procedures. Foreign matter is, without doubt, the most frequent cause
of bearing failure, and one over which the manufacturer has no control.
Where cleaning is required, bearings, bearing housings and seal sleeves may be cleaned with the following
solvents or cleaning agents (in strict accordance with the manufacturer’s recommendations as such substances are
generally toxic and/or explosive under certain conditions):
Benzene
Chlorethane
Freons
Gasoline
Kerosene
Mineral Spirts
Naptha
Tricholorethylene
Do not, however, expose any components to the above substances for more than 24 hours and only use at room
temperature. Never use the following solvents or cleaning agents: alcohols, cresols, phenols, flouro propanols, or
other similar chemicals or mixtures.
NOTE: Hammer blows, overheating, or improper use of force can damage precision parts.
ÎFIGURE 3 (MSSM0303AE)
ÎTwo Bearing Housing Guide
Rods in Position
ÎFIGURE 4 (MSSM0303AE)
ÎBearing Housing Pulling
Fixture in Position
12