


15
1
2
3
4
5
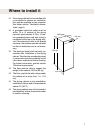
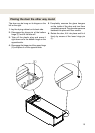
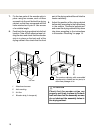
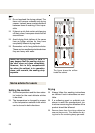
1. Keep the adhesive tape on the door until the
drying cabinet is in place. Place the cabinet
so that its front is properly aligned with the
cabinetry facing.
2.
Plug the connection cord into the socket and
take care to be sure that the cord is not stuck
and can easily be unplugged.
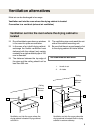
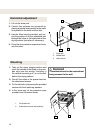
3. Take off the adhesive tape and open the
door. Draw out the upper hanging section.
Measure and note down the distance bet-
ween the back wall of the drying cabinet
and the wall behind the drying cabinet. See
fi gure Measurement ’A’.
4. Mark the position of the holes on the back
wall with a pencil.
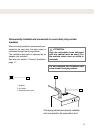
5. Push back the hanging section, shut the
door and hold it in place with adhesive tape.
Pull out the entire drying cabinet.
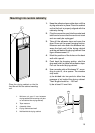
6. Use a wooden strip of thickness “A”, accor-
ding to point 3, as a spacer. The wooden
strip must:
a) be divided into two parts to allow free
passage of air behind the drying cabinet.
Their length should be ~150 mm
b) be at least 10 mm thick.
Place the drying cabinet so that its
front fi ts well into the cabinet mounting
unit.
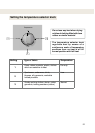
1. Minimum air gap 10 mm between
drying cabinet and mounting unit (abo-
ve and behind the drying cabinet)
2. Tape measure
3. Assembly holes
4. Drying cabinet back wall
5. Wall behind the drying cabinet
Mounting into custom cabinetry