


15
ENGLISH
#FGPSFZPVCFHJO
The door reversal procedure consists of four main parts:
t3FNPWJOHBOESFJOTUBMMJOHUIFEPPSBOEIJOHFT (steps
BOE
t3FNPWJOHBOESFWFSTJOHDPNQPOFOUTPOUIFESZFS
DBCJOFUTUFQ
t3FNPWJOHBOESFWFSTJOHDPNQPOFOUTPOUIFdoor
DPWFSTUFQTBOE
t3FNPWJOHBOESFWFSTJOHDPNQPOFOUTinside the door
TUFQTUISPVHI
5PPMT3FRVJSFE
t1IJMMJQTTDSFXESJWFS
t-BSHFGMBUCMBEFTDSFXESJWFS (recommended for hinge
screws if they are tight or your Phillips screwdriver is
worn)
t4NBMMGMBUCMBEFTDSFXESJWFS (for lifting out parts)
W
WARNING
t5PBWPJEEBNBHFUPUIFESZFSPSUIFEPPSTVQQPSU
UIFEPPSXJUIBTUPPMPSCPYUIBUGJUTVOEFSUIFEPPS
PSIBWFBOBTTJTUBOUTVQQPSUUIFXFJHIUPGUIFEPPS
t"WPJEESPQQJOHUIFEPPSUPBWPJEEBNBHFUPUIF
EPPSPSUIFGMPPS
t6OQMVHUIFESZFSPSUVSOPGGQPXFSBUUIFNBJO
DJSDVJUCSFBLFSCFGPSFCFHJOOJOHEPPSSFWFSTBM
t5)&%3:&3%003*47&3:-"3(&"/%)&"7:
'BJMVSFUPGPMMPXUIFJOTUSVDUJPOTCFMPXDBOSFTVMUJO
EBNBHFUPUIFESZFSQSPQFSUZEBNBHFPSQFSTPOBM
JOKVSZ
*OTUSVDUJPOT
NOTE
The door reversal procedure for the two-way door
is far more complex than for a conventional dryer
door. It is recommended that you read through these
instructions in their entirety before beginning the
process, in order to gauge whether you prefer to have
the procedure done by a professional installer or
service person.
NOTE
The instructions here are for changing the door swing
from a right to a left side hinge. If the door has been
reversed, and it is necessary to change it back, use
care when following these instructions. Some of
the illustrations and the left/right references will be
reversed, and you will need to read the instructions
carefully.
W
WARNING
#FTVSFUPTVQQPSUUIFXFJHIUPGUIFEPPSCFGPSF
removing the hinge screws.
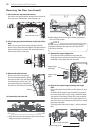
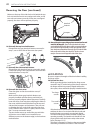
0QFOUIFEPPSGSPNUIFTJEFTPUIBUUIFIJOHF
TDSFXTBSFBDDFTTJCMF
3FNPWFUIFGPVSIJOHFTDSFXT
While supporting the door, remove the four hinge
screws, two from each hinge. Set the door aside face
down on a protected surface to prevent damage to
the door or the work surface.
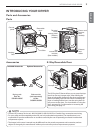
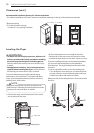
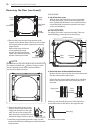
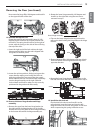
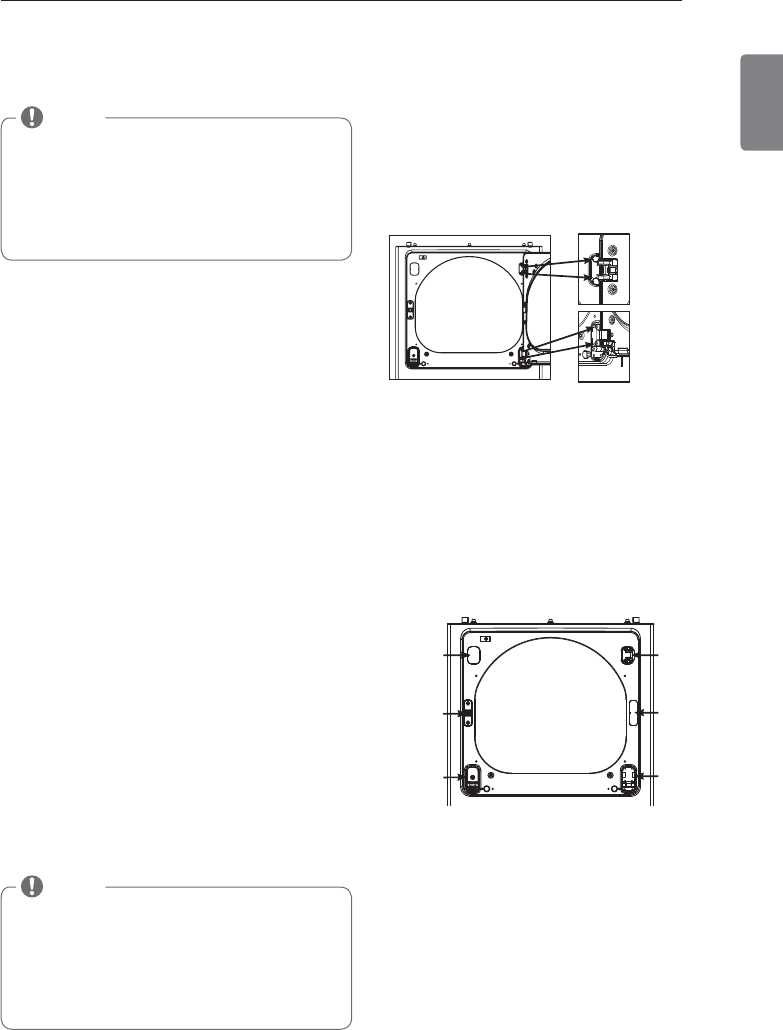
3FWFSTFUIFDPNQPOFOUTPOUIFDBCJOFU
a. Use a Phillips screwdriver to remove the two screws
and the latch mechanism on the front panel of the
cabinet.
b. Remove the latch hole cover by gently prying it
up with a flat blade screwdriver, being careful not
to scratch the paint. Install the latch hole cover on
the opposite side, where the latch mechanism was
removed. Install the latch mechanism in the position
from which you removed the latch hole cover, using
the two screws removed in step a.
c. Remove the hinge cover by gently prying it up with
a flat blade screwdriver, being careful not to scratch
UIFQBJOU3PUBUFUIFIJOHFDPWFSEFHSFFTBOE
install it on the opposite side, where the upper hinge
was attached.
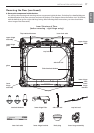
Reversing the Door
Two large
screws
Two small
screws
INSTALLATION INSTRUCTIONS
upper
hinge
hinge
cover
latch hole
cover
latch
mechanism
hinge
bracket
hinge