


7
INSTALLATION REQUIREMENTS
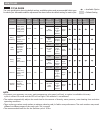
KEY DIMENSIONS AND SPECIFICATIONS
CHOOSE THE PROPER LOCATION
CLEARANCES
FLOORING
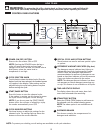
WARNING
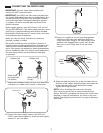
•This washer is heavy. Two or more people are
required when moving and unpacking the washer.
Failure to do so may result in damage to property or
serious bodily harm.
•Store and install the washer where it will not be
exposed to temperatures below freezing or exposed
to outdoor weather conditions. Failure to follow this
warning can cause serious injury, re, electric shock,
or death.
•Properly ground washer to conform with all electric
governing codes and ordinances. Failure to follow this
warning can cause serious injury, re, electric shock, or
death.
•To reduce the risk of electric shock, do not install the
washer in humid spaces. Failure to follow this warning
can cause serious injury, re, electric shock, or death.
• Toensureproperairow,donotblockthelarge
opening on the bottom of the washer with carpeting
or other materials.
•Do not remove ground prong. Do not use an adapter
or extension cord. Plug into a grounded 3-prong
outlet. Failure to follow this warning can cause serious
injury, re, electric shock, or death.
PowerOutlet
• The power outlet must be within 60 in. (1.5 m) of either
side of the washer.
• The appliance and outlet must be positioned so that
the plug is easily accessible.
• Do not overload the outlet with more than
one appliance.
• The outlet must be grounded in accordance with
current wiring electric codes and regulations.
• Time-delay fuse or circuit breaker is recommended.
NOTE: It is the personal responsibility and obligation of
the product owner to have a proper outlet installed by a
qualied service technician.
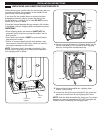
To ensure sucient clearance for water lines and airow,
allow minimum clearances of at least 1 in. (2.5 cm) at the
sides and 4 in. (10 cm) behind the unit. Be sure to allow
for wall, door, or oor moldings that may increase the
required clearances.
Allow at least 21 ¼ in. (54 cm) in front of
the washer to open the door.
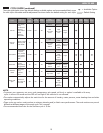
NOTE: The oor must be strong and rigid enough to
support the weight of the washer, when fully loaded,
without exing or bouncing. If your oor has too much
ex, you may need to reinforce it to make it more rigid.
A oor that is adequate for a top-loading washer may
not be rigid enough for a front loading washer, due to
the dierence in the spin speed and direction. If the
oor is not solid, your washer may vibrate and you may
hear and feel the vibration throughout your house.
• To minimize noise and vibration, the washer MUST be
installed on a solidly constructed oor. See the NOTE
to your right.
• Allowable slope under the entire washer is a maximum
1 in. dierence from side to side or from front to back.
• Installing on carpeting and soft tile surfaces is
not recommended.
• Never install the washer on a platform or weakly
supported structure.
Description Front-Loading Washer
Rated Voltage/Frequency 120VAC, 60Hz
Dimensions 26 ¼ in. (W) X 30 ⅓ in. (D) X 38
15
/16 in. (H), 54 ⅜ in. (D, door open)
66.8 cm (W) X 76.8 cm (D) X 98.5 cm (H), 138.1 cm (D, door open)
Net Weight 215.8 lbs (97.9 Kg)
24
1
/
8
"
(61.3 cm )
30
1
/3"
(76.8 cm )
4"
(10 cm )
54
3
/
8
"
(138.1 cm )
1"
(2.5 cm )
1"
(2.5 cm )
26
1
/4"
(66.8 cm )
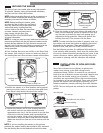
Drain Hose Extension
P/N 5215ER2002K
D26 17002 (White)
D26 17008 (Ginger)
D26 17009 (Chili pepper)
Stacking kit (For dryer)
WDP3RW (White)
WDP3R (Wild Cherry Red)
WDP3R (Platinum)
Pedestal