


10
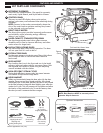
Drain Hose Extension
P/N 5215ER2002K
Drain Hose
Floor Drain
INSTALLATION INSTRUCTIONS
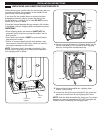
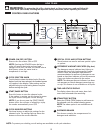
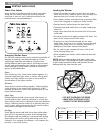
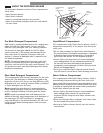
CONNECTING THE DRAIN HOSE
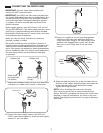
CONNECT TO THE POWER SUPPLY
• The drain hose should always be properly secured.
Failure to properly secure the drain hose can result in
ooding and property damage.
• Do not install the end of the drain hose higher than 96
in. (243.8 cm) above the bottom of the washer.
• The drain must be installed in accordance with any
applicable local codes and regulations.
• Make sure that the drain hose is not stretched, pinched,
crushed, or kinked.
Install the end of the drain hose into the elbow bracket.
Do not extend the drain hose more than 4 inches past the
end of the elbow bracket. Use a tie strap to secure the
drain hose in place.
NOTE:
• Total height of the hose end should not exceed 96 in.
(243.8 cm) from the bottom of the washer.
• The drain hose should be inserted no more than 8–12
inches into the standpipe. Inserting more than 8-12
inches can cause mold or microorganisms to spread to
the inside of the washer.
NOTE:
A drain hose extension kit is
available if the drain hose is not
long enough. Do not extend the
drain hose more than 6 feet, as
this will cause poor draining,
which will result in poor wash
and spin performance.
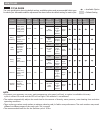
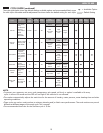
Option1:Standpipe
Option2:LaundryDrum
Option3:FloorDrain
The elbow bracket should be installed near the end of
the drain hose. Hang the end of the drain hose over the
side of the utility sink. Use a tie strap to secure the drain
hose in place.
Insert the end of the drain hose into the oor drain.
If possible, secure the hose to prevent it from moving or
coming out of the drain.
Washer should be plugged into a 120-VAC, 60-Hz
grounded 3-prong outlet.
Plug in the washer.
Drain Hose
Tie Strap
Elbow
Utility Sink
Bracket
Drain Hose
Elbow Bracket
Tie
Strap
Elbow
Tie
Strap
Drain Hose
Bracket