


CONNECTING THE WATER LINES
• IMPORTANT: Use new hoses when installing the washer.
Do NOT reuse old hoses.
• IMPORTANT: Use ONLY the inlet hoses provided with this
laundry product. Aftermarket hoses are not guaranteed to
fit or function correctly. Other hoses may not tighten
correctly and could cause leaks. Subsequent damage to
product or property will not be covered under the terms of
the product warranty.
• Water supply pressure must be between 14.5 PSI and 116
PSI (100~800 kPa). If the water supply pressure is more
than 116 PSI, a pressure reducing valve must be installed.
• Periodically check the hose for cracks, leaks, and wear,
and replace the hose if necessary.
• Make sure that the water lines are not stretched, pinched,
crushed, or kinked.
• The washer should never be installed or stored in a
location subject to freezing temperatures. Damage to the
water lines and internal mechanisms of the washer can
result. If the washer was exposed to freezing temperatures
prior to installation, allow it to stand at room temperature
for several hours before use and check for leaks prior to
operation.
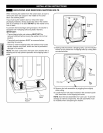
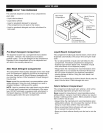
f
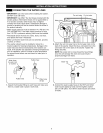
For cold water For hot water
Water Inlets
2. Attach the red, hot water line to the hot water inlet on the
back of the washer. Attach the blue, cold water line to the
cold water inlet on the back of the washer. Tighten the
fittings securely.
NOTE: Be careful not to cross-thread the hose fittings
since this will damage the valve and could result in
property damage from leaks.
f-
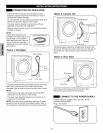
Water Hose
(to waterinlet
on washer) X
Rubber Seal
Rubber Seal
1. Inspect the threaded fitting on each hose and make sure
there is a rubber seal in place in both ends.
Water Hose
(to tap)
,J
WaterTap
3. Connect the water supply hoses to the HOT and COLD
water faucets tightly by hand and then tighten another
2/3 turn with pliers. Turn ON the water faucets and check
for leaks.
ilii liiiiiiiiHiiii
9