


WARNINGS
●
Before using appliance,
remove transit brackets,
clamps and screws
Retain parts for future
transportation.
Replace work top lid and 3
screws.
Remove 3 screws and front
transit bracket, retain.
Remove 4 screws and rear
transit bracket, retain.
From rear of appliance, grip
sides of work top lid, lift, slide
and pull towards you.
Slide and push work top lid into
position, ensuring front edge is
correctly located into console.
Remove 3 screws from back of
work top lid, retain.
Fig 2
Fig 1
1
2
3
4
5
6
Remember you may be
charged for a service call
if a problem with your
appliance is caused by
incorrect installation or
misuse.
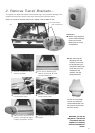
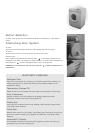
2. Remove Transit Brackets...
Your appliance is fitted with internal transit brackets (Fig 1) which prevents damage to the
appliance during transit. Remove parts (Fig 2) following the instructions below.
Note: It is normal for the door seal to look creased, it will not affect its use.
Front Transit Bracket
Rear Transit Bracket
5
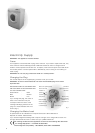
●
After removing the
packaging from the
machine, ensure that
the polystyrene pyra-
mid (shown below) has
come away from the
underside of the
machine, with the
polystyrene base.
If it has not come away,
remove it by tilting the
machine backwards until
the pyramid can be seen
and then remove.