


8 9
Using Attachments
NOTE:Wheninstallingorchangingattachments,besuretheunitisoff,unplugged,andno
steamisbeingreleasedtoavoidcontactwithhotwater.
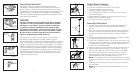
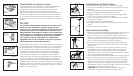
1.Fabric Brush
Helpsopenthefabricforgreatersteampenetration.
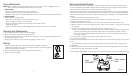
-Attachthefabricbrushontothesteamnozzle(Fig.3).
-Movethefabricbrushinadownwardmotionfromtoptobottomgentlybrushingthefabric.
2.Crease Clamp
Helpscreateastraightcrease
-Attachthecreaseclamptothesteamnozzle(Fig.5).
-Pushthetriggertoopenthecreaseclamp.
-Placethegarmentbetweenthecreaseclampandsteamnozzle.
-Releasethetrigger.
-Movethecreaseclampinadownwardmotionfromtoptobottomtosetacrease.
Cleaning and Maintenance
1.Besurethesteameristurnedoffandunplugged.
2.Allowthesteamertocoolforatleast30minutes.
3.Emptyanyexcesswaterfromthewatertankandallowittoairdrybeforereplacingthecap
andsettingitbackintheunit.
4.Emptyexcesswaterfromthereservoirbytippingunitoverasink.
Storing
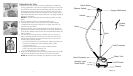
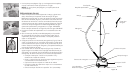
1.Openthe3clips(Fig.2)onthetelescopicpoleandglideitslowlyto
collapsebeingcarefulnottopinchyourfingers.Whenitisallthewaydown
closethe3clipsbackintoplace.
2.Coilthehoseandplaceonthehangerattachment(Fig.9)
3.Storeinacool,dryplace.
Removing Mineral Buildup
Onecommonproblemwithsteamersismineralbuildupcausedbythehighmineralcontent
inmanymunicipalwatersupplies.Mineralresidueinsideoftheinternalpipesandheatercan
causeintermittentsteamingorinseverecasesnosteamingatall.
Thebestwaytoavoidthisistousede-mineralizedordistilledwaterintheunit.Theprocedure
belowcanbeusedtoclearmineralbuildup.Ifyouareunabletousede-mineralizedordistilled
waterwerecommendyouusethisprocedureevery30hoursofoperationtohelpavoidmineral
buildup.
1.Turntheunitoffandunplugthepowercord.
2.Unscrewandremovethehosefromthehoseconnectoronthetopoftheunit.
3.Removethepolefromtheunit.
4.Removethewatertankfromthemainunitanddrainanywaterintheunitoverasink.
5.Makeamixtureof4oz.whitevinegarand4oz.water.Inmostcases1cupofthismixturewill
besufficient.
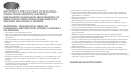
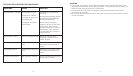
6.Slowlypourthewater-vinegarmixtureintothehoseconnector(Fig.11).
a.Iftheinternalpipingisonlypartiallyblockedbymineralbuildup,thewater-vinegarmixture
willsoonstartflowingoutofthewaterintakehole.Ifthishappensproceedtostep8.
b.Iftheinternalpipingiscompletelyblocked,continuetopourthemixtureintothehose
connectoruntilfull.
7.Pourthewater-vinegarmixtureintothewaterintakeholeuntilfull.
8.Letstandfor40minutes.
9.Drainthewater-vinegarmixturefromhoseconnectororthereservoirbytippingtheunitovera
sink.
Pourcleanwaterthroughthehoseconnectorandwaterintakeholeuntilthevinegarsmell
dissipates.
Draintheresidualwaterfromhoseconnectororthereservoirbytippingtheunitoverasink.
Reassembletheunitandoperatenormally.
Iftheprocedureabovedoesnotreturntheunittonormaloperation,theunitmayneedservicing.
10.
11.
12.
Hose
Connector
Water Intake
Hole
Figure 11
Figure 9