


4 5
Grounding Instructions
Thisproductmustbegrounded.Ifitshouldmalfunctionor
breakdown,groundingprovidesapathofleastresistanceforthe
electriccurrenttoreducetheriskofelectricshock.Thisproductis
equippedwithacordhavinganequipmentgroundingconductorand
agroundingplug.Theplugmustbepluggedintoanappropriate
outletthatisproperlyinstalledandgroundedinaccordancewithall
localcodesandordinances.
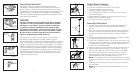
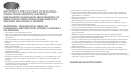
DANGER
Improper connection of the equipment-grounding conductor
can result in a risk of electric shock. Check with a qualified
electrician or serviceman if you are in doubt as to whether
the product is properly grounded. Do not modify the plug
provided with the product - if it will not fit the outlet, you may
temporarily use an adapter (such as the one shown in Figure
B) until you have a proper outlet (such as the one shown in
Figure C) installed by a qualified electrician.
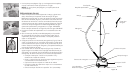
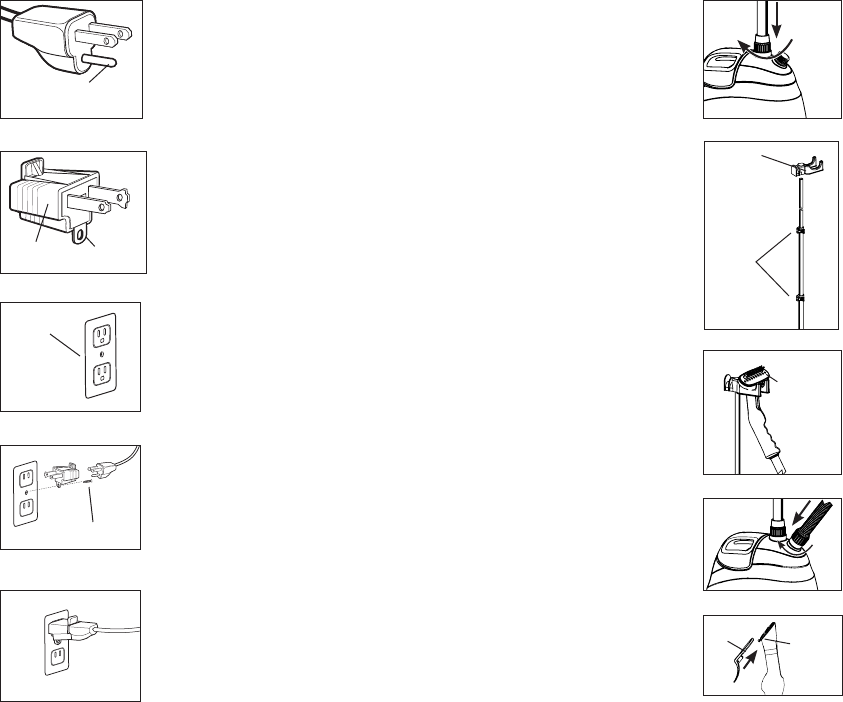
Thisproductisforuseonanominal120-voltcircuit,andhasa
groundingplugthatlooksliketheplugillustratedinFigureA.
AtemporaryadapterthatlooksliketheadapterillustratedinFigureB
maybeusedtoconnectthisplugtoa2-polereceptacleasshownin
FigureDifaproperlygroundedoutletisnotavailable.Thetemporary
adaptershouldbeusedonlyuntilaproperlygroundedoutletFigure
Ccanbeinstalledbyaqualifiedelectrician.Thetabforgrounding
screwFigureBextendingfromtheadaptermustbeconnectedtoa
permanentgroundsuchasaproperlygroundedoutletboxcover.
Whenevertheadapterisused,itmustbeheldinplacebyametal
screw.SeeFiguresDandE.
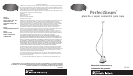
Perfect Steam Features
• Safeforuseonalltypesoffabrics
• Quickheat-upfeatureemitssteamin45seconds
• Convenientintegratedgarmenthanger
• Telescopingdesignforcompactstorage
• 5footflexiblehosewithSafeTouch
®
hosecoverforsafeand
comfortablehandling
• Easy-fillwatertankprovides45minutesofcontinuoussteam
• Rollingcastersforexcellentmobility
• Lowwaterautoshut-offforsafeuse
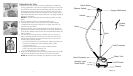
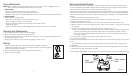
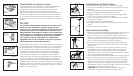
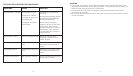
Assembly Instructions
1 Carefullyremoveallcontentsfrompackagingandinspectthe
producttomakesureallcomponentshavebeenreceived
(Fig.10).
2.Insertpoleintotopofunit.Matchthegroovesonthepolewiththe
notchesinthepoleconnectorandpushdown.Securelytighten
thenutonthepoleovertheconnectorbyturningitclockwise
(Fig1).
3.Toattachthehangerattachment,aligntabsinhangerattachment
withgroovesonpoleandpushdown(Fig.2).
4.Fullyextendthetelescopicpole.Todoso,openthe3clipsonthe
poleandpullthepoleupwards(Fig.2).Whenfullyextendedclose
theclips.Makesurethatthepoleissecurelylockedintoplace
andcannotbepusheddownward.
5.Attachthefabricbrushtothenozzlebysettingintoplace(Fig.3).
6.Attachhandle&hoseassemblytounit.Lineupthenutonthe
hosewiththescrewonthehoseconnector.Turnnutclockwise
untilitissecurelytightenedonthehoseconnector,(Fig4).It
shouldbetightlyscrewedintoplace.Thenyoumayhangthe
steamerhandleontothehangerattachment(Fig.3).
NOTE:Donothangthehoseonthehangerattachmentuntilafter
ithasbeenconnectedtothebasetopreventthehosefromfalling
onyou.
7.Attachthecreaseclamp(Fig.5)ontothenozzletabandgently
pushintoplace.
NOTE:Donotusethecreaseclampandthefabricbrushatthe
sametime
Pole
Turn
Turn
Nozzle
Tab
Crease
Clamp
Clips
Hanger
Attachment
Grounding Pin
Adapter
Tab for
Grounding
Screw
Figure A
Figure B
Figure D
Figure C
Figure E
Grounded
Outlet
Metal Screw
Fabric
Brush
Figure 1
Figure 2
Figure 3
Figure 4
Figure 5