24
25
3WPL090501
■
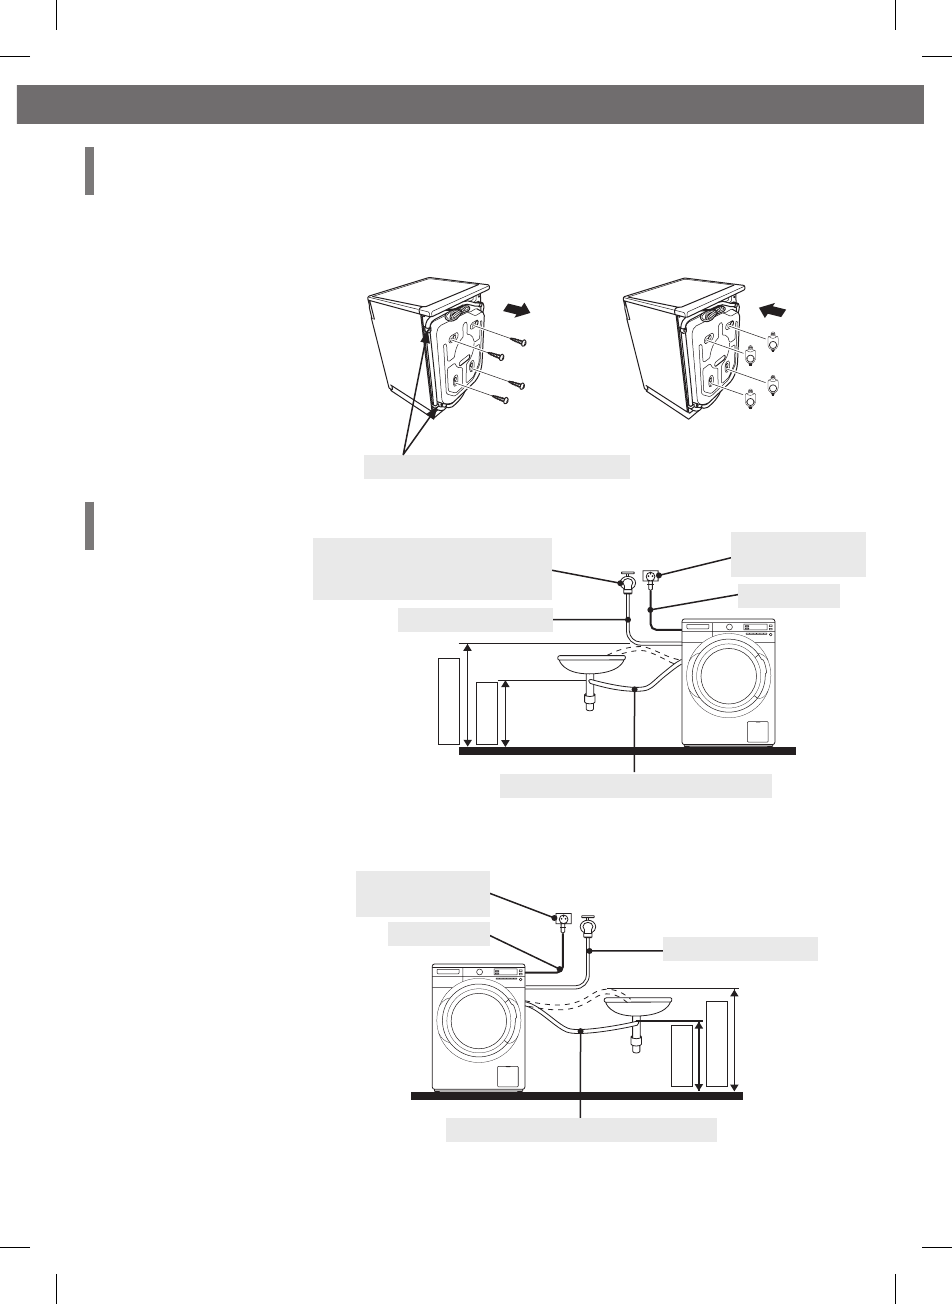
Remove the four transport bolts and insert the cover caps using the
packed-in 13 mm box spanner.
■
The transport bolts must always be removed before using the washing
machine for the rst time and must be retained for any subsequent
transport (e.g. when moving).
Insert the
cover caps
Do not remove these hose holders.
Remove the
transport bolts
●
Connection on the left side
Water Drain Hose (Approx. 105 cm)
min 60 cm
max 100 cm
Power Supply
(220-240V 50Hz)
Power Cord
Water Supply Hose
●
Optimum Water Pressure :
(30kpa ~ 800kpa)
●
Use cold water from the tap
■
The washing machine is heavy. Use caution when lifting it.
■
When lifting the washing machine, do not hold the jog dial or the
detergent dispenser casing. Lift the washing machine with two persons
holding the bottom and the back of the washing machine.
■
Frozen hoses may tear/burst. Do not install the washing machine in
areas where there is a risk of freezing, or outdoors.
■
If the power supply plug is damaged, in order to avoid hazard, it
must only be replaced by an authorized service agent or repair shop
appointed by the manufacturer.
■
Make sure to earth the unit. Failure to earth the unit may cause electric
shock if an electric leak takes place.
W:600 mm
H:850 mm
(*820 mm)
D:624 mm
D:600 mm
(*Height without worktop for under-counter installation)
■
Install the appliance on a at hard oor to avoid excessive vibration and
noise.
■
Do not install the unit in humid places such as a bathroom or places
that are exposed to wind and rain.
■
Keep the minimum installation distance from the walls to prevent
abnormal sound and vibration.
(Side)
At least 3 mm
(Back)
At least 3 mm
(Side)
At least 3 mm
● Connection on the right side
min 60 cm
max 100 cm
Power Supply
(220-240V 50Hz)
Water Drain Hose (Approx. 160 cm)
Water Supply Hose
Power Cord
How to Install the Washing Machine
How to Install the Washing Machine
Removing the
transport bolts
Hose and cable
length


