


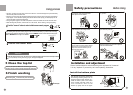
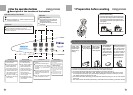

Adjust the Installation position
The largest allowed slope of the shank base of the machine is 2 . The slanting or rough ground will result in
unstable running or stoppage of the machine. Please adjust it with following methods:
Confirm it's horizontal
Hang the plumb to confirm it's horizontal
Adjust the adjustable foot
(1) To twist the adjustable foot at the right front of
the cabinet (front the sight of front), please first
lift up the side of the foot slightly, loosen the
adjustable nut, and twist the foot.
(2) Fasten the nut after adjustment.
Loosen
Fasten
High
Low
adjustable nut
adjustable foot
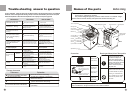
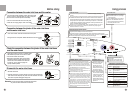
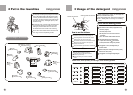
1.The height of the drain hose shall be
less than 10cm, or the drainage will not
be smooth, and cost such long time that
the machine may stop at mid way.
2.Do not ramp or press the drain hose.
3.If the drain hose is too long, cut it at mid
point. To make smooth drainage, cut the
front end of the hose slantingly.
4.If extra drain hose is needed, please
make separate purchase. The inner
diameter of the extra hose shall not
less than 30mm, and the length shall
not exceed 1.5m.
Usage of the drain hose
The drain hose shall drain smoothly
5.If the extra hose is too long, cut it
either atA or at B point.
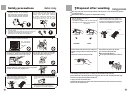
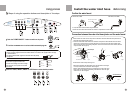
How to change the direction of the drain hose
1.Lean the machine down gently with the front
surface facing the ground. Loosen the eight
screws by a cross screwdriver.
3.Extend the drain hose from the right side. Push the
drain hose into the groove with hands.
4.Install the bottom plate (as per indicated before),
then lift the machine up gently.
2.Pull out the drain hose from the groove at the left side.
Back
Front
Bottom plate
Soft item
Use groove at
this side after
direction changing
Page 3
Before Using
Before Using
4
Page 9
Page 11
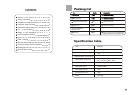
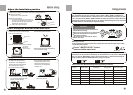
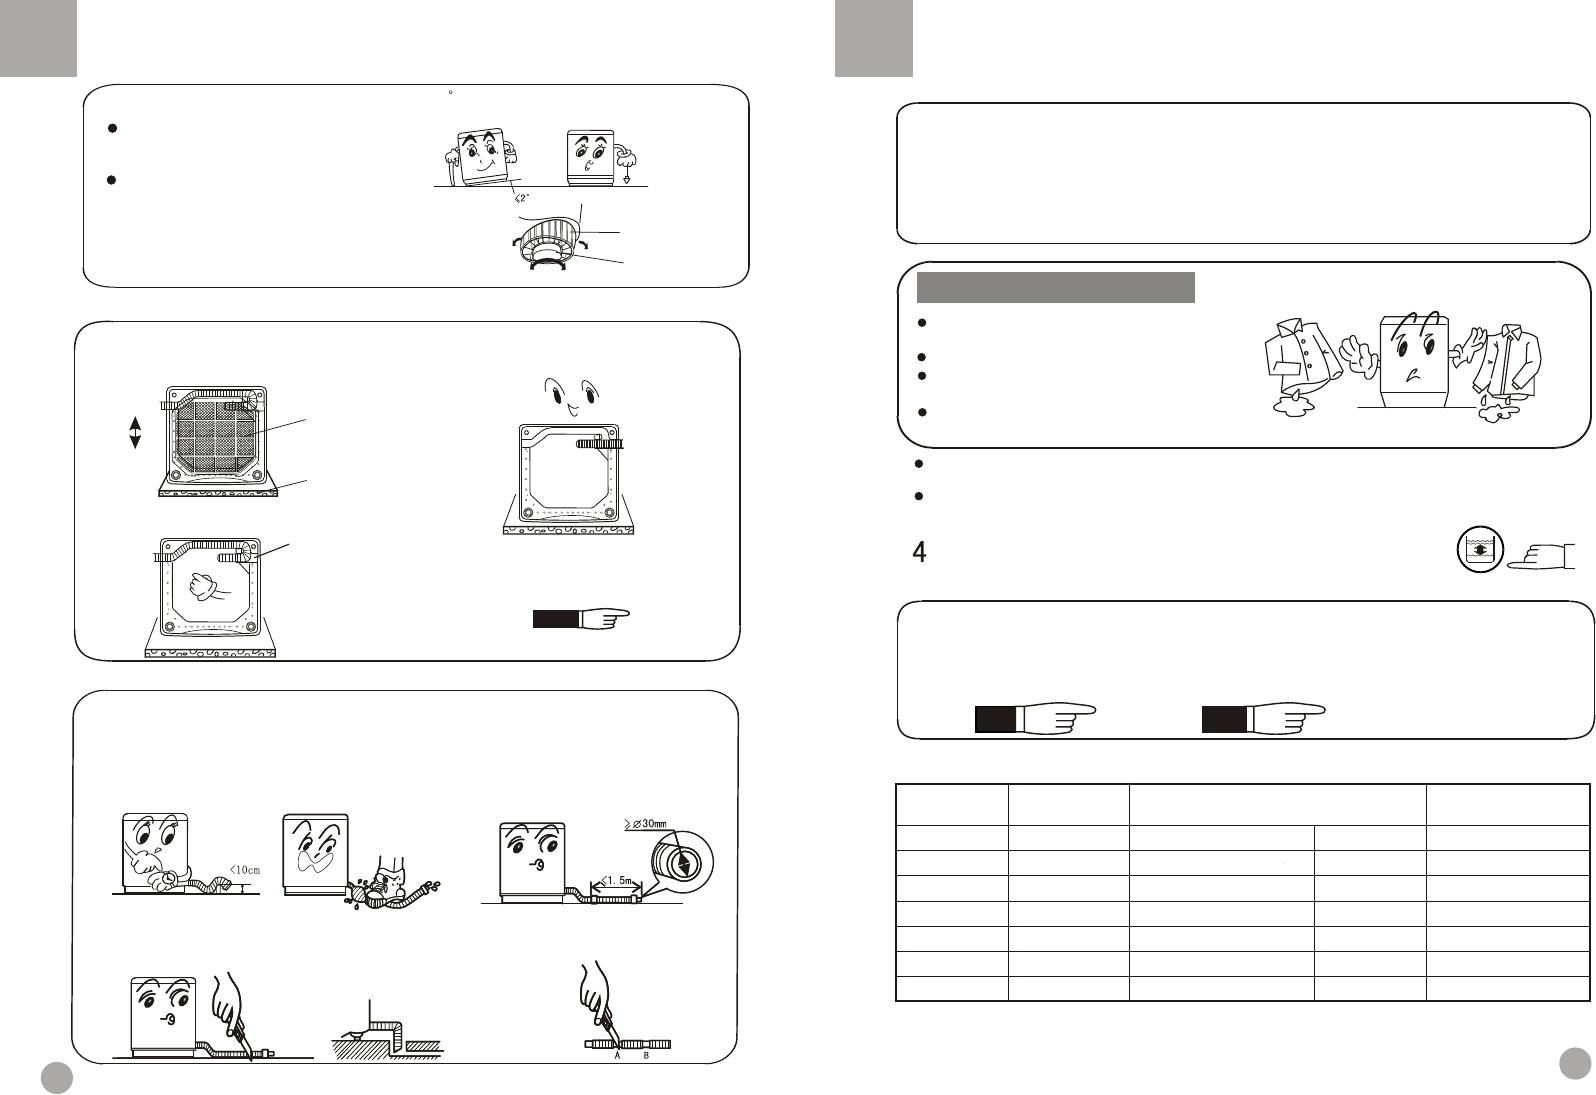
Program
Wash(minutes)
About 15 About 51
About 4
About 3
About 12
Standard
About 30About 12
About 10 About 56
About 5About 15 About 72
Blanket
Rinse twice, about 5 each time
About 1
About 6 About 37
About 5
About 2 About 30
WATER LEVEL
After switching on the power, the washing machine will set to standard program including"wash, rinse,
spin "automatically.To select other procedures, push the "SOAK"," WASH"," RINSE"or "SPIN"
button to
select the time of soak,wash and spin, and the times of rinse. After switching on the power,if you push
one of the button among "WASH", "RINSE"and"
SPIN
", the digitron of the formerprocedures will turn off
automatically. The former procedures will not run. For instance: after switching on the power. If you push
the "SPIN" button first, it will execute spin singly after starting.
.
Even there's no water in the tub, a certain period is
required before spin starting.
Do not use the soak program for the woolen textiles.
Separate the laundries that are not colorfast from
other laundries in washing.
The pulsator will not rotate unless the water is
filled to water level 3.
Attention
After the machine starts operation, you can only set the program and procedure during washing, and can not
make setting in other cases.
The soak program can be used as fitting of common, carpeting,nomarl or cotton automatic programs. It will do soaking
with intermittent stirring of pulsator.
Press " WATER LEVEL "button,
select suitable water level
After switching on the power, the washing machine will execute fuzzy program automatically to detect the cloth.
After defection, it can set the water level automatically. To select other water level, first push the "START/PAUSE"
button, then push the "WATER LEVEL" button to set the water level. Refer to "water level, water quantity and
desoge of powder"in Page 9 and "WATER LEVEL"button in Page 11 for selection.
Water Level and Time Table for Each Program (self programming not included)
Rinse(times) Spin(minutes)
Total time(minutes)
About 3
Rinse twice, about 2 each time
Rinse twice, about 3 each time
Rinse twice, about 2 each time
Rinse twice, about 2 each time
Dry-cleaning
Save
Cotton
Woollen
Silk
Using process
Using process
13
Rinse twice, about 5 each time
About 5
Rinse once, about 3 each time
About 1