


7
Installation Instructions
MOBILE HOME INSTALLATION
• Installation must conform to Manufactured Home
Construction and Safety Standard, Title 24 CFR,
Part 32-80.
• The dryer must be exhausted to the outside with
the termination securely fastened to the mobile
home structure.
• The exhaust MUST NOT be terminated beneath the
mobile home.
• The exhaust duct material MUST NOT support
combustion.
CONSIDERATION MUST BE GIVEN TO PROVIDE ADEQUATE
CLEARANCES FOR INSTALLATION AND SERVICE.
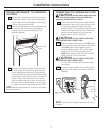
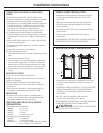
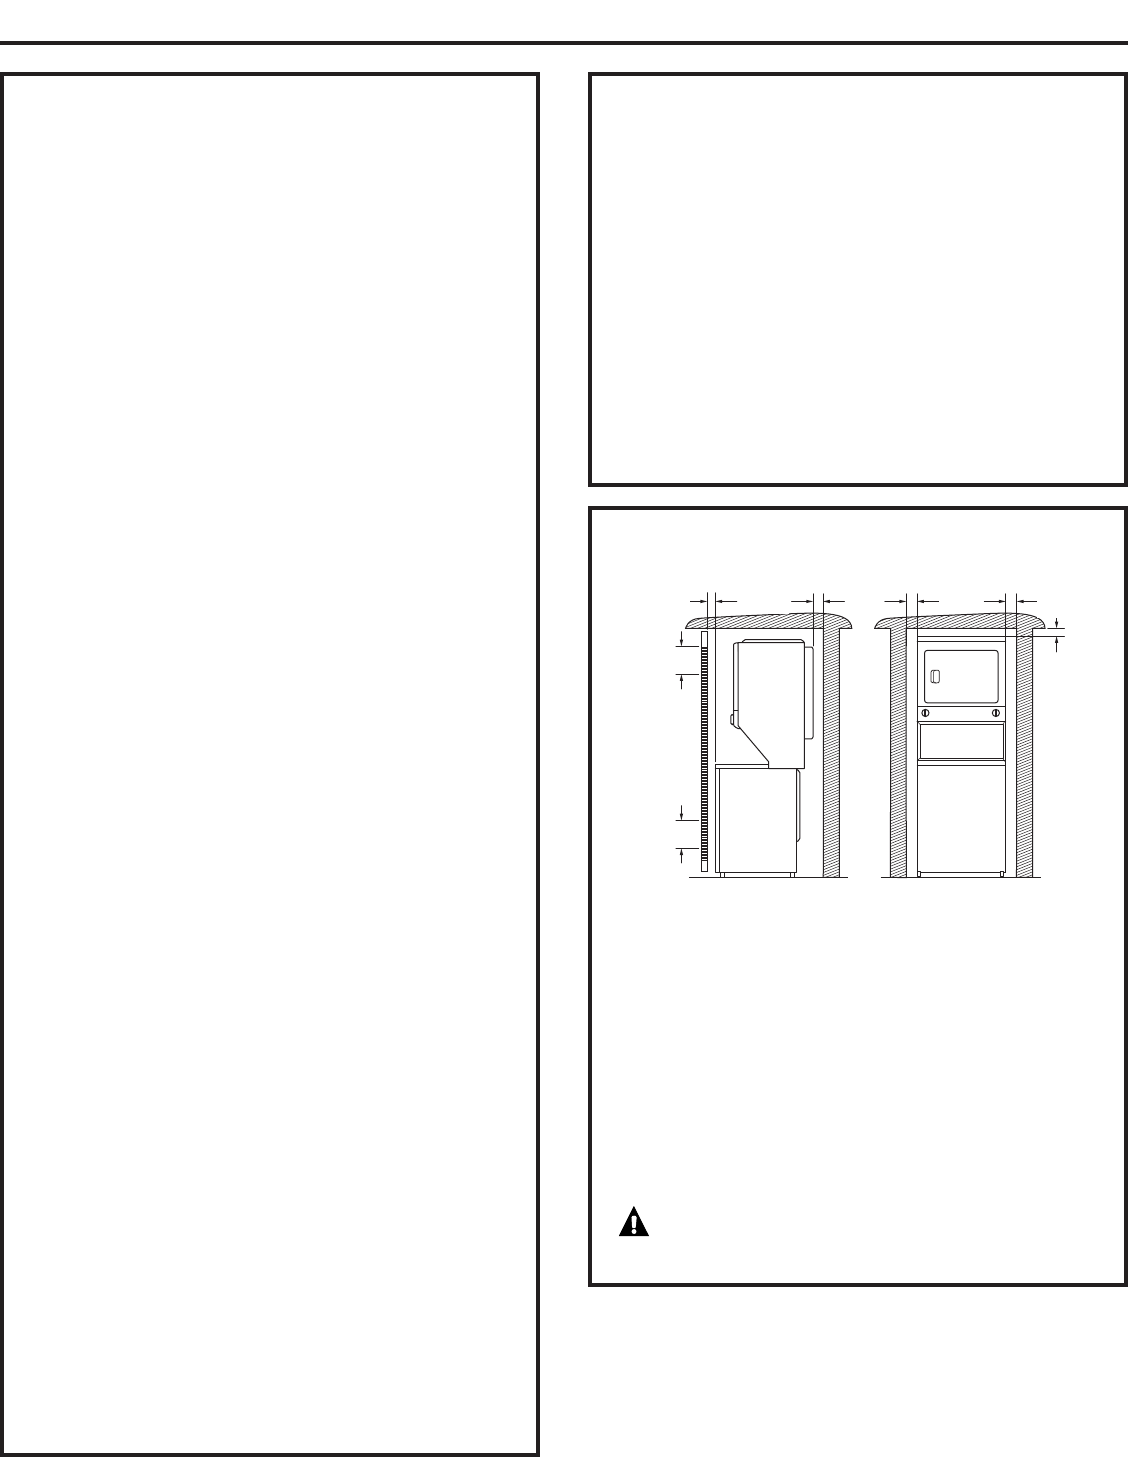
ALCOVE OR CLOSET INSTALLATION
• If your dryer is approved for installation in an alcove
or closet, it will be stated on a label on the back of
the dryer.
• TO PREVENT LARGE AMOUNTS OF LINT AND MOISTURE
FROM ACCUMULATING AND TO MAINTAIN DRYING
EFFICIENCY, THIS MACHINE MUST BE EXHAUSTED
OUTDOORS.
• DO NOT install this appliance with less than
the minimum clearances shown above.
CONSIDERATION MUST BE GIVEN TO PROVIDE ADEQUATE
CLEARANCES FOR INSTALLATION AND SERVICE.
CAUTION: DO NOT INSTALL THIS APPLIANCE
IN A CLOSET WITH A SOLID DOOR.
1″
1″
0″
0″
0″
60 Sq. In.
60 Sq. In.
CONNECTING THE DRYER TO HOUSE VENT
(CONT.)
UL-Listed Flexible Metal (Foil-Type) Transition Duct
• In special installations, it may be necessary to connect
the dryer to the house vent using a flexible metal
(foil-type) duct. A UL-listed flexible metal (foil-type) duct
may be used ONLY in installations where rigid metal
or flexible metal (semi-rigid) ducting cannot be used
AND where a 4″ diameter can be maintained
throughout the entire length of the transition duct.
• In Canada and the United States, only the flexible
metal (foil-type) ducts that comply with the "Outline for
Clothes Dryer Transition Duct, Subject 2158A" shall be
used.
• Never install flexible metal duct in walls, ceilings, floors
or other enclosed spaces.
• Total length of flexible metal duct should not exceed
8 feet (2.4 m).
• Avoid resting the duct on sharp objects.
For best drying performance:
1. Slide one end of the duct over the clothes dryer outlet
pipe.
2. Secure the duct with a clamp.
3. With the dryer in its permanent position, extend the
duct to its full length. Allow 2″ of duct to overlap the
exhaust pipe. Cut off and remove excess duct. Keep
the duct as straight as possible for maximum airflow.
4. Secure the duct to the exhaust pipe with the other
clamp.
SEALING OF JOINTS
• All joints should be tight to avoid leaks.
NOTE:
The male end of each section of duct must point
away from the dryer.
• Do not assemble ductwork with fasteners that
extend into the duct. They will serve as a collection
point for lint.
• Duct joints can be made air- and moisture-tight by
wrapping the overlapped joints with duct tape.
INSULATION
• Ductwork that runs through an unheated area or
is near an air conditioning duct should be insulated
to reduce condensation and lint buildup.
PARTS AVAILABLE FROM LOCAL SERVICE
ORGANIZATIONS
• Rigid Metal Duct Components
WX8X63 4″ x 1′ Duct
WX8X64 4″ x 2′ Duct
WX8X51 4″ Elbow
WX8X59 4″ Aluminum Hood
• Flexible Metal Duct Components
WX8X58 4″ Clamps (2)
WX8X59 4″ Aluminum Hood
WX08X10077 6′ UL-Listed, Flexible Metal (Semi-Rigid)
Duct, 2 Clamps, 2 Close Elbows