7
OPERATION
• Begin ironing with the garments requiring lower temperature settings. Doing this
shortens the waiting time (the iron heats up faster than it cools) and reduces the
risk of scorching garments.
• Ifthegarmentconsistsofamixtureofbres,settheironaccordingtothebrethat
requires the lowest temperature.
• Ifuncertain aboutthebrecontentofagarment, testingonaminorareaofit
before ironing is recommended. In doing this, start with a low temperature. If
wrinklespersist,graduallyincreasethetemperaturetondthebestsettingforthe
garment.
• Topreventthegarmentsfrombeingstainedordamaged,itisbesttoironthemon
the reverse side.
• Whenchangingthetemperaturesetting,pleaseallowtheiron2minutestoadjust.
Filling the iron with water
NOTE: This iron has been designed to work with ordinary tap water; however, if you
live in an area with hard water, we recommend the use of distilled water. Chemically
softened water (e.g. from household water softeners) is not recommended and may
cause the iron to leak or spit.
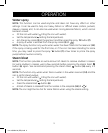
• Ensurethe power plug (13) is disconnected from the wall outlet.
• Placetheirononitsheel(10)onaat,dryandlevelsurface(ill.
d
).
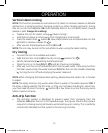
• Pressthellinletcover (2) to open (ill.
a
).
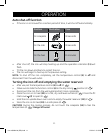
• Usethesuppliedmeasuringcup(16)andllthewaterreservoir(12)throughthell
inlet (3) until the MAX lllevelonthewaterreservoir(12) is reached (ill.
b
).
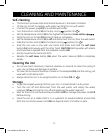
• Closethell inlet cover (2) (ill.
c
).
Iron-169234-04 (GB).indd 7 5/13/10 9:15 AM


