


1950756200 English (US), French (Canadian), Spanish (US) {PDF Created 12/05/09 09:56:00}
13
TD4178W issue 1
Installation Instructions
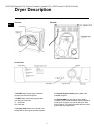
Exhaust Ducting
The ducting system for the dryer must be as short and straight as possible and with as few elbows as possible. Four-
inch (102 mm in Canada) rigid metal ducting should be used, metal flexible ducting can be used but the maximum
length of ducting if used is 7ft (2.4 m). and provided it complies with the following:
In Canada, that only those foil-type flexible ducts, If any, specifically identified for use with the appliance by the
manufacturer shall be used. In the United States, that only those foil-type flexible ducts, if any, specifically identified for
use with the appliance by the manufacturer and that comply with the Outline for Clothes Dryer Transition Duct, Subject
2158A, shall be used;
Never use plastic ducting. All elbows must also be a minimum of 4-inch (102 mm) diameter. Joints must be secured
with ducting tape. Do not use screws or other metal fastenings that extend into the duct as lint can collect on the
screws.
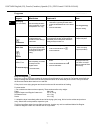
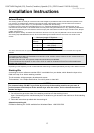
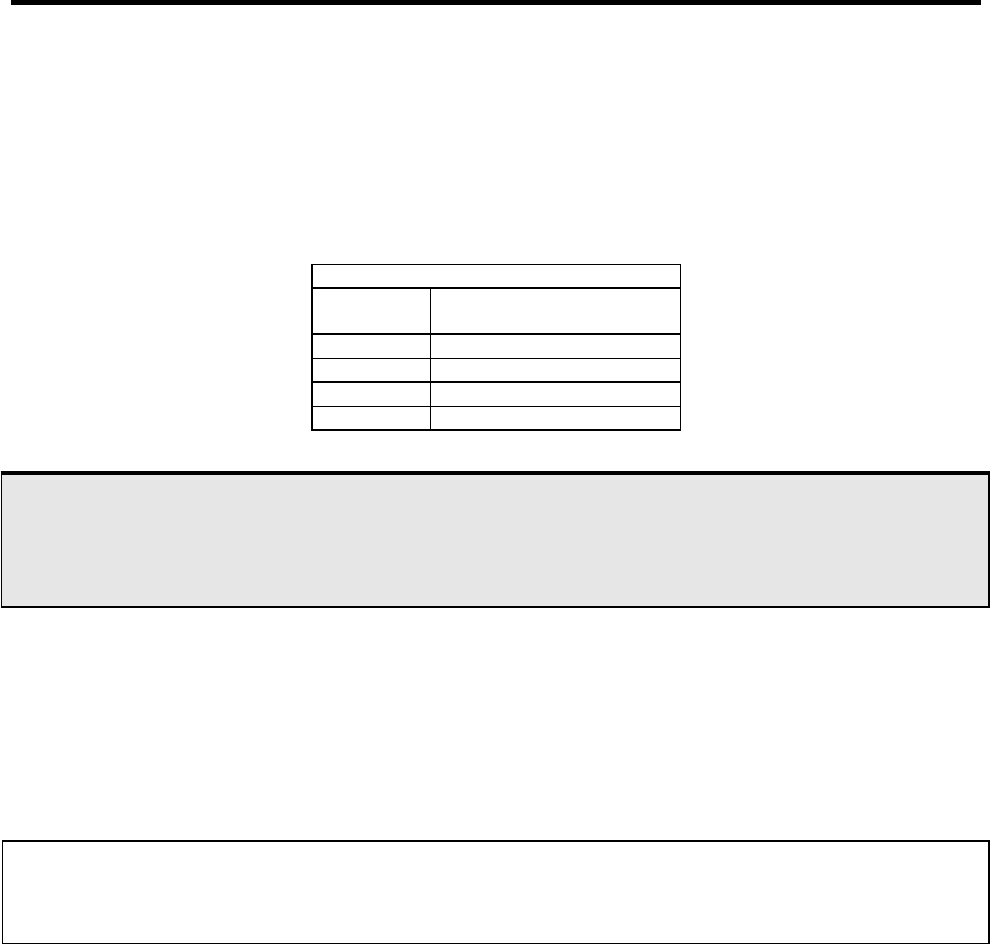
Maximum len
g
th of Ri
g
id duct
Number of
Elbows
Rigid Duct (only)
0 22 ft. (6.6m)
1 18 ft.
(
5.4.m
)
2 14 ft.(4.2m)
3 6 ft.
(
1.8m
)
The above assumes that an approved venting hood is used and that the flap on this hood must not have magnetic
catches.
WARNING:
-The appliance MUST NOT be exhausted into a chimney, a wall, a ceiling, a wall, a ceiling, an attic, a crawl space or a
concealed space of a building.
- To reduce the risk of fire, this appliance MUST BE EXHAUSTED OUTDOORS
- Do not discharge the exhaust air into a flue, which is used for exhausting fumes from other appliances
burning gas or other fuel.
Depending on the frequency of use it is essential that the ducting is checked periodically and any fluff or debris removed
Stacking Kits
A stacking kit Ariston reference number 66911 is available from your dealer, which allows the dryer to be
fitted to the top of an Ariston washing machine
The kit contains, all the necessary brackets and screws.
Tools needed; - No 2 Philips Screwdriver, 2mm drill, power or hand drill
SAFETY
For personal safety, DO NOT try to fit the dryer on top of the washing machine on your own. A
second person should help to lift the tumble dryer onto the washer, and to relocate the stacked
washer and dryer.
1. You will need to get to the sides of the washing machine to fit the stacking kit and
dryer. If necessary pull the machine away from its location to gain access to the machine to fit the stacking
kit and dryer.
2. Follow the instructions provided with the stacking kit.
Alternative stacking kit.
RV/Marine Stacking Kit ~SK02 available from Westland Sales: 1-800-356-0766