


Installation
13
F232158
© Copyright, Alliance Laundry Systems LLC – DO NOT COPY or TRANSMIT
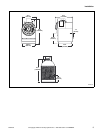
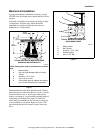
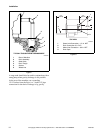
Figure 5
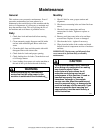
2. Set machine over bolts and shim the machine so
that it sits level and is 1/2 inch off the floor.
Apply machine grout between the floor and all
frame members of the base of the machine
(remove front panel and expanded metal back
panel to gain access to all frame members). Force
grout under machine base until all voids are
filled. Refer to Figure 5.
Leave a small opening for water drainage at the
rear of the machine. Do not omit this step.
3. After grout has cured, place washers and nuts on
bolts and tighten securely. Be sure nuts are
tightened evenly all around. DO NOT DISTORT
MACHINE BY BOLTING DOWN ON AN
UNEVEN FLOOR SURFACE.
NOTE: Make sure to retighten the anchor bolts
after a few days of operation.
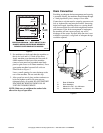
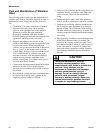
Drain Connection
Providing an adequate drain arrangement and capacity
is essential. Ideally, the machine should dump through
a 3 inch pipe directly into a sump or floor drain.
Connection to a drain must be vented to prevent an air-
lock or siphon effect and must be flexible. Increasing
drain hose length, installing elbows or causing bends
will decrease drain flow rate which might harm washer
performance. If the drain arrangement is inadequate,
the machine will not extract properly nor will it
discharge all the water. If proper drain line size is not
available or practical, a surge tank of adequate design
would be required.
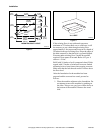
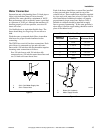
Figure 6
PHM519N
PHM518N
PHM519N
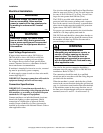
GROUTING DIAGRAM – APPLY GROUT IN ALL
SHADED AREAS UNDER FRAME MEMBERS.
REMOVE COVER PANELS FOR ACCESS.
35.63 in.
(905 mm)
27.63 in.
(702 mm)
35.75 in.
(908 mm)
4 in. TYP.
(102 mm)
12.13 in.
(308 mm)
11.63 in.
(295 mm)
PHM528N
1 Rear of Machine
2 Drain Assembly
3 Waste Line Tee – 3 in. Minimum
4 Waste Line – 4 in. Minimum
2
1
3
4