


© Copyright, Alliance Laundry Systems LLC – DO NOT COPY or TRANSMIT
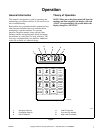
Operation
F232161
8
Start-Up
Turn on the main power source (breaker panel or cut-
off switch on the wall). The front panel display should
light up and show “WAIT 00” for 30 seconds followed
by “NEXT 00” which means Select Cycle. This
display will be on at all times that power is on
indicating the machine is ready for loading and
unloading.
NOTE: Throughout this manual, when display
indications are referred to, these indications will
pertain to the first four digits of the display reading
left to right. The last two digits on the right side of
the display will indicate either the last cycle used or
the current cycle in process.
Loading
To load the washer, use left hand to press the door
unlock button located on the lower right front of the
control panel. Use right hand to turn door handle to the
right. The door can then be opened.
Load linen until the machine is full. Partial loads are a
waste of energy, water and chemicals and cause
greater machine wear than full loads. If you do not
have enough to fill the basket, wait until you do.
Partial loads, if necessary, should only occur at the end
of the day. Even then, they can usually be held until
the next day when more linen is received.
IMPORTANT: If stringy items such as mop heads
are to be washed, laundry nets should be used in
order to prevent fouling of seals and drains.
Once loading is complete (you cannot overload the
machine as far as harm to the machine is concerned;
however, overloading can cause improper mechanical
action and an inferior quality wash), close and lock the
door making sure that all fabric is inside the basket.
The machine should not start or run if the door is not
both closed and locked.
Select Cycle
Find the cycle number (cycle numbers must be two-
digit numbers) of the desired wash cycle from the
cycle code list provided. Press (do not punch) with
your finger the numbers desired on the keypad and
note that this number is displayed instead of “NEXT”.
When keys are pressed on the keypad, a beep will be
heard. If an error is made, simply press the CLEAR
key and then press the numbers again. As numbers are
entered, they move from right to left on the display.
Display will show “CY12” if cycle 12 is pressed.
NOTE: In order to Clear or Enter data, the display
must be filled – i.e., no blank spaces.
Start Cycle
To start the cycle that has been selected, simply press
the START key. If the cycle number selected is not in
the computer memory, the display will show
“NOGO”. If this happens, select another cycle.
Otherwise, the display will now show the first step.
(Example: “HL01”.) This number indicates the step
number in the cycle as listed in the Selection List. As
the cycle proceeds, the display will show the step
being run and the cycle number selected.
If the door is not locked, the display will indicate
“DOOR”. If this occurs, be sure the door is closed and
locked and again press the START key. If the computer
starts but the machine does nothing, this indicates the
door hinge microswitch cam may need adjusting. The
door hinge microswitch interlocks all 120 volt power
to the controls with the exception of the computer
itself.
As the cycle progresses, the display will show the step
in the cycle that is being run as well as the cycle
number. In addition, as water is being turned on to fill
the machine, one or more of the four indicator lights
above the first four digits (left to right) in the display
will come on and stay on until the required water level
is reached. Indicator lights above the last two digits on
the right will indicate the water level(s) reached. When
the indicator light in the next to last digit is
illuminated, the low water level has been reached.
Likewise, when the light in the last digit to the right
illuminates, high water level has been reached. The
cycle will continue until its completion and, at this
time, the display will show “NEXT”.