59
4. 5. 6.
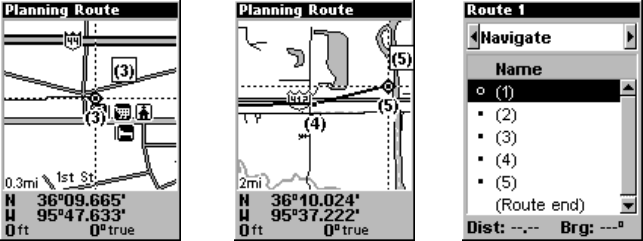
Route creation sequence, continued: Fig. 4. Point (3) set at on-ramp turn.
Fig. 5. Waypoint (4) set at highway exit to frontage road leading to river.
Waypoint (5) ends the route at a tree stand in the hunting area.
Fig. 6. Press EXIT to save the route and you return to this screen.
5. Move the cursor to the next point in the route, a spot where you need
to turn or change direction, and press
ENT to set the next waypoint.
6. Repeat step five until the route reaches your destination.
7. To save your route, press
EXIT. AirMap reverts to the Route screen,
with the route automatically named "Route 1" and stored in AirMap's
internal memory.
8. You can edit the name if you wish. Press ↑ to select the screen's
command box, then press → to
EDIT NAME|ENT. Press ↑ or ↓ to change
the first character, then press → to move the cursor to the next charac-
ter and repeat until the name is correct, then press
ENT.
9. You can execute other route commands, such as
NAVIGATE. With the
command box active, just press → to highlight a different command,
then press
ENT.
10. If you are finished with the route for now, you can return to the
last page displayed by pressing
EXIT|EXIT|EXIT.
Delete a Route
1. From the
NAVIGATION PAGE, press MENU|ENT or from the MAP PAGE
press MENU|MENU|↓ to ROUTE PLANNING|ENT.
2. Press ↓ to the route list|press ↓ or ↑ to select route name|
ENT.
3. Press ← to
DELETE|ENT|← to YES|ENT.
Save GPS Data Files to an MMC
1. Press MENU|MENU|↓ to SYSTEM SETUP|ENT|↓ to TRANSFER MY
DATA|ENT.


