


12
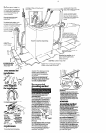
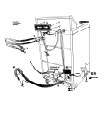
Corefully tilt washer
n
backward until front of
washer is 3-4 inches off of floor
Insert 1 or 2 corner posts
actual size
13
Use legs and
n
nuts from parts
package Screw nut down to wIthIn
‘7, of base
PANEL C
front corner of washer until nuts touch
washer. Da
not
tiahten nuts until steo 17
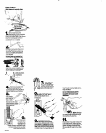
15.
Tilt washer backward ond remove
corner post(s). Gently lower wosherto
floor.
Move washer to Its
permanent location.
Tilt washer forword raising back legs
1” oft of floor to adlust rear self-
leveling legs Genily lower washer to
floor Check levelness ot the washer
front and from front to back on each
side uslna a carpenter’s level.
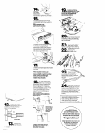
19
n
CHECK ELECTRICAL
REQUIREMENTS. SE SURE
YOU HAVE CORRECT ELECTRICAL
SUPPLY AND RECOMMENDED
GROUNDING METHOD.
20
Check that 011 parts are
W now installed. See parts
list, Panel A. If there is
an edra part.
go back through steps to see which
step wos skipped
21.
Turn on water faucets
and check for leaks
TIghten couplings if there is leaking
22
Untope electrical cord
and plug Into
W grounded outlet
_
If washer is not level, screw the front legs
up or down to adjust. Moke final check
with level.
When washer is level, use
wrench to turn nuts on front
legs up tightly against washer
base. If nuts are not tight
against washer base, the
washer may vibrate.
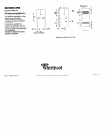
18
Put “hook” end of droin
n
hose in tub or stondplpe
Secure droin hose bv wroooina the
plastic strap oround’the &e 0s
shown in Figures A-C. If droin hose
cannot be stropped I” place, It must
be cut exactly to length so the
“hook” end IS held tightly over the
edge of the tub orstondplpe OS
shown In Figure D.
D
CHECK THAT HOSE IS NOT
TWISTED OR KINKED AND IS
SECURELY IN PLACE.
you started with and that the
shipping strap with its 3 cotterplns
and plug wos removed
24
Take a few minutes and
w read the Use ond Core
Guide to fully understand your new
washer Now stort the washer and
allow it to complete the regular cycle
Put literature in the Llteroture Rock.
(Literature Rack not supplied with all
models.)
or hordboard to prevent
damage.
Keep Installation lnstructlons and
Guide. The instructions will make
re-installtng Your Whirlpool