


Before you start...
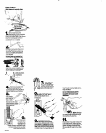
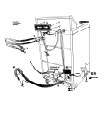
Unlape and open washer lld Remove
Hot and cold waler faucets:
must
be wIthin 4 feet of the
Check locai~on where washer WIII
be lnslalled
Proper installation 1s
your
responslblllty Make sure “0~
have everylhlng necessary for
correct fnstallatlon
Grounded electrical ouflel
IS required See Electrical
requirements
bock of the washer and provide
water pressure 51CO PSI
Laundry
tub drain system:
needs a 20.gallon laundry tub
Top of tub must De at least 34
inches high and no higher than
72
Inches
from bottom 01
Standpipe drain system: needs
a two~lnch mfnlmumdtameter
standpIpe with mlnimum carp-away
capoc~h, of 17 gollons per minute
Top
of standpipe must
be a1 least 34 Inches
high and iio higher
than 72 Inches from
bottom of washer
longer drown hose 1s
needed.
drain hose. Pari No
388423. and hose exterwon kit.
Part No 285442. are ovalIable
Floor drain
system: requires
0 siphon break.
Part No 285320
Important: observe all governrng
codes and ordinances.
I
Tools needed for
installation:
for instabtfon:
~?ermve$&s hm pockcges. Check
‘hot all pails were Included.
Ileralure 2 Inlet hcses
package
- .._. ..__ -_
dmln hose
_. _.. 4flatwater
, hosewashen
plasilc
Stmp
1 lltemlure rack
gmundlng Clamp ,, (not BuPPrled
and screw
w+th all model.,
wire form
2
front leveling
EIectricaI
legs with nuts
requirements
20
Volt. 60
Hz. AC only, 15 or 20
Ampere fused electrical supply IS
from Whirlpool out
Water healer:
set to dellvet
r lo the washer
roleclion from weather: do not
store or operate washer below
32°F See Use and Care Guide for
further InformatIon
r: maximum slope under
support washer weight 315 pounds
required. [Time-delay fuse or circuit
breaker is recommended.] It is
recommended that a separate
circuit serving only this appliance
be provided
WARNING: AN DClENSlON CORD
SHOULD NOT BE USED WITH THIS
APPLIANCE.
SUCH
usE
MAY RESULT
IN A FIRE, ELECTRICAL SHOCK.
OR OTHER PERSONAL INJURy.
Recommended
grounding method
Da Not, under any ctcumstances.
remove the power supply cord
gmundlng prong.
For your penon safety, this appliance
must be graunded.Thi; applii&e is
e&wed with a sower suwlv cord
l-&r& a $prong’groundl&j &g. To
minimize possible shack hazard. the
‘%
cord must b+lue~ed Into a mating 5
prong groundIngtype wall recepta+
gmurded In acoxdancewi+t~ the
Natlqnal ElectrIcal Code. ANSVNFPA
PenorKll respaasc ,:
Mlity and obllgoflon
gmunc!Bd cl-pm-Q ,:_:.
wall receptacle Installed by a c&lifled
electriclon
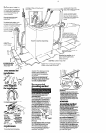
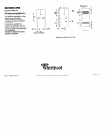
For added &I safety use clamp
and green colafed cop& grounding
wire. Connect the grcundlng wire
(#16 minimum] frafn the external
QrrXJndlng connector on the back of
the appliance too grwndec cold
water pipe.’ See Figure 2.
Elechical around Is reaulnxl an this
groiiriding method
w NOT, UNDER ANY CIRCUM-‘. .
STANCES, REMOVE IHE POWER SUPPLY
CORD GROUNDING PRONG.
If chunglng and wly grounding
the v&l receptacle Is impxx.sible and
where local codes permit (-ii
your electrical lrx+x&r). a tewary
adaptor may be p1-g !nfa the ;~’
.’
extsttng 2-prorr~ wal! reyxptacle ta mate
with ~,+wQ pqwerwqord. :
-’ ,+,i ,S NO, R~~j,&Dja$$$
If this Is~done;yoU rn+ -a L*. . .
~‘separote’~grptl~l~wlre”;.?‘1
(#ia minlmum) to a grwnded cold ‘%
water pipe’ by means da clamp and
then to the etie@ araundlng j* ..’ I.-:
connector screw. Do Not ground to a
gas supply pipe 01 hot water pipe. Da
not connect the power cord to outlet
until the appliance Is permanently
grounded See Figure 2.