


10
w The electrical connections must
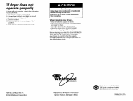
Recessed and closet
installation instructions
be done by a licensed electrician.
The dryer may be Installed In a recessed area
or closet.
Fire Hazard
It the dryer Is Installed In a closet, the
dryer MUST be exhausted outslde.
Failure to do so may result In a tlre.
the tools you started with.
11
W Check levelness of dryer by
15
n
Carefullv slide drver into ik final
placing level on top of the dryer, first side to
side, then front to back. If dryer is not level,
adjust the legs of the dryer up or down.
Dryer must be level to prevent noise and
poor drying performance.
TO PREVENT LARGE AMOUNTS OF LINT AND
MOISTURE FROM ACCUMULATING, TO
MAINTAIN DRYING EFFICIENCY AND TO
PREVENT EXPOSURE TO POSSIBLE HEALTH
HAZARDS, THIS DRYER SHOULD BE EXHAUSTED
oLmooRs.
The installation spacing is in inches and
centimeters and is minimum allowable.
Additional spacing should be considered for
ease of Installatton. servicing and compliance
with local codes and ordinances.
If closet door is Installed. the mlnlmum
unobstructed air openings in top and bottom
is required. Louvered doors with equivalent air
openings are acceptable. Closet installation
must be exhausted. Other installations must
use the minimum dimensions indicated.
Companlon appliance spacing should be
considered.
location. Check to be sure legs were
properly installed and dryer is level.
16
n
Read the Use and Care Guide to
fully understand your new dryer. Start the
dryer and allow it to complete a full heat
cycle (not the air cycle). After five minutes,
open dryer door. You should feel heat inside
the dryer. If you do not feel heat, follow
instructtons given on back cover, “If dryer
does not operate properly.”
12
n
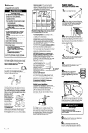
Connect exhaust duct to
exhaust hood and dryer. (See Exhaust
requirements, Panel 9.)
l
Use the straightest path possible to avoid
90” turns.
l
Use duct tape to seal all joints in the
exhaust system.
l
Use caulking compound to seal exterior
wall opening around exhaust hood.
For recessed, non-exhausted Installation,
Exhaust Detlector Klt, Part No. 3391278, ls
required.
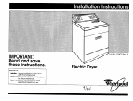
flnlshed lnstalllng
your new Whlrlpool dryer.
To get the most ettlclent use
form your new dryer, read your
1 Congratulations!
\
Whlrlpool Use and Care gulde. Keep
lnstallatlon Instructtons and Guide
close to dryer ror easy reterence.
The lnstructlons will make
relnstalllng your Whlrlpool
Dryer In another home
1
H Check that all parts vou
removed from the park packages are now
Installed
In the dryer. If there is an extra part,
go back through the steps to see which step
was skipped.
0”
(0 c
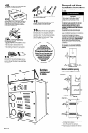
Recessed front vie
Minimum installation spacing
Closet installation &be exhausted.
3ers
spend
Num
corfx
1” (2.5 cm)
_I
P-
Side view
closet door
\
1
48 sq. in.”
(309.7 sq cm)
-Fcm)
Front view
* Additional clearances for wall, door and floor
moldings may be required.
** Opening is minimum for closet door. Louvered
door with equivalent air openings is
acceptable.
l
** Additional space is needed when external
exhaust elbow is used.
Panel C