


7
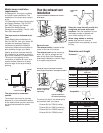
The maximum length of the exhaust
system depends upon:
• the type of vent (rigid or flexible
metal).
• the number of elbows used.
• side or bottom exhaust. Side or
bottom exhaust adds a 90° turn
inside the dryer. To determine
maximum exhaust length, add one
90° turn to the chart.
1. See the exhaust vent length chart
that matches your type hood for the
maximum vent lengths you can use.
Do not use vent runs longer
than specified in exhaust vent
length charts.
Exhaust systems longer than
specified will:
— Accumulate lint creating a
potential fire hazard.
— Shorten the life of the dryer.
— Reduce performance, resulting in
longer drying times and
increased energy usage.
2. Determine the number of elbows
you will need.
3. In the column listing the type of
metal vent you are using (rigid or
flexible), find the maximum length of
metal vent on the same line as the
number of elbows.
4. Determine the number of 4-inch
diameter vent clamps required.
The maximum length using a 2" x
6" rectangular vent with 2 elbows
and a 2-1/2" exhaust hood is 8 feet.
For exhaust systems not covered
by exhaust vent length charts (such
as multiple unit hookups, plenums,
and power-assist fans), see Service
Manual, Part No. 603197. (To
purchase the Service Manual, see
your Use and Care Guide for a toll-
free telephone number.)
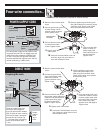
Installation steps
If installing washer and dryer, install
dryer first.
SLIDE DRYER ONTO CARDBOARD
OR HARDBOARD BEFORE MOVING
ACROSS TO PREVENT FLOOR
DAMAGE.
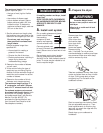
A. Install vent system
Put on safety glasses and gloves.
Install exhaust hood.
Use caulking
compound to seal
exterior wall opening
around exhaust hood.
Connect exhaust vent
to hood. (Exhaust vent MUST fit inside
hood.) Secure vent to hood with 4-inch
clamp.
Run exhaust vent to dryer location.
Use the straightest path possible.
Avoid 90° turns. Use clamps to seal all
joints. Tin snips may be needed to cut
vent to required length.
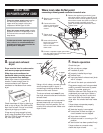
Remove tape from
dryer cabinet.
Open dryer door
and remove tape
from dryer drum.
(Not all dryer
drums are taped.)
Remove drying
rack, if included. Turn dryer drum
counterclockwise to make sure all tape
was removed. Wipe drum with damp
cloth to remove any dust.
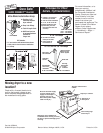
B. Prepare the dryer
diamond
marking
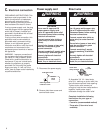
Excessive Weight Hazard
Use two or more people to move and
install dryer.
Failure to do so could result in back
or other injury.
WARNING
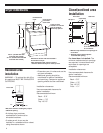
Take two cardboard corners from dryer
carton and place them on floor in back
of dryer. Firmly grasp body of dryer
and gently lay it on its back on the
cardboard corners.
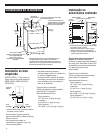
Start to screw legs into holes by hand.
Use an adjustable wrench or 1” hex-
head socket wrench to finish turning
legs until you reach the ridge with the
diamond marking.
Stand dryer up on cardboard or
hardboard.