


5
4. The unit may emit an odor and/or smoke during the first few uses due
to oils used in manufacturing. This is normal for newly manufactured
appliances.
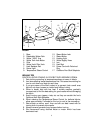
5. Unwrap Power Cord and Water Supply Hose fully. Attach Heat
Resistant Pad onto Base (see Figure 2).
USE AS A DRY IRON/IRONING WITHOUT STEAM
1. Place the Base on a stable surface.
2. Place Iron on Heat Resistant Pad and turn Temperature/Steam control
to MIN and remain on as long as the iron is plugged in. The Heating
Light will continue to cycle on and off during use. DO NOT PLACE HOT
IRON DIRECTLY ON BASE. HEAT RESISTANT PAD MUST BE IN PLACE
FIRST.
3. Plug into 120V ~ 60Hz outlet. The Power Light will come on.
4. Align red arrow on Temperature/Steam Control to desired setting. The
Heating Light will come on.
5. Do not press the Steam Button while using as a dry iron.
6. When finished, move Temperature/Steam Control to MIN. Unplug
from outlet and allow Iron to cool completely before storing Steam
Station.
FILLING THE DETACHABLE WATER TANK
CAUTION: UNPLUG FROM OUTLET AND ALLOW TO COOL COMPLETELY
BEFORE FILLING WITH WATER.
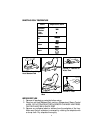
1. Depress the Water Tank Lock Button and carefully pull out the
Detachable Water Tank. (see Figure 3).
2. Remove filter by turning it toward arrow and lifting up, (see Figure 5).
3. Fill Detachable Water Tank with fresh, cool water to MAX fill line as
marked on side of tank.
NOTE: Because of the special Filter, normal tap water can usually be
used for ironing. But if you live in a hard water area, we recommend
that you use distilled water to ensure optimum performance of your
iron.
4. Replace Filter back into Water Hole/Filter Hole. Turn Filter to the left or
right until it locks into position.
5. Carefully push Detachable Water Tank back into Base until it locks into
place.
NOTE: The Detachable Water Tank will hold 28 oz. of water and will pro-
vide continuous steam for up to one hour of use before the Detachable
Water Tank requires refilling.
IRONING WITH STEAM
1. Place the Base on a stable surface. Place the Heat Resistant Pad on
Base.
2. Place Iron on Heat Resistant Pad, and turn Temperature/Steam Control
to MIN. DO NOT PLACE HOT IRON DIRECTLY ON BASE. HEAT
RESISTANT PAD MUST BE IN PLACE FIRST.